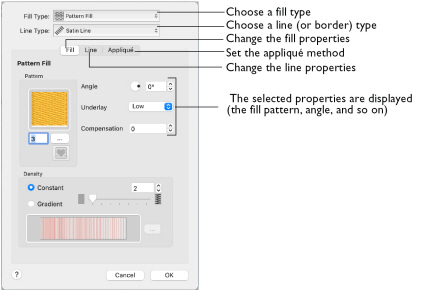
Use the Area properties dialog to set properties before creation, or to change the fill and line type for a previously created area or line. Then edit the properties using the tabs in the dialog.
Note: The options available below the two pop-up menus will vary, depending upon the selected fill and line type.

Note: You can change a previously created area to any other fill or line type in the pop-up menus, including No Fill or No Border Line.
To show the Area properties dialog
-
Choose an object type from the Options pop-up menu on the Create toolbar to set the properties before creating an object.
-
Control–click an existing line or fill in the work area and select Properties from the context menu.
-
Control–click a line or fill in the FilmStrip and select Properties from the context menu.
Note: If accessed from the Options menu before creating the area, you cannot change the fill and/or line type.
Use the Area Properties Dialog
-
Control–click an existing line or fill in the work area, then select Properties to open the Area properties dialog.
Alternatively, click the Options pop-up menu in the Quick Create, Freehand Create or Point Create toolbar and select the object type. -
Select a Fill type from the Fill pop-up menu.
-
Select a Line type from the Line pop-up menu.
-
Edit the tabbed pages below as desired.
Note: For details on the options available, for Line types see Using Lines and for Fill types see Using Fill Areas.
Fill
You can select the following Fill types from the pop-up menu, or using a shortcut:
-

(press ^⇧N).
-

(press ^⇧P).
-

(press ^⇧F).
-

(press ^⇧H).
-

(press ^⇧U).
-

(press ^⇧B).
-

(press ^⇧Q).
-

(press ^⇧C).
-

(press ^⇧O).
-

(press ^⇧V).
-

(press ^⇧W).
-

(press ^⇧E).
-

(press ^⇧S).
Line
You can select the following Line types from the pop-up menu, or using a shortcut:
-

(press ^⇧X for no border).
-

(press ^⇧R for a border or line).
-

(press ^⇧D for a border or line).
-

(press ^⇧Z for a border or line).
-

(press ^⇧T for a border or line).
-

(press ^⇧L for a border or line).
-

(press ^⇧M for a border or line).
Appliqué
-
To use appliqué, click the Appliqué tab.