MultiWave Fill areas ![]() use a wave pattern defined by a line, or lines, drawn on the fill area. Vary the density, or use a motif for the stitch lines.
use a wave pattern defined by a line, or lines, drawn on the fill area. Vary the density, or use a motif for the stitch lines.
|
|
|
|
|
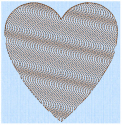
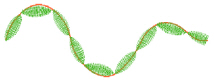
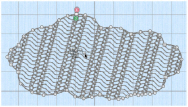
MultiWave Fill, using a density of 15 |
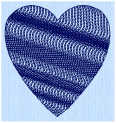
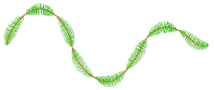
MultiWave Fill, using a density of 15, a Freehand MultiWave Line, and a Hand Stitches 1, Pattern 1 motif |
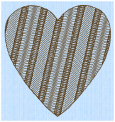
MultiWave Fill, using a density of 15, and a short Freehand MultiWave Line to add texture |
You can change the direction of the stitch lines, or add texture, with Freehand MultiWave Line and Point MultiWave Line.
To show the MultiWave Fill dialog
-
Click a MultiWave fill area so that the points defining its shape are shown, then Control–click and choose Properties.
-
Select MultiWave Fill in the pop-up menu in the the fill area section of the Create toolbar, then click the Options button and select Fill Area and Line from the pop-up menu.
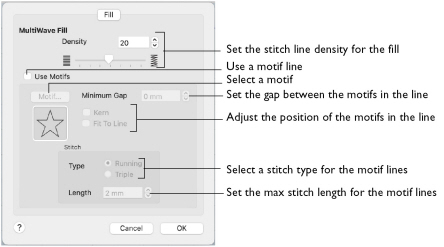
Density
Create a uniform fill at the chosen density. The lower the number, the closer together the stitches and the more stitches are produced. You can set Density from 2 to 40.
-
Use the slider or the numbers box to set the Density.
Use Motifs
Use a motif line instead of a plain line to follow the line angle selected for the fill.
-
Select the Use Motifs checkbox, then click the Motif button to choose a motif. See Motif Selection.
Minimum Gap
This is the minimum amount of extra stitching that is placed between the motifs along the line. Minimum Gap is in addition to any spacing that is part of the selected motif.
Fit To Line
Select how the motifs follow the curves of the line.
|
|
|
|
When Fit To Line is off, the ends of each motif are placed on the line. |
When Fit To Line is on, each whole motif is adjusted to fit along the line. |
Kern
Kern automatically increases the space between adjacent motifs, so that the motifs fit along the line without overlapping.
Stitch
Select between Running and Triple stitch for stitching out the motif line.
Set the maximum stitch Length from 1 to 12mm in steps of 0.1mm.
Note: Length is initially set to the recommended value for each motif.
Adjust a MultiWave Fill
-
Set the hoop size to 100mm x 100mm - Universal Square Hoop 1. See Hoop Selection.
-
Ensure that the Control Panel
 is available.
 -
In the stitch types area choose MultiWave Fill and No Line. See Select a Stitch Type.
-
Click Load Background
 in the toolbar and browse to /mySewnet/Samples/Embroidery/Pics.
 -
Select Climate2.png (a thunder cloud) and click Open. The cloud is displayed as your background picture.
-
Click Quick Create
 , and in the Quick Create toolbar click the QuickStitch™
  button.
 -
Click on the dark gray part of the cloud.
The Color Tolerance dialog appears, and some of the cloud is filled with a checkered pattern. See Use Color Tolerance to Select an Area or Line. -
Use the slider in the Color Tolerance dialog to ensure that the outline of the cloud, but none of the background or flash, is filled with the checkered pattern. (The inner pale gray areas will be included in the fill unless AutoHole is used.)
-
Click OK to confirm.
An embroidered cloud using MultiWave Fill with no border appears in the work area. -
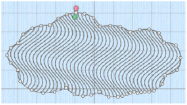
In the toolbar click Background Visibility and choose Background Off. You can now see the shape clearly. The lines in the fill are widely spaced.
-
Control–click and select Finish QuickStitch to close the QuickStitch tool.
-
Control–click the cloud and choose Properties to open the MultiWave Fill window of the Area Properties dialog.
-
Note that the fill uses a Density of 20.
-
Set the Density to 10, then click OK.
-
Control–click the cloud again and choose Properties to open the MultiWave Fill window of the Area Properties dialog.
-
Set the Density to 40, then click OK.
-
Control–click the cloud again and choose Properties.
-
Reset the Density to 20, then select Use Motifs. The motif area becomes available.
-
Click the Motif button. The Motif selection dialog opens.
-
In the Universal Group, General Motifs 1 Category, select the motif in row 1, column 2 (number 2).
-
Click OK twice to close the Motif selection dialog and the Area Properties dialog.
The running stitch fill lines have been replaced by motif lines with closely spaced motifs. -
Open the Area Properties dialog and the Motif selection dialog.
-
Click Flip Vertically
 , and close both dialogs. The pattern on alternate lines in the fill is reversed.
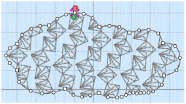
-
Open the Area Properties dialog.
-
Set the Minimum Gap to 2mm and click OK. There are now gaps between the motifs in the lines.
-
Open the Area Properties dialog.
-
Try the effects of selecting Kern and Fit To Line.
-
Open the Area Properties dialog.
-
Deselect (uncheck) Use Motifs.
-
Click OK to close the dialog.
-
Click Freehand Create
 , and in the Freehand Create toolbar click Freehand MultiWave Line
  .
. -
Draw a line across the middle of the cloud. The MultiWave lines follow the line that you drew.
-
Undo the MultiWave line. The original pattern returns.
-
With Freehand MultiWave Line still selected, draw a very short spiral line. The pattern follows the shape of the line that you just drew.
The fill is now closely spaced.
The fill is now very widely spaced.