Use the Motif selection dialog to select motifs for motif lines, fills, tapered motif columns, and as lines within a MultiWave or Curved Crosshatch Fill.
The delete function is only available for motifs you have created in MyMotifs.
Note: You can only delete motifs in MyMotifs if two or more motifs have been created.
Group
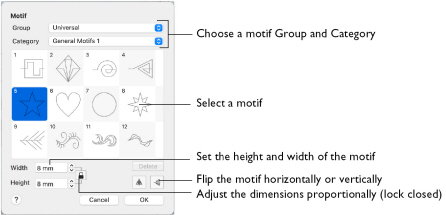
Use the Group pop-up menu to choose the desired group of motif patterns.
Category
Use the Category pop-up menu to choose the desired category of motif patterns.
Pattern
Select the desired motif visually. Motifs are numbered for convenient reference.
Height and Width
The Height and Width are initially set according to the chosen motif. The maximum and minimum values for Height and Width are individual to each motif.
Proportional
Use Proportional

to keep the relative Height and Width in proportion when either is changed. Use Non-Proportional

to change the relative Height and Width separately.
Flip Horizontal
Use Flip Horizontal

to reverse the direction of the motif along the line of motifs. Some motifs are symmetrical and will have no apparent change when they are reversed.
Note: This is useful, for instance, if you have converted a line to a Motif Line and wish to reverse the motif direction.
Flip Vertical
Use Flip Vertical

to mirror the motif along the motif line. Some motifs are symmetrical and will have no apparent change when they are mirrored.
Selecting a Motif
-
In the Motif Fill, Motif Line, Tapered Motifs, MultiWave Fill, Curved Crosshatch Fill or Shape Fill dialog, click the Motif (1 or 2) button.
-
Choose a Group from the pop-up menu.
-
Choose a motif Category from the pop-up menu.
-
Select a motif.
-
Set the Width and Height for the motif. If desired, select Proportional to preserve the Height and Width ratio.
-
Use Flip Horizontal or Flip Vertical to mirror the motif horizontally or vertically.
-
Click OK to use your selected motif.
Note: When creating a Motif Fill, you can set Motif 1 and Motif 2 so that the motif is reversed on alternate lines.