MultiWave fill areas use a wave pattern defined by a line, or lines, drawn on the fill area by the designer. Vary the density, or use a motif for the stitch lines.
|
|
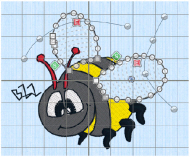
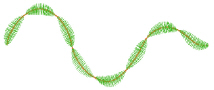
The bumblebee wings are in MultiWave Fill, using a density of 20 |
You can change the direction of the stitch lines, or add texture, with Freehand MultiWave Line and Point MultiWave Line.
To show the MultiWave Fill dialog
-
With a MultiWave fill area selected, Control–click and choose Edit MultiWave Fill.
-
With a MultiWave fill area selected, click the Properties button.
-
Convert a fill area to MultiWave Fill in the Object window. The Properties dialog appears.
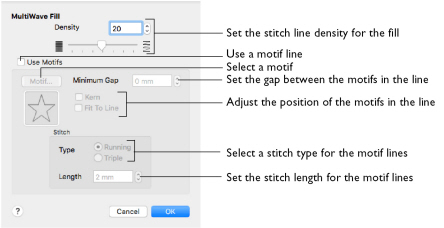
Density
Create a uniform fill at the chosen density. The lower the number, the closer together the stitches and the more stitches are produced. You can set Density from 2 to 40.
-
Use the slider or the numbers box to set the Density.
Use Motifs
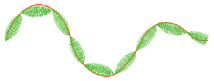
Use a motif line instead of a plain line to follow the line angle selected for the fill.
-
Select the Use Motifs checkbox, then click the Motif button to choose a motif. See Motif Selection.
Minimum Gap
This is the minimum amount of extra stitching that is placed between the motifs along the line. Minimum Gap is in addition to any spacing that is part of the selected motif.
Fit To Line
Select how the motifs follow the curves of the line.
|
|
|
|
When Fit To Line is off, the ends of each motif are placed on the line. |
When Fit To Line is on, each whole motif is adjusted to fit along the line. |
Kern
Kern automatically increases the space between adjacent motifs, so that the motifs fit along the line without overlapping.
Stitch
Select between Running and Triple stitch for stitching out the motif line. Set the maximum stitch Length from 1 to 12mm in steps of 0.1mm.
Note: Length is initially set to the recommended value for each motif.
Change Bumblebee Wings to MultiWave Fill with a Wave Line
-
If required, choose File > New.
-
Choose Edit > Insert > Insert Design.
-
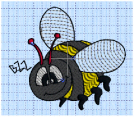
In the folder mySewnet/Samples/Stitch Editor/Stitch load the 'Bumblebee 2' embroidery.
-
Select the Object
 window of the Control Panel
  . The pointer changes to the Object Select
  pointer.
 -
Click the upper wing to select it.
-
In the Modify Objects area, click Remove Underlying Stitches
 .
. -
Click the lower wing to select it, then click Remove Underlying Stitches
 . The number of stitches drops again.
 -
Use Command–click to select both wings.
-
In the Convert pop-up menu choose "Pattern Fill to MultiWave Fill".
-
Click Convert. The MultiWave Fill properties dialog appears.
-
Click OK to close the dialog.
-
With the wings still selected, click Point MultiWave Line
 .
. -
Starting to the left of the upper wing, click a series of points to draw a curved line that runs below the top of the wing, but follows its line.
-
Press Return or double-click to finish the line. The node points on the line are displayed.
-
Click Point MultiWave Line
 , and starting above and to the right of the lower wing, click a series of points to draw a line that intersects the wing, then curves down and back.
 -
Press Return or double-click to finish the line. The node points on the line are displayed.
-
Adjust the nodes on the two wave lines as desired.
-
Click outside the bumblebee to deselect the wings.
Note: All of the icons are unavailable (dimmed) as no area of stitches is selected.
Note the end stitch number in the Control Strip.
The number of stitches is reduced, as shown by a lower end stitch number in the Control Strip.
Note: Remove Underlying Stitches removes any underlay stitches, or other stitches, under a fill area. The wings are Pattern Fill, which uses an underlay. With MultiWave Fill the fabric should be visible underneath the lines of stitching.
The stitch lines within the wing change to follow the direction of the line that you drew.