Satin areas contain zigzag stitches that fill the area from one end to the other at the same density. The stitch angle changes with the shape of the area, and can be adjusted as desired. Choose automatic edge walk and/or zigzag underlay.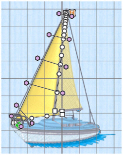
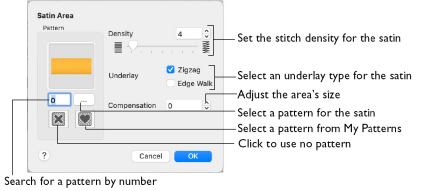
Use the Satin Area dialog to set density, compensation, pattern and underlay for satin areas.
To show the Satin Area dialog
-
With a Satin Area selected, Control–click and choose Edit Satin Area.
-
With a Satin Area selected, click the Properties button.
-
Convert a fill area or column to Satin Area in the Object window. The Properties dialog appears.
Density
Set Density from 2 to 40. The lower the number, the closer together the stitches and the more stitches are produced.The initial setting is 4.
Compensation
Compensation is used to make an area 'bolder' by increasing its relative size. Set Compensation from 0 to 30. The higher the number, the bolder the area appears.
Pattern
Choose from more than 250 patterns for satin (for areas wider than around 8-10mm). Set the Pattern number to 0 for standard satin with no pattern, or click No Pattern. The initial setting is 0.
Add new patterns using Manage My Fills in mySewnet™ Digitizing. View the patterns in the pattern viewer. See Fill and Satin Patterns.
-
Click the pattern button or enter a number to select a pattern.
Underlay
Set the Underlay option to be used for the satin area. Zigzag is initially selected.
-
Zigzag creates zigzag lines of running stitch as underlay. Use zigzag underlay for wide areas of satin.
-
Edge walk places lines of running stitch just inside the edges of the satin areas. Use edge walk when the satin areas have both wide and narrow sections.
-
For very wide areas of satin, select both underlay types.
Adjust a Satin Area
-
If required, choose File > New.
-
Choose Edit > Insert > Insert Design.
-
In the folder mySewnet/Samples/Stitch Editor/Stitch load the 'Sailboat 2' embroidery.
-
Select the Object
 window of the Control Panel
  . The pointer changes to the Object Select
  pointer.
 -
Click to select the sail on the left (the front sail).
-
In the Convert pop-up menu choose "Pattern Fill to Satin Area".
-
Click Convert. The Satin properties dialog appears.
-
Click OK to close the dialog. The front sail is now a satin area.
-
Drag one of the points defining the satin area to change its shape.
-
Hold the Shift key and click one of the points. The point becomes square and the lines on either side of that point become straight. Use Shift–click to create corners or straight lines.
-
Release the Shift key and click the point again. The point is round, and the line is curved.
-
Click Insert Points
 .
. -
Click on the outline of the satin area. A point is added to the area outline.
-
Click Delete Points
 .
. -
Click the point you just added. It is removed from the design.
-
Control–click and choose Finish Delete Points Tool to deselect the function.
-
Drag a pink handle on one of the stitch angle lines. The stitching in the satin area changes.
-
Click Delete Points
 again and click one of the pink handles at the end of a stitch angle line. The stitch angle line is removed.
 -
Control–click and choose Finish Delete Points Tool to deselect the function.
-
Drag the start marker
 to a different point on the area outline. This position becomes the new start point for the satin area.
 -
Drag the end marker
 to a different point on the area outline. This position becomes the new end point for the satin area.
Note: All of the icons are unavailable (dimmed) as no area of stitches is selected.