Curved Crosshatch fills use curving lines in the crosshatch, which can be used to create a feeling of depth. They are used in quilting, and to create free-standing lace
|
|
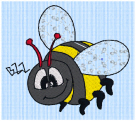
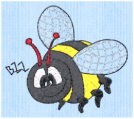
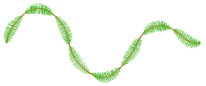
The bumblebee wings are in Curved Crosshatch Fill, using Square style and a Gap of 4.0mm. |
.
To show the Curved Crosshatch Fill dialog
-
With a curved crosshatch fill area selected, Control–click and choose Edit Curved Crosshatch Fill.
-
With a curved crosshatch fill area selected, click the Properties button.
-
Convert a fill area to Curved Crosshatch Fill in the Object window. The Properties dialog appears.
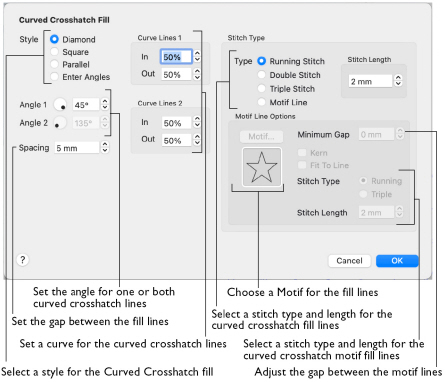
The Curved Crosshatch Fill properties dialog enables you to set the curve, gap, style, line angle, stitch type and stitch length for the curved crosshatched lines of stitching in the fill, and to use Motif lines for the fill.
Style
Select Diamond, Square, Parallel and Enter Angles.
-
Diamond creates a symmetrical crosshatch pattern (balanced horizontally).
-
Square creates a crosshatch pattern of lines set at 90 degrees.
-
Parallel creates a pattern of parallel lines, with an initial angle of 0 degrees.
-
Enter Angles can be used to create an asymmetrical crosshatch pattern. Set an angle for each of the two line directions in the crosshatch.
Note: The Pattern Fills 257 to 264 provide banded fill patterns that combine with crosshatch parallel fills to create a weave effect. Set Spacing for the parallel fill at 2.4mm to combine with Pattern 257, or to 2.8mm to combine with Pattern 258, and so on.
Spacing
Set the spacing to the preferred distance between lines of stitching from 1mm to 20mm in steps of 0.1mm. It is initially set to 5mm.
Curved Crosshatch
Use Lines 1 and 2 to change the curve on the crosshatch lines.
Note: You can also change the curves in the crosshatch lines using the handles in the work area.
Lines 1
Change the position of the origin for one of the sets of curved lines.
-
Set percentage Curve In and Curve Out from -100 to 100. The initial setting for Curve In % and for Curve Out % is 50.
Lines 2
Change the position of the origin for the other set of curved lines.
-
Set percentage Curve In and Curve Out from -100 to 100. The initial setting for Curve In % and for Curve Out % is 50.
Stitch Type
Select a stitch type for the curved crosshatch fill. Choose from:
Stitch Length
Set the Stitch Length for the line type used in the curved crosshatch fill. You can set the Stitch Length from 1 to 12mm in steps of 0.1mm. The initial setting is 2.0mm.
Motif
The selected Motif is only used by the Curved Crosshatch Fill if the Motif Line option is selected in the Stitch Type section.
-
Click Motif to select a motif in the Motif Selection dialog. See Motif Selection.
Minimum Gap
The Minimum Gap is the minimum amount of extra stitching that is placed between the motifs along the line. This is in addition to any spacing that is part of the selected motif.
Kern
-
Use Kern to automatically increase the space between adjacent motifs where necessary, so that the motifs fit along the line without overlapping.
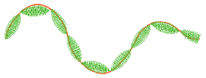
Fit Motif To Line
Select this option to make the shape of the motifs follow the curves of the line.
|
|
|
|
When Fit To Line is off, the ends of each motif are placed on the line. |
When Fit To Line is on, each motif is adjusted to fit along the line. |
Stitch Type
-
Select Running or Triple stitch for stitching out the motifs. Set the maximum stitch Length from 1 to 12mm in steps of 0.1mm. Length is initially set to the recommended value for each motif.
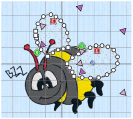
Change Bumblebee Wings to Curved Crosshatch Fill
-
If required, choose File > New.
-
Choose Edit > Insert > Insert Design and in the folder mySewnet/Samples/Stitch Editor/Stitch load the 'Bumblebee 2' embroidery.
-
Select the Object
 window of the Control Panel
  . The pointer changes to the Object Select pointer.
 -
Click the upper wing to select it. Note the end stitch number in the Control Strip.
-
In the Modify Object area, Click Remove Underlying Stitches
 .
. -
Click the lower wing to select it, then click Remove Underlying Stitches
 . The number of stitches drops again.
 -
Use Command–click to select both wings.
-
In the Convert pop-up menu select "Pattern Fill to Curved Crosshatch Fill".
-
Click the Convert button. The Curved Crosshatch Fill properties dialog appears.
-
Note the settings in Curve Lines and Curve Lines 2 areas.
-
Set the Spacing to 4.0mm.
-
Click OK to close the dialog.
-
With the wings still selected, move the pink handles for the wings. This changes the curve on the lines in the fills.
-
Ensure that both wings are still selected, then Control–click and select Edit Curved Crosshatch Fill in the context menu.
-
Look at the settings in the Curved Crosshatch area. They have changed.
-
In Stitch Type, select Motif Line.
-
Click the Motif button.
-
In the Motif dialog set the Group to Universal and the Category to Hand Stitches 1.
-
Set the Pattern to 6.
-
With Proportional
 selected (locked), set Height to 1.8mm.
 -
Click OK twice to close both dialogs. The lines on the wings now use the motif.
-
Click outside the bumblebee to deselect the wings.
Note: All of the icons on the Object panel are dimmed (grayed out) as no area of stitches is selected.
Note: The number of stitches is reduced, as shown by a lower end stitch number in the Control Strip.
Note: Remove Underlying Stitches removes any underlay stitches, or other stitches, under a fill area. The wings are Pattern Fill, which uses an underlay. With Curved Crosshatch Fill the fabric should be visible underneath the lines of stitching.
Note: You can change the curve on the crosshatch lines with the handles, or with the Curve Lines 1 and Curve Lines 2 settings.