Contour fill areas use contour stitch lines. Vary the gap between stitch lines and the length of the stitches, and use running, double or triple stitch.
|
|
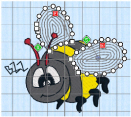
The bumblebee wings are in Contour Fill, using Double Stitch and a 1.4mm gap |
To show the Contour Fill dialog
-
With a contour fill area selected, Control–click and choose Edit Contour Fill.
-
With a contour fill area selected, click the Properties button.
-
Convert a fill area to Contour Fill in the Object window. The Properties dialog appears.
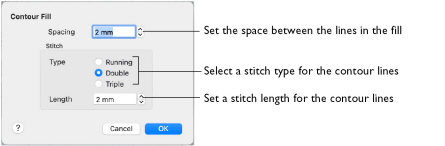
Spacing
Use Spacing to set the preferred distance between lines of stitching. The distance can be set from 0.2 to 5mm in steps of 0.1mm. It is initially set to 0.8mm.
Note: This also is the border inside the area, between the edge of the area and the fill pattern.
-
Click the Spacing up and down arrows, or enter a number.
Stitch
Use Stitch to select the stitch type for stitching out the fill, and the length of the stitches used. Set stitch length from 1 to 12mm in steps of 0.1mm. It is initially set to 2mm.
-
Select Running, Double or Triple stitch, and click the Length up and down arrows, or enter a number.
Change Bumblebee Wings to Contour Fill
-
If required, choose File > New.
-
Choose Edit > Insert > Insert Design, browse to mySewnet/Samples/Stitch Editor/Stitch and load the 'Bumblebee 2' embroidery.
-
Select the Object
 window of the Control Panel
  . The pointer changes to the Object Select
  pointer.
 -
Click the upper wing to select it.
-
In the Modify Objects area, click Remove Underlying Stitches
 .
. -
Click the lower wing to select it, then click Remove Underlying Stitches
 . The number of stitches drops again.
 -
Use Command–click to select both wings.
-
In the Convert pop-up menu, choose "Pattern Fill to Contour Fill".
Alternatively, Control–click and a context menu appears. Select "Convert from Pattern Fill to Contour Fill...". -
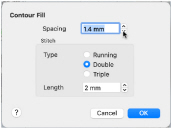
Click Convert. The Contour Fill properties dialog appears.
-
Set Spacing to 1.4mm.
-
Click OK. The bumblebee’s wings now use contour fill.

Note: All of the icons are unavailable (dimmed) as no area of stitches is selected.
Note the end stitch number below the Control Strip.
The number of stitches is reduced, as shown by a lower end stitch number in the Control Strip.
Note: Remove Underlying Stitches removes any underlay stitches, or other stitches, under a fill area. The wings are Pattern Fill, which uses an underlay. With Contour Fill the fabric should be visible underneath the lines of stitching.
Note: You can use Draw Previous Color Block ![]() or Draw Next Color Block
or Draw Next Color Block ![]() to isolate areas for object editing.
to isolate areas for object editing.