Use Insert Embroidery  to insert any embroidery into the current design.
To insert an .edo or .can design outline file, use Insert

An inserted embroidery is automatically converted to stitch objects and placed as a group. The first object in the group is placed after the selected object or the last visible object in the design. The group can be moved, resized, mirrored, rotated, copied or cut. Embroideries are inserted at the size they were created.
To open an embroidery as a design, use File, New

to start a design with no picture, and Insert Embroidery

to convert an embroidery to a design.
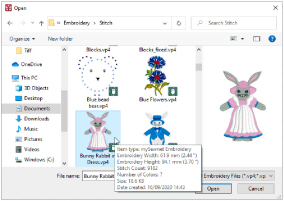
To see the name of an embroidery, position the arrow pointer over the desired thumbnail. A label showing the file name will appear.
The following embroidery file formats may be loaded: Bernina (.art version 1, 2, 3), Brother/Baby Lock/Bernina PEC (.pec), Brother/Baby Lock/Bernina PES (.pes version 2 - 11), Compucon/Singer PSW (.xxx), Husqvarna Viking / Pfaff (.vp4, .vp3 and .vip), Husqvarna (.hus, .shv and .dhv), Janome (.jef and .sew), Melco (.exp), Pfaff (.pcs), Tajima (.dst) and Toyota (.10*).
Files that hold color information, such as .vp4, .vp3, .vip, .hus, .shv, .dhv, .pcs, .pes, .jef, .sew and .xxx, are shown in the nearest match to the colors in which they were created for the selected Thread Range (set in mySewnet™ Configure). For files that do not store colors, such as .dst, .exp and .10?, the embroidery will be shown in a default color sequence.
Shortcuts
-
Home Tab:

-
Keys: Alt, H, IE
How to Insert an Embroidery
-
Click the Insert Embroidery icon

. The Open dialog box will appear.
-
Browse to the desired embroideries folder.
-
Use the scroll bars to view all the embroideries within the folder.
-
Click on an embroidery to select it, then click Open to insert the embroidery into the work area.
The embroidery is converted to a group of objects and placed in the center of the work area.
Use Ctrl + click in the Open dialog box to insert multiple embroideries. Each embroidery will be inserted as a separate group. Use Reveal Groups

to view the inserted groups.