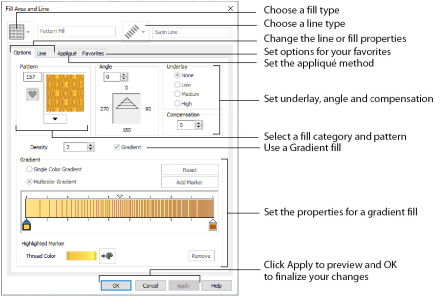
Use the Fill Area and Line properties dialog box to change the fill and line type for a previously created area. Then edit the properties using the tabs in the dialog.
The options available in the two drop-down lists vary, depending upon the selected fill and line type.
You can change a previously created area to any other fill or line type in the drop-down lists, including No Fill or No Border Line.
To access the Fill Area and Line properties dialog, click the Fill Area and Line button in the Options area of one of the Create tabs. Alternatively, right-click an existing line or fill on the FilmStrip or in the work area.
If accessed from the Options button, you cannot change the fill and/or line type.
Fill
Select the Fill type from the drop-down list:
|
|
|
|
|||
|
|
|
|
|||
|
|
|
|
|||
|
|
|
|
|
||
|
|
|
|
|


Line
Select the Line type from the drop-down list:
Click the Line tab and select Insert Color Change for a different color for a fill area border. See Secondary Colors.
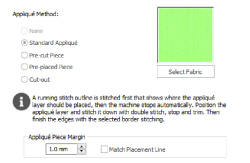
Select the appliqué method before or after creating an area or line. Choose from:
-
None
-
Standard Appliqué
-
Pre-cut Piece
-
Pre-placed Piece
-
Cut-out
Standard Appliqué
Stitch a running line to show where appliqué fabric should be placed, then stop to position the fabric. Stitch down the appliqué fabric with double stitch, then stop so the fabric may be trimmed. Finish the edges with the selected border stitching.
Pre-cut Piece
Use a pre-cut appliqué piece; created, for example, using an automatic cutter or cutwork needles.
Stitch a running line to show where the pre-cut appliqué piece should be placed, then stop to position the appliqué piece. Stitch down the appliqué piece with double stitch, then finish the edges with the selected border stitching.
Place the appliqué fabric before stitching.
Place the appliqué layer in position, then stitch down the appliqué fabric with double stitch. Stop so the fabric may be trimmed. Finish the edges with the selected border stitching.
Cut-out
Use the appliqué placement line as a guide to where the fabric should be cut; for example for reverse appliqué.
Stitch a double stitch line. Stop so the fabric may be cut to form a hole defined by the stitched outline. Finish the edges with the selected border stitching.
Select Fabric
Use Select Fabric to choose a fabric for your appliqué in the Appliqué Selection dialog box.
Click Select Fabric and the Appliqué Selection dialog box appears. See Appliqué Selection.
Appliqué Piece Margin
Set the margin for appliqué placement relative to the drawn border shape from -10mm to 10mm. The initial value is 1.0mm.
Use a positive value when trimming the appliqué fabric before the border is stitched, for example with Standard Appliqué and Pre-placed Appliqué. A negative value is recommended for cut-out and reverse appliqué.
Placement stitches are set to 2.0mm initially. To alter the stitch length for individual lines, use the Break Apart function for the area.
Adjust the position of the first running stitch line for either Standard Appliqué or Pre-cut Piece so that it matches the outline of the appliqué piece after the Appliqué Piece Margin has been applied.
This may be useful for precise positioning of appliqué pieces that have been pre-cut with an automated cutter, to ensure the placement line is visible.
Use the Favorites tab of the Fill Area and Line properties dialog to make the chosen settings into favorites, to change your defaults for a stitch type, or to return to the original settings.
Save these options as my favorite
Use ’Save these options as my favorite’ ![]() to save the chosen options as the favorite for this area or line type.
to save the chosen options as the favorite for this area or line type.
The favorite option must always be applied from the Favorites tab. It is not the same as the current settings, used to create new areas.
Apply my favorite to these options
Use ’Apply my [stitch type] favorite to these options’
to use your favorite settings for the area or line type instead of the settings shown.
Select multiple objects with the same fill type in the work area or FilmStrip, right-click and select Properties. Then in the Favorites tab use ’Apply my favorite to these options.’. All of the selected objects are changed.
Set these options as the current settings
Use ’Set these options as the current settings’
to use the chosen options as the default for new areas of this type.
Reset these options to the system default
Use ’Reset these options to the system default’
to change the settings for the selected area or line type to the system default.
Show a text summary for these options
Use ’Show a text summary for these options’
to display details of the currently selected area or line settings.
Save a Fill and Line Type as a Favorite
-
To open the Fill Area and Line properties dialog, right-click an existing line or fill, or click the Fill Area and Line Options button in the Quick Create, Freehand Create or Point Create tab.
-
For an existing fill, select a Fill type from the Fill drop-down list at the top.
-
For an existing line, select a Line type from the Line drop-down list at the top.
-
Edit the details in tabbed pages below as desired.
-
Click the Favorites tab, then click ’Save these options as my favorite’ .
The Fill and Line type menus will only be available if you opened an existing line or fill.
The settings will be saved for the fill and the line type in an object with both.
For details on the options available, for Line types see Using Lines, for Fill types see Using Fill Areas, and for Appliqué see Appliqué Selection.
This will save your settings as a favorite in case you want to use these settings frequently. Click ’Show a text summary for these options’ to view your settings.
Save a Fill and Line Type as your Current Settings
-
Right-click an existing line or fill object to open the Fill Area and Line properties dialog.
-
Make any desired adjustments to the line and fill types in the Options and Line tabs.
-
Click the Favorites tab.
-
Click "Set these options as the current settings".
In future when you use that fill type, the settigns that you chose here for the fill and line types will be used.
To use the system defaults for the fill type in future, click "Reset these options to the system default" on this tab.