Design Size and Creating Embroideries
The purpose of creating a design is to generate an embroidery from the finished design. Before creating an embroidery you may wish to consider how the design size will affect the finished embroidery.
The size of a design is mainly controlled by the hoop size used.
You can create a design for many different hoop sizes from the same design outline (.edo) file. However, you need to consider how this will affect the size of individual parts. For example, a satin line for an embroidery size of 150mm may look better as a running stitch line if the embroidery size is 80mm. The recommended maximum length for satin stitches is around 8-10mm, otherwise the stitches may be loose and not lie flat. To create a satin sections wider than this, either overlap satin sections, or use one of the fill patterns to create smaller alternating stitches
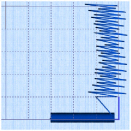
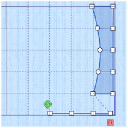
When creating designs, remember the outside edge of some stitch types may extend beyond the hoop. For example, satin borders have stitches generated on both sides of the center line and feathered satin sections have stitches that go beyond the points placed to define the feathered satin. The design size is measured according to the distance between the outermost control points. However, the embroidery may be larger than the desired design area or hoop size if stitches are created that extend beyond the outermost points, as in the example. This is easy to see in 3D View, but in Object View you could create areas that are too large without realizing.
|
|
|
|
The stitches created go outside the hoop. |
The points for both the satin line and feathered satin are inside the hoop. |
You will be able to save the design outline file, but if you select Export Embroidery a message will appear: Embroidery is too large or will not fit in hoop. Click OK to continue.
Change to a larger hoop  to stitch out the design, or in the Modify Block menu on the Home tab, select Scale Fit to Hoop
 ![]() to automatically adjust the actual size of the design to fit in the hoop.
to automatically adjust the actual size of the design to fit in the hoop.
Use Change Design Size ![]() to alter a design automatically to a new size, allowing for the stitch objects used such as satin borders.
to alter a design automatically to a new size, allowing for the stitch objects used such as satin borders.