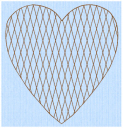
Crosshatch fills are used in quilting, and to create free-standing lace.
|
|
Crosshatch Fill, using Diamond style and an Angle of 75 degrees |
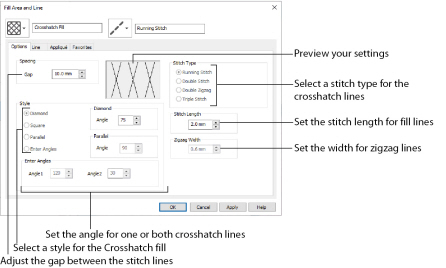
The Crosshatch Fill Properties enable you to set the gap, style, line angle, stitch type and stitch length for the crosshatched lines of stitching in the fill. The preview changes according to the options chosen.
Spacing
Set the Gap to the preferred distance between lines of stitching.
Set the Gap from 1mm to 20mm in steps of 0.1mm. It is initially set to 5mm.
Style
Choose from Diamond, Square, Parallel and Enter Angles. Diamond is selected by default, and creates a symmetrical crosshatch pattern (balanced horizontally). Choose Enter Angles to create an asymmetrical crosshatch pattern, if desired.
Diamond
Enter an Angle for the Diamond fill. The Angle is initially set to 45 degrees.
Square
There are no additional options for the Square fill.
Parallel
Enter an Angle for the Parallel fill. The Angle is initially set to 90 degrees.
The Pattern Fills 257 to 264 provide banded fill patterns that combine with crosshatch parallel fills to create a weave effect. Set Spacing for the parallel fill at 2.4mm to combine with Pattern 257, 2.8mm to combine with Pattern 258, and so on.
Enter Angles
Enter an angle for each of the two line directions in the crosshatch. Angle1 is initially set to the same angle as the Diamond style previously used, and Angle2 is initially set to this angle plus 90 degrees.
Stitch Type
Select a stitch type for the crosshatch fill. Choose from:
Stitch Length
Set the Stitch Length from 1 to 12mm in steps of 0.1mm. The initial setting is 2.0mm.
Zigzag Width
Set the Zigzag width for Double Zigzag stitch from 0.1 to 6mm in steps of 0.1mm. The initial setting is 0.6mm.
Double Zigzag is a special stitch type, recommended for lace. A running stitch line is retraced in a zigzag pattern to create a mesh. After embroidering on water soluble stabilizer, the mesh of stitches provides strength when the stabilizer is washed away.
Creating and Changing Fills: Fleur de Lys Background and Base
-
In the Quick Access toolbar, click Change Hoop
 , and set the hoop to Universal, 100mm x 100mm - Universal Square Hoop 1.
 -
Click the View tab, and ensure that Grid size is set to 5mm.
-
Click File, Preferences
 , and ensure that Color Tolerance is selected (checked), and that Tie Off Before and After Trims is selected.
 -
Click File, New

, or File, New Window

, and in the Choose Design Type page of the ExpressDesign Wizard select Load or Create a Background Picture, then click Next. In the Choose Picture page, click Load a Picture
 , browse to the folder Documents\mySewnet\Samples\Digitizing\Pics, and load the picture 'Fleur de lys.svg’.
 -
Click Next and in the Design Size page click Enter Design Size, change the Size to 90mm, and click Width. Click Finish to load the picture into the work area.
-
Click the Quick Create tab.
-
In the Fill Area and Line section, click the Fill drop-down menu and select Crosshatch Fill
 . In the Line drop-down menu select Satin Line
  . Ensure that Appliqué
  is not selected.
 -
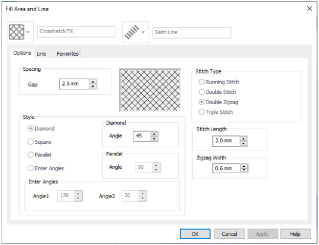
In the Options section, click the Fill Area and Line button. The Fill Area and Line dialog box opens at the Options tab for Crosshatch Fill.
-
In Spacing set the Gap to 2.5mm. Set Style to Diamond, and ensure the Angle for Diamond is 45.
-
In Stitch Type select Double Zigzag. Set Stitch Length to 2.0mm, and Zigzag Width to 0.6mm.
-
Click the Line tab.
-
Ensure that Density is set to 4 and that Underlay is selected (checked). Set Width to 3.0mm.
-
Click OK to close Fill Area and Line properties.
-
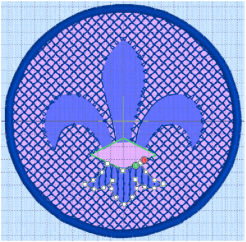
Click QuickStitch™ + AutoHole
 .
.
-
Click within the circle, but outside the fleur de lys. The dashed line will show the area selected for the fill area, with a different colored dashed line around the fleur de lys.
-
Click OK and the crosshatch fill area will appear.
-
Right-click to deselect QuickStitch™ + AutoHole.
A satin border is created around the outside of the circle, and around the edge of the fleur de lys (the edge of the hole).
In the FilmStrip the Crosshatch Fill area and its borders are shown as a single object. -
Select the Crosshatch Fill area, and in the Edit tab click Break Apart
 .
. 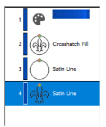
Where there was one object (the Crosshatch Fill) there are now three (Crosshatch Fill, and two Satin Lines). These objects can be edited individually. -
Click the Satin Line in the shape of a fleur de lys at the bottom of the FilmStrip.
-
Right-click, and in the context menu click Delete
 . The fleur de lys satin line will be removed from the FilmStrip.
This removes the border around the fleur de lys hole, and leaves the border around the circle. -
Click the View tab and drag the Background slider to the central point (Fade Background
 ). You can now see the stitching better.
 -
Click the Quick Create tab.
-
Click Line so that it is not selected.
-
In Options, click the Fill Area and Line button. The Fill Area and Line dialog box opens at the Options tab.
There should be no Line tab. If a Line tab is present, close the Fill Area and Line properties and deselect the Line button. -
In Spacing set the Gap to 2.4mm.
-
Set Style to Parallel, and set the Angle for Parallel to 90.
-
In Stitch Type, ensure Double Zigzag is selected. Leave Stitch Length at 2.0mm, and Zigzag Width at 0.6mm. Click OK to close Fill Area and Line properties.
-
Click QuickStitch™
 .
. -
Click in the bottom of the fleur de lys. The dashed line surrounds only the base of the fleur de lys, and does not go into the green band area.
-
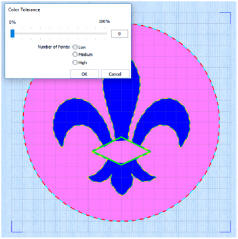
Click OK in the Color Tolerance dialog box. A parallel crosshatch fill area will appear.
-
Right-click to deselect QuickStitch™.
-
Click the Fill drop-down menu and select Pattern Fill
 . Then in the Options section click the Fill Area and Line button. The Fill Area and Line dialog box opens at Pattern Fill.
 -
Set the fill Pattern to 257 (this is in the Gradient & Lace category).
-
Select (check) Gradient, then click Single Color Gradient and set the start and end markers to 6. (Delete any other markers.)
When a single color gradient is set with both markers at the same number, the traveling stitches will go around the fill area rather than across it. This is recommended for loosely stitched pattern fills such as this one. -
Set Angle to 0 and set Compensation to 0. Click OK to close Fill Area and Line properties.
Underlay does not have to be adjusted as it is automatically set to None for the gradient density fill. -
Click QuickStitch™
 .
. -
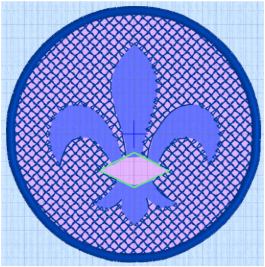
Click in the bottom of the fleur de lys and click OK in the Color Tolerance dialog box. A linear fill appears over the area of parallel crosshatch fill.
-
Right-click to deselect QuickStitch™.
-
To create a band and feathers for the fleur de lys, see Create the Band and Feathers for a Fleur de Lys.
Double Zigzag is a special stitch type, recommended for lace. A running stitch line is retraced in a zigzag pattern to create a mesh. After embroidering on water-soluble stabilizer, the mesh of stitches provides strength when the stabilizer is washed away.
These settings are for the fill area and its border. They are parts of the same object.
This is not a problem as this area will be stitched separately.
This combination of fill areas creates a loosely stitched ’weave’ effect that will still have strength when the stabilizer is washed away.
Patterns 257 to 264 provide banded fill patterns that combine with crosshatch parallel fills to create a weave effect. Set Spacing for the parallel fill at 2.4mm to combine with Pattern 257, 2.8mm to combine with Pattern 258, and so on.