Use Motif line ![]() to draw a line of motifs.
to draw a line of motifs.
Use motif lines for decorative stitches and details.
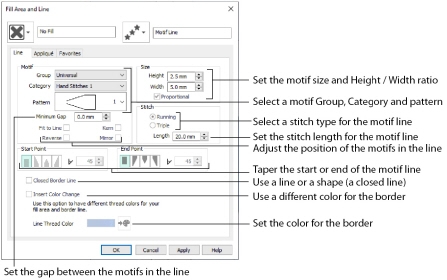
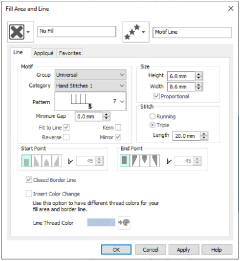
Group
Click the drop-down arrow to select the desired group of motif patterns.
Click the drop-down arrow to select the desired category of motif patterns.
Click the drop-down arrow to select the desired motif visually. Motifs are also numbered for convenient reference.
The Minimum Gap is the minimum amount of extra stitching that is placed between the motifs along the line. This is in addition to any spacing that is part of the selected motif.
Select this option to make the shape of the motifs follow the curves of the line.
|
|
|
|
When Fit To Line is off, the ends of each motif are placed on the line. |
When Fit To Line is on, each motif is adjusted to fit along the line. |
Use this option to reverse the direction of the motif along the line. This is useful, for instance, if you have placed a QuickStitch™ Motif Line and wish to reverse the motif direction. Some motifs are symmetrical and will have no apparent change when they are reversed.
Use Kern to automatically increase the space between adjacent motifs where necessary, so that the motifs fit along the line without overlapping.
Use this option to mirror the motif across the line of motifs. Some motifs are symmetrical and will have no apparent change when they are mirrored.
The Height and Width are initially set according to the chosen motif. The maximum and minimum values for Height and Width are individual to each motif.
Proportional
Use this option to keep the relative Height and Width in proportion when either is changed.
Select Running or Triple stitch for stitching out the motifs. Set the maximum Length of stitches from 1 to 20mm in steps of 0.1mm. Length is initially set to the recommended value for each motif.
The Start Point and End Point settings can be used to taper the ends of your motif lines.
For Motif Lines, the Central Point option starts at the first stitch point in the first motif in the line. The precise position of the point will vary, depending on the motif used.
Use these options to create mitered or pointed ends for your motif lines.
Use these options to change the type of line beginning for the Motif Line. Select a taper type, then set the angle of the taper.


To set the Taper Angle

, click the up and down arrows or enter a number.
Use these options to change the type of line end for the Motif Line. Select a taper type, then set the angle of the taper.


To set the Taper Angle

, click the up and down arrows or enter a number.
Set the line as an open line or a closed line (a shape).
Use Closed Border to change an open line to a closed one, or vice versa. This allows you to create a fill area with a closed or open border (a border that runs all the way around a fill area, or only part of the way).
Insert Color Change
Insert a color change between a border line and the enclosed fill area. The Color Selection dialog is displayed.
Insert Color Change is only used when the line forms the border to a fill area.
Create a Flower with Motif Lines
-
Click File, New

, or File, New Window

, and in the Choose Design Type page of the ExpressDesign Wizard select Load Existing Design, then click Next. In the Open Existing design page, click Load a Design
 , browse to the folder Documents\mySewnet\Samples\Digitizing\Edo, and load the file 'PetalsBasicFill_Motif fills'.
 -
Click File, Preferences
 , and ensure that Color Tolerance is selected (checked), and that Tie Off Before and After Trims is selected.
 -
Click the View tab, and ensure that Grid size is set to 5mm.
-
Click Edit Background

.
-
In mySewnet™ Draw & Paint, click the Insert tab.
-
In the Shapes drop-down list, select Shape 49, a flower.
-
Click Insert Shape

.
-
Click and drag inside the selection box to move the flower. Position it in the larger end of the petal on the left.
-
In the File menu, click Exit (or click Close in the mySewnet™ Draw & Paint window).
-
Click 2D View
 .
. -
Click the Home tab.
-
In the work area, select the fill area for the petal on the left. It will also be highlighted in the FilmStrip.
-
With the blue Pattern Fill selected, click Delete
 to delete it.
This removes the fill area from the petal so that we can create a flower using motif lines. -
Click the Quick Create tab.
-
In the FilmStrip, select the blue color that was used for the fill.
-
Right-click in the FilmStrip and select Display Only From Start. All objects after the blue color will be hidden. In the FilmStrip, you will be able to see a blue color block and the violet colored fill.

-
In the Quick Create tab, deselect the Fill and Appliqué buttons.
-
In Line click the drop-down arrow and select Motif Line
 .
. -
In the Options section click Fill Area and Line. The Fill Area and Line properties for Motif Line opens.
The line selection drop-down is grayed out (unavailable). The line type is set to Motif Line, so only its properties are shown. After creating a line you may change its type and properties. -
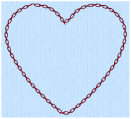
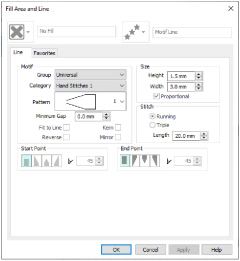
Set the Motif Group to Universal, and the Category to Hand Stitches 1, Pattern 1, the desired chain stitch pattern, is selected automatically.
-
Set the Height to 1.5mm. The Width will automatically change to 3.0mm because Proportional is selected.
-
Click OK to close the dialog box.
-
Click QuickStitch™
 .
. -
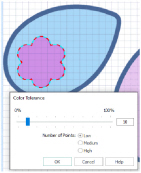
Use Color Tolerance to preview the area of the picture that defines the new QuickStitch™ area or line. This is useful even when it is not necessary to adjust the Tolerance value.
-
Click OK and a chain stitch line will appear around the flower. Right-click to deselect the function.
You may need to click 3D View
in the View tab to see this more clearly.
-
Click the Freehand Create tab.
-
Click Create Area or Line
 . The pointer changes to a pen
  .
. -
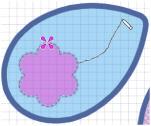
Click and drag to draw a line from the flower up to the top right point of the petal.
-
Release the mouse button, or lift your pen from the tablet, and a chain stitch line will appear.
-
Right-click to deselect the function.
-
Select the line that you just drew and use the Zoom Bar to zoom in on the line.
-
Move the points (nodes) on the line to smooth it, making it into a gentle curve.
-
If desired, use Insert Points
 or Delete Points
  in the Home tab to add or remove points from the line. Right-click to deselect.
 -
Use Life View
 to preview the results, then click Cancel.
 -
Double-click the second color (pale blue) in the color worksheet and the Color Selection dialog box appears.
-
Click Show All Thread Ranges, then click the drop-down arrow for the Thread Range and select Robison-Anton Rayon Vari 40.
-
In the shade list, browse for 2365 (3CC Horizon) or enter 2365 in the Find Thread box. Click OK.
-
Click the Edit tab.
-
Click Display All Objects
 and Zoom To Fit
  .
. -
Click Save
 and browse to the folder Documents\mySewnet\My Designs.
 -
Change the File name to 'PetalsMotif' and click Save.
-
Click Print
 to print the embroidery worksheet.
 -
Click Export Embroidery
 and ensure that .vp4 is set as the file format. Click OK.
 -
In the Save As dialog, browse to the folder Documents\mySewnet\My Designs and click Export. The design is saved as PetalsMotif.
There is no need to change the file name, as it is taken automatically from the design file name.
Alternatively, use the petals design that you created in Create a Petal Design with the ExpressDesign Wizard, and added two motif fills to in Use Motif Fills in Two Petals.
In mySewnet™ Digitizing, the View tab should still be open.
This enables you to see the picture behind the fill area.
Click along the edge of the flower. A dashed line of alternating colors will appear around the flower, showing the area that is selected for outlining with the Motif Line. Also, the Color Tolerance dialog box will appear, with the Tolerance set to 10.
Don’t worry if the line is wobbly, you will change it below.
When you click on a square node it becomes round. Square nodes are used for straight sections, round for curved sections. To make a node square, hold down the Shift key when you click on it.
Alternatively, scroll up the FilmStrip and click the Color at the beginning of the light blue objects. Right-click on the FilmStrip and select Properties.
Change Satin Line to Motif Line in an Appliqué Petal
-
Click File, New

, or File, New Window

, and in the Choose Design Type page of the ExpressDesign Wizard select Load Existing Design, then click Next. In the Open Existing design page, click Load a Design
 , browse to the folder Documents\mySewnet\Samples\Digitizing\Edo, and load the file 'PetalsBasicApplique’.
 -
Click the View tab, and ensure that Grid size is set to 5mm.
-
Click File, Preferences
 , and ensure that Color Tolerance is selected (checked), and that Tie Off Before and After Trims is selected.
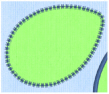
-
Select the satin line for the petal on the left, then right-click to see the Fill Area and Line dialog box.
-
In the Line drop-down menu at the top right, select Motif Line
 . The Line tab of the Fill Area and Line properties dialog box will appear.
 -
Set the Motif Group to Universal, and the Category to Hand Stitches 2. Pattern 1, the desired butterfly stitch pattern, is selected automatically.
-
Click Proportional so that it is no longer selected, then set the Height to 4.0mm.
-
Click OK. Click Life View
 to see the effect, and click Cancel.
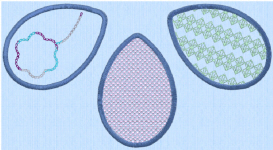
To change the inside of the middle petal to a QuiltStipple fill, see Insert QuiltStipple Fill in a Petal.
Alternatively, use the petals design that you created in Create Appliqué Areas with Express Border.
Change Satin Line to Picot Motif Line
-
Click File, New

, or File, New Window

, and in the Choose Design Type page of the ExpressDesign Wizard select Load Existing Design, then click Next. In the Open Existing design page, click Load a Design
 , browse to the folder Documents\mySewnet\Samples\Digitizing\Edo, and load the file 'PetalsBasicApplique’.
 -
Click the View tab, and ensure that Grid size is set to 5mm.
-
Click File, Preferences
 , and ensure that Color Tolerance is selected (checked), and that Tie Off Before and After Trims is selected.
 -
In the Home tab, click to select Edit Points
 .
. -
Click the edge of the middle petal. Its nodes (points) are displayed.
-
Right-click the work area to see the Fill Area and Line properties for this Satin Line.
-
In the Line drop-down menu at the top right, select Motif Line
 . The Line tab of the motif line properties will appear.
 -
Set the Motif Group to Universal, and the Category to Hand Stitches 1.
-
Click the drop-down arrow for Pattern and select Pattern 7, a buttonhole picot stitch.
-
Click the Fit To Line and Mirror options so they are selected. This will ensure that the shape of the motif curves to follow the outline of the petal and the blanket stitch will be inside the picot edge.
-
Set the Stitch type to Triple.
-
Click OK.
Alternatively, use the petals design that you created in Create Appliqué Areas with Express Border.
In the status bar the stitch type is displayed as Satin Line Appliqué.
In the FilmStrip the objects should also be Satin Line Appliqué. You can select objects in the FilmStrip, or press the right and left arrow keys to step through the objects in the design.
Add a motif fill to the right petal in Insert Motif Fill in an Appliqué Petal.
Add a Triple Stitch Embellishment to a Satin Line
-
In the Quick Create tab, ensure that Fill and Line are selected.
-
Ensure that Fill is set to Pattern Fill and Line is set to Satin Line.
-
Right-click the thread color in the FilmStrip and select Properties. Then set the thread to a pale color.
-
In the Options area, click Fill Area and Line and choose a pattern for the Pattern Fill.
-
Click the Line tab and ensure that Width is set to 4mm.
-
Select (check) Insert Color Change, then click Line Thread Color

and choose a medium color for the border.
-
Click OK to close the Fill Area and Line dialog box.
-
Select a shape from the drop-down list.
-
Click the Shape icon

. The shape is placed in the center of the work area as a selected block.
-
Resize the shape as desired using the square corner handles.
Hold down Ctrl as you click and drag to resize proportionally. Hold down Shift to resize from the center. -
In the FilmStrip click the Pattern Fill shape to select it.
-
In the Home tab click Copy

, and then click Paste

-
Right-click the copy in the FilmStrip and select Properties from the context menu.
-
In Fill, select No Fill

. The Line tab opens.
-
In the Line drop-down menu select Triple Stitch, then click Apply.
In the FilmStrip the second shape is now described as Triple Stitch. This may take a few second to happen.
Note that the upper line exactly follows the line below. -
Click Line Thread Color

and in the Color Selection dialog box set the thread to a darker color.
-
Click OK twice to view the shape in the work area.
-
Click outside the design to see both lines clearly.
You could also embellish a satin line with a chain stitch or other motif line. -
Select both shapes in the FilmStrip, then in the Home tab click Group

.
This will place the copied shape on top of the original. Duplicate would place it slightly to one side.
This will keep the two lines together until Ungrouped.