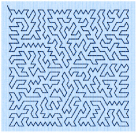
QuiltStipple fill areas ![]() use stipple stitch in a curved or straight lines. Vary the gap between stitch lines, use running or triple stitch, and add holes.
use stipple stitch in a curved or straight lines. Vary the gap between stitch lines, use running or triple stitch, and add holes.
|
|
|
|
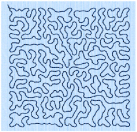
QuiltStipple Fill using a curved style |
QuiltStipple Fill using a straight style |
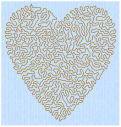
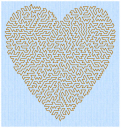
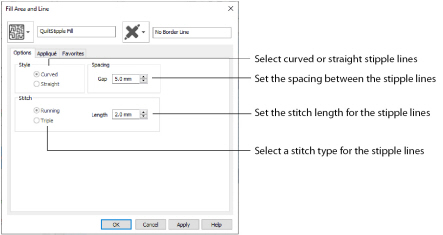
Choose between curved or straight.
Set the Gap to the preferred distance between lines of stitching. This also, where possible, is the border inside the area, between the edge of the area and the fill pattern.
Set the Gap from 1 to 20mm in steps of 0.1mm. It is initially set to 5.0mm.
Select Running or Triple stitch for stitching out the fill. Set the Length of stitches from 1 to 12mm in steps of 0.1mm. Length is initially set to 2mm.
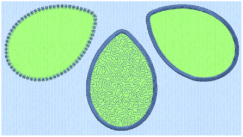
Insert QuiltStipple Fill in a Petal
-
Click File, New

, or File, New Window

, and in the Choose Design Type page of the ExpressDesign Wizard select Load Existing Design, then click Next. In the Open Existing design page, click Load a Design
 , browse to the folder Documents\mySewnet\Samples\Digitizing\Edo, and load the file 'PetalsApplique_Butterfly Line’.
 -
Click the View tab, and ensure that Grid size is set to 5mm.
-
Click File, Preferences
 , and ensure that Color Tolerance is selected (checked), and that Tie Off Before and After Trims is selected.
 -
Click along the edge of the middle petal to select the petal.
-
In the status bar the stitch type is displayed as Satin Line Appliqué.
-
Right-click the work area to see the Fill Area and Line properties for this Satin Line.
-
In the Fill drop-down menu at the top left, select QuiltStipple Fill
 .
.
It will currently be shown as No Fill. -
In the Options tab, set the Gap in Spacing to 2.0mm.
-
Click OK.
-
In the Quick Access toolbar, click Save
 and browse to the folder Documents\mySewnet\My Designs.
 -
Change the File name to 'PetalsApplique1' and click Save to save your design file.
-
Click Export Embroidery
 and ensure that .vp4 is set as the file format. Click OK.
 -
In the Save As dialog, browse to the folder Documents\mySewnet\My Designs and click Export. The embroidery is saved as PetalsApplique1_Exported.
There is no need to change the file name, as it is taken automatically from the design file name. -
Click File, Print. Deselect (uncheck) Print Plan View and Print Picture.
-
Click Print
 to print the embroidery worksheet.
Alternatively, use the petals design that you created in Create Appliqué Areas with Express Border, and added a motif line to in Change Satin Line to Motif Line in an Appliqué Petal.
In the FilmStrip the objects should also be Satin Line Appliqué. You can select objects in the FilmStrip, or press the right and left arrow keys to step through the objects in the design.
To change the appliqué fabric for the petals, right-click and in the Fill Area and Line dialog box click the Appliqué tab. Click the Select Fabric button and choose a Quick Color for a fabric, or click Fabric and then load  a fabric with the Picture Viewer.

If desired, open the embroidery in mySewnet™ Embroidery to preview on a garment or fabric background, as in the example.