Fabric and Stitch Type Options
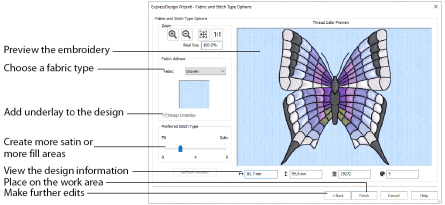
The Fabric and Stitch Type Options page of the ExpressDesign Wizard only appears when you are creating an Express Embroidery. Use the Fabric and Stitch Type page to choose the typical fabric that the design will be stitched onto, and the preference for fill areas or satin areas.
Choose the fabric on which the design will be stitched. Adjustments are made in the embroidery creation process to suit the chosen fabric, such as the type of underlay chosen for individual areas of satin or fill.
Choose Design Underlay to provide stitching below the whole embroidery, in addition to automatic underlay in different areas.
When Design Underlay is turned off it is easier to convert pattern fill areas to lightly stitched specialty fills.
This affects whether areas are likely to be created as satin or fill. If you prefer satin, move the slider to the right. If you prefer fill, move the slider to the left. The design size also influences whether areas are created as satin or fill, as this affects the size of individual areas.
To see the effect of different options, click Refresh Preview to regenerate the design.
Refresh Preview
Refresh the preview with your new settings.
If a change is made to the options, you must click Refresh Preview before you can click Finish.
The design information boxes show the dimensions (Width
and Height
), Stitch Count
, and number of colors
for the embroidery. The design information may change when the embroidery is exported, depending on the Optimize for Sewing Options.
Use the Zoom functions to change the view of the picture.
Use Zoom In

to magnify the view. Move the pointer over the picture and the pointer changes to the zoom in pointer

. Then either click a point you want to zoom in towards, or click and drag a rectangle around the area you want to zoom in to and release the mouse button to zoom. When zoomed in, use the scroll bars to move around.
Use Zoom Out

to shrink the view. Move the pointer over the picture and the pointer changes to the zoom out pointer

. Then click a point you want to zoom out from.
Click Zoom To Fit

to fit the picture to the preview area.
Click Real Size

to view the picture at its real size in pixels. This means that one pixel of the picture uses one pixel of the screen.
This shows how the thread colors have been chosen to replace colors in the picture. This allows you to view and check the final design before closing the ExpressDesign Wizard.
Back
If desired, use the Back button to go back through the ExpressDesign Wizard and modify settings before previewing the design again.
Finish
Accept the final design and close the ExpressDesign Wizard.
If a change is made to the options, you must click Refresh Preview before you can click Finish.