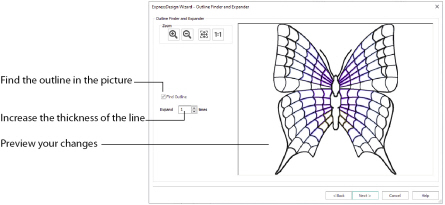
The Outline Finder and Expander page of the ExpressDesign Wizard only appears if you are creating an Express Trace design. If the picture consists of mainly solid color areas, use this page to create outlines appropriate for tracing.
Select this option to find the outlines in your picture and show them in the preview area.
Find Outlines looks for distinctive boundaries between color areas in the picture. Pictures that have gradual color changes, such as photographs or previously scanned pictures saved in JPEG format, may not have strong color boundaries that can be detected by Find Outlines.
It is usually not necessary to Find Outlines in a picture that already has black outlining. However, if there are additional color boundaries that do not have outlining in the picture, you may still wish to use Find Outlines.
This is only available when Find Outlines is selected. Use this option to increase the thickness of outlines that have been found, by adding up to 5 pixels on each side of the lines. It is initially set to 1. Lines are traced down the center by Express Trace, so setting Expand to at least 1 will allow curves to be traced more smoothly and continuously.
If Expand is set to 0 (zero), the outlines found in the picture will be only one pixel wide. When a line changes direction, this may cause a break in the line where pixels only meet at the corner. This may cause a line to be traced in multiple sections, or not at all. Therefore, it is recommended to set Expand to at least 1.
If desired, use higher Expand values to merge outlines when parallel outlines are close together. Alternatively, you may be able to exclude unwanted lines by using Monochrome Threshold on the next page.
Use the Zoom functions to change the view of the picture.
Use Zoom In

to magnify the view. Move the pointer over the picture and the pointer changes to the zoom in pointer

. Then either click a point you want to zoom in towards, or click and drag a rectangle around the area you want to zoom in to and release the mouse button to zoom. When zoomed in, use the scroll bars to move around.
Use Zoom Out

to shrink the view. Move the pointer over the picture and the pointer changes to the zoom out pointer

. Then click a point you want to zoom out from.
Click Zoom To Fit

to fit the picture to the preview area.
Click Real Size

to view the picture at its real size in pixels. This means that one pixel of the picture uses one pixel of the screen.
Preview
The preview shows the picture. If Find Outlines is selected, the preview shows the outlines that have been found, and the effect of using Expand.
Back
Return to the Rotate and Crop Picture page.
Next
Go to the Monochrome Threshold page.