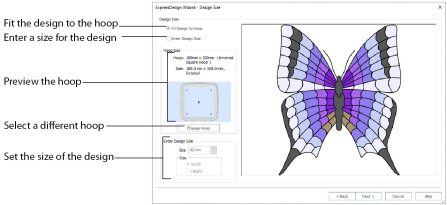
The Design Size page only appears when creating a new design, from New or New Window.
To specify the design size, either select Fit Design to Hoop to ensure the design fits the desired hoop, or choose Enter Design Size to specify the width or height of the design.
The current hoop name and hoop size are shown, with a thumbnail of the hoop. The selected hoop is remembered, next time you use the ExpressDesign Wizard.
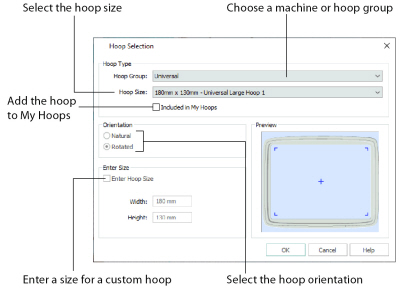
Click Change Hoop to choose a different hoop in the Hoop Selection dialog box. The new design will be a best fit to the selected hoop and orientation.

The drop-down list of Hoop Groups shows all the machine Hoop Groups, and the My Hoops group, if used.
The drop-down Hoop Size list shows the hoops in the chosen Hoop Group. Select the desired hoop size and a picture of the hoop will be shown in the Preview.
Select (check) Included in My Hoops to add the selected hoop to the My Hoops list. Use the My Hoops list to create a list of your favorite hoops.
The selected hoops will be displayed in the My Hoops group in the order that they were selected.
Select Natural or Rotated orientation according to the shape of the embroidery that is to fit in the hoop. Natural orientation is similar to the way the hoop would appear when you sit in front of your machine; note the position of the bracket.
It is recomended to use natural hoop orientation for designs with Twin Needle colors.
To enter a hoop size that is not listed in any of the Hoop Groups, click the Enter Hoop Size box so that it is selected (checked). The Width and Height boxes will become available. You can enter any size from 10mm to 4000mm. The preview shows the shape of the hoop you enter.
If you position the arrow pointer over the box without clicking, the alternative units and range will be shown.
Select the dimension you wish to set (the Width or Height of the design), usually the longest side, then enter the size of the design.
Enter Design Size is not available if one of the Start a New Design with no Picture options was selected in the Choose Design Type page.
Back
Return to the:
-
Rotate and Crop Picture page for an Express Embroidery and when loading or creating a background picture
-
Monochrome Threshold page for an Express Trace or Express Border
-
Choose Design Type page when starting a new design with no picture.
Next
Go to the:
-
Choose Thread Colors Page for an Express Embroidery
-
Express Trace Options or Express Border Options for those design types
For Start a New Design with No Picture, and for Load or Create a Background Picture close the ExpressDesign Wizard and open the main screen.