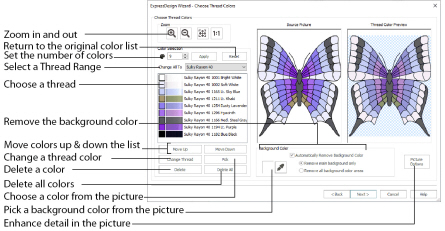
The Choose Thread Colors page of the ExpressDesign Wizard only appears when you are creating an Express Embroidery. Use the Choose Thread Colors page to match thread colors to colors in the picture, to set the number of colors, and to choose the color order. Select whether or not to keep the background and, if desired, pick a different background color. Optionally, choose whether or not to expand thin lines and set the sensitivity to small areas in the picture.
The Number of Colors is initially set to the Recommended number of colors. The ExpressDesign Wizard determines the optimal number of colors for converting the picture into thread colors. When this number is changed, the list of colors and the preview are updated.
The maximum Number of Colors is 256. For pictures with less than 256 colors, the maximum is the total number of colors in the picture.
The total number of colors in photographs and other complex color pictures may be shown as 256+. This may mean that there are a lot of small color areas in the picture. This can also happen with clipart in JPEG-JFIF Compliant (.jpg, .jif, .jpeg) format, as this format introduces minor color variations that may not be visible.
Apply
Click Apply to recalculate the threads with the new number of colors.
Use Reset to return the color list to the initial set of colors. The colors are also re-ordered from light to dark. The colors in the picture will be matched to thread colors from the thread range shown in the Change All To box. Any custom thread matches that are required must be re-selected with Change Thread.
Click the drop-down arrow to choose a different thread range. When a thread range is chosen, each picture color in the list will be assigned the nearest matching thread color from the chosen thread range.
When a new thread range is chosen, all custom thread matches set by Change Thread will be lost.
The color list shows the colors that have been automatically selected. The colors are picked to give the closest representation of the original picture with the current Number of Colors. Each time the number of colors is changed, this list is updated.
Sometimes, when the Number of Colors is reduced to a low number, colors will be chosen that are averages of two or more prominent colors in the picture. This can give a posterized appearance to the Reduced Colors Preview. If this effect is not desired, increase the Number of Colors.
The list shows a sample of each color currently selected from the picture. Initially, the colors are shown from light to dark, with each picture color automatically matched to a thread color from the thread range shown in Change All To. The color order can be changed. This affects the order that colors are used in the final design.
The basic color order is set by this list. However, the order for stitch types is satin, then fill, then outlines (running stitch or satin border). Hence, if black is moved so that it is first in this list, it will still be last in the final design if it is only used for outlining.
The same thread color may be matched to two or more colors in the picture. Each thread color can be individually changed with Change Thread. When thread colors are changed in the list, the Thread Color Preview is updated.
When more than one color in the picture is matched to the same thread color, the number of color changes in the final embroidery is reduced.
Use Move Up and Move Down to change the order of colors in the list.
Click a color in the list, then click the Change Thread button. The Color Selection dialog box will appear so that a different thread color can be chosen. Alternatively, double-click a color in the list and the Color Selection dialog box will appear.
It is recommended only to use Change Thread after the main thread range has been selected.
Click Pick to add thread colors to the list by clicking the desired colors in the Source Picture.
When Pick is selected, the pointer changes to an eyedropper

over the source picture. Click the picture to pick up the color under the tip of the eyedropper, and the nearest matching thread color from the selected Thread Range will be automatically selected and added to the thread color list. The Thread Color Preview will be updated to show any other areas that can use the selected thread color.
The thread color is picked for the clicked color according to the RGB (red, green, blue) value at the point clicked. If there is already a thread color assigned to that exact RGB value, it will be highlighted in the list instead of adding a thread color to the list.
Delete the picture color currently highlighted in the list. The deleted color is replaced with the nearest remaining picture color in the list. The Thread Color Preview is re-displayed, with the reduced set of thread colors.
Click Delete All to remove all the thread colors from the list if you wish to use Pick to choose colors from the Source Picture.
The background color is automatically determined. It is the color which is used the most along the edges of the picture. If desired, select a different background color.
The large color square shows the current background color.
Click Pick Background Color
to choose a different color from the Source Picture as the background color. When Pick Background Color is selected, the pointer changes to an eyedropper

over the source picture. Click the picture to pick up the color under the tip of the eyedropper. The sample of the current background will change. Depending on the choice for Automatically Remove Background Color, the Thread Color Preview may show the effect of removing the selected color.
Automatically Remove Background Color
When this is selected, the Thread Color Preview will show any areas that will be removed as a checkerboard pattern.
When removing the background color, choose between:
-
Remove main background only
Any areas of the background color that are connected to the edges of the picture will not be used in the final design. Use this option when there are significant design elements in the background color within the design. -
Remove all background color areas
Any areas of the background color will not be used in the final design. Use this option when the background shows through gaps in the composition. Also choose this if you wish to remove a background color that is not connected to the edges of the picture.
Removing Multiple Background Colors
Some pictures may have more than one background color, even after color reduction. To remove additional unwanted background colors, change the thread color so that all the background colors use the same thread color.
If the thread color used for the background color is the same as for a color area that you wish to keep, change the background thread color to a 'false color' that is not needed for this design.
Click the Picture Options button to see the Picture Options dialog box, which is used to set the Black Lines option and set the Area Sensitivity.
There are three options for handling black lines in your picture. Expand Pixel-Thin Lines is chosen by default.
Select No Change if you feel that outlines in the picture do not need to be expanded or reduced.
Select Expand Pixel-Thin Lines to make black lines thicker, to prevent broken lines where pixels join at corners. This option is on by default, to ensure that outlines in the picture are continuous.
Select Reduce Thick Lines if your picture has very heavy outlines, and you prefer to have markout stitching in your picture rather than satin outlines.
Area Sensitivity is used to determine how significant small areas of color in the picture may be. Choose High, Medium or Low. Area Sensitivity is set to Medium each time the ExpressDesign Wizard is used.
Use High sensitivity to increase the detail extracted from the picture. This is useful, for example, when facial details are ignored at Medium sensitivity. Use Low sensitivity to decrease the detail extracted from the picture. This is useful, for example, when unwanted details are retained in the design at Medium.
Previews
This shows the original picture, after being rotated and cropped, in full color.
This shows how the thread colors have been chosen to replace colors in the picture. This gives an approximate indication of where thread blocks will be in the final design.
If variegated threads have been selected, only the first color is shown in the preview.
Use the Zoom functions to change the view of the picture. The same area of the picture is shown in both previews when the zoom level is changed.
Use Zoom In

to magnify the view. Move the pointer over the picture and the pointer changes to the zoom in pointer

. Then either click a point you want to zoom in towards, or click and drag a rectangle around the area you want to zoom in to and release the mouse button to zoom. When zoomed in, use the scroll bars to move around.
Use Zoom Out

to shrink the view. Move the pointer over the picture and the pointer changes to the zoom out pointer

. Then click a point you want to zoom out from.
Click Zoom To Fit

to fit the picture to the preview area.
Click Real Size

to view the picture at its real size in pixels. This means that one pixel of the picture uses one pixel of the screen.
Back
Return to the Design Size page.
Next
Go to the Fabric and Stitch Type Options page.