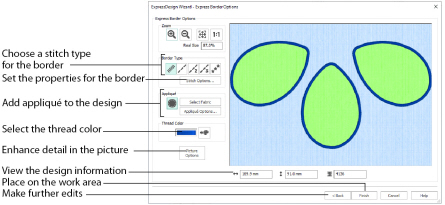
The Express Border Options page of the ExpressDesign Wizard only appears if you are creating an Express Border design. Use the Border Options to select the type of stitching used for the borders, appliqué settings, and to choose the thread color.
Select the type of border to create around areas of the picture from one of the following:
-
Satin Line
 : see Satin Line.
 -
Running Stitch
 : see Running Stitch.
 -
Double Stitch
 : see Double Stitch.
 -
Triple Stitch
 : see Triple Stitch.
 -
Motif Line
 : see Motif Line.
When Appliqué is selected, the preview shows where the appliqué fabric should be placed.
Stitch Options
After selecting the type of border, click the Stitch Options button to show the properties for that border type. If desired, adjust the properties and click OK.
Appliqué
Select Appliqué ![]() to use appliqué within the borders of the design.
to use appliqué within the borders of the design.
-
Click Select Fabric to change the appliqué fabric. See Appliqué Selection.
-
Click Appliqué Options to select the appliqué type. See Appliqué Options.
When Appliqué is selected, the preview shows where the appliqué fabric should be placed.
Set the Thread Color for the stitches. Click the Color Change button

to choose a different color in the Color Selection dialog box. The thread sample is updated with the selected color.
Click the Picture Options button to see the Picture Options dialog, which is used to set the Area Sensitivity.
Area Sensitivity is used to determine how significant small areas of color in the picture may be. Choose High, Medium or Low. Area Sensitivity is set to Medium each time the ExpressDesign Wizard is used.
Use High sensitivity to increase the detail extracted from the picture. This is useful, for example, when facial details are ignored at Medium sensitivity. Use Low sensitivity to decrease the detail extracted from the picture. This is useful, for example, when unwanted details are retained in the design at Medium sensitivity.
The design information boxes show the dimensions (Width

and Height

), Stitch Count

, and number of colors

for the embroidery. The design information may change when the embroidery is exported, depending on the Optimize for Sewing Options.
Use the Zoom functions to change the view of the picture.
Use Zoom In

to magnify the view. Move the pointer over the picture and the pointer changes to the zoom in pointer

. Then either click a point you want to zoom in towards, or click and drag a rectangle around the area you want to zoom in to and release the mouse button to zoom. When zoomed in, use the scroll bars to move around.
Use Zoom Out

to shrink the view. Move the pointer over the picture and the pointer changes to the zoom out pointer

. Then click a point you want to zoom out from.
Click Zoom To Fit

to fit the picture to the preview area.
Click Real Size

to view the picture at its real size in pixels. This means that one pixel of the picture uses one pixel of the screen.
Preview
The preview shows where the borders will be created. It allows you to view and check the final design before closing the ExpressDesign Wizard.
Back
If desired, use the Back button to go back through the ExpressDesign Wizard and modify settings before previewing the design again.
Finish
Accept the final design and close the ExpressDesign Wizard.