Use the Modify Block  dialog box to show and change the size and rotation of the currently selected block, and to skew the selected block.
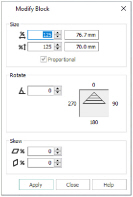
Modify the currently selected block as desired, then click Apply to show your changes in the work area.
Click Undo
to reverse your changes.
Size
Height and Width %
Show and change the height
and width
percentage of the currently selected block. The height and width are scaled or resized according to the Resize mode.
The size in millimeters to which the block will be changed is shown to the right.
Proportional
Use this option to keep the relative Height and Width in proportion when either is changed.
Angle
In the Angle
box enter an angle, from 0 to 359 degrees, then click the Apply button. The preview shows the selected angle.
If desired, move the center of rotation

before rotating.
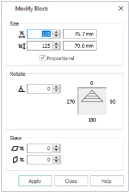
Skew the currently selected block horizontally and vertically. Enter values in the horizontal
and vertical
percentage boxes, then click Apply. The block is scaled or resized according to the Resize mode.
For Horizontal Skew

, positive numbers will skew the lower part of the block to the left and negative numbers will skew it to the right. For Vertical Skew

, positive numbers will skew the right part of the block upwards, and negative numbers will skew it downwards.
-
Click File, New
 to open a new window.
 -
In the Quick Access toolbar, click Insert
 .
. -
In the folder Documents\mySewnet\Samples\Stitch Editor\Stitch, scroll down to the thumbnail of Perky Dragonfly.
-
Click to load the embroidery.
-
Ensure the Home tab is selected, and click Box Select
 .
. -
Click and drag to draw a rectangle around the dragonfly.
-
Release the mouse button and the dragonfly is surrounded by a selection box with white handles.
-
Click Resize
 . The handles on the selection box become blue.
The blue handles indicate that when the size of the embroidery is changed it will be resized. The stitches are recalculated to maintain the original density. -
Note the number of stitches in the embroidery. You can see this in the Information area on the Design Panel, or in the Control Strip.
-
In the Size section, ensure Proportional is checked, then change Height percentage
 to 125%.
The Width percentage will increase by the same amount. -
Click Apply. The dragonfly increases in size, and the number of stitches is increased from 4337 to approximately 4387.
-
Close the Modify Block dialog box.
-
Left-click outside the select box to deselect the stitches.
A larger size would be more suitable when creating cutwork, for example.
 . The Modify Block dialog box appears.