Use Manage My Fills ![]() to load new pictures for fill patterns, export an existing My Fill pattern as a picture and delete unwanted My Fills.
to load new pictures for fill patterns, export an existing My Fill pattern as a picture and delete unwanted My Fills. 
If you have a design using a My Fill pattern and give it to a friend, it is likely that their My Fill database will have different patterns to your My Fill database. Export the My Fill pattern and give the picture to your friend to import into their My Fill database.
Shortcuts
-
Edit Tab:

-
Keys: Alt, E, F
Use Export to save a My Fill pattern as a picture. The picture can then be copied and imported into a friend’s My Fills.
Click Export and the Save As dialog box appears. The file name is automatically set to the number used for the pattern in your My Fills.
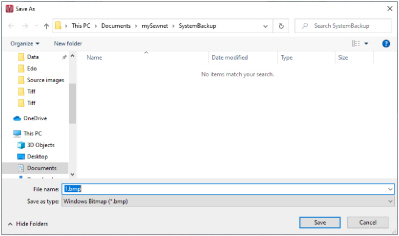
The following file formats may be saved: Windows or OS2 Bitmap (.bmp), JPEG Low Quality (.jpg), JPEG High Quality (.jpg), Tagged Image File Format uncompressed (.tif) and Portable Network Graphics (.png).
To remove an unwanted My Fill pattern, select the desired pattern then click Delete. A message will appear to ask for confirmation.
Click OK to remove the pattern.
When a My Fill pattern is deleted, any designs that used that pattern will use standard Pattern 3 until a new pattern is chosen.
Use Import to create a new My Fill based on a picture or a previously exported My Fill. After importing a picture, that fill will be available in the My Patterns ![]() category of the Fill Area and Line Properties dialog. Click the Import button and an open dialog box will appear where you can choose the picture to import.
category of the Fill Area and Line Properties dialog. Click the Import button and an open dialog box will appear where you can choose the picture to import.
The height and width of the picture must each be from 120 to 700 pixels.
The following file formats may be loaded: Windows or OS2 Bitmap (.bmp), JPEG-JFIF Compliant (.jpg, .jif, .jpeg), Portable Network Graphics (.png), Tagged Image File Format uncompressed (.tiff, .tif), Windows Meta File (.wmf), Windows Enhanced Meta File (.emf) and Windows Icon (.ico).
Click the desired picture, then click Open.
The picture is automatically converted to black and white to determine the best positions for stitch points. Therefore, you are likely to find the best results from simple pictures drawn in black and white.
A My Fill pattern is repeated every 0.1mm for each pixel in the source picture. For example, if your picture is 300 x 200 pixels, it will be repeated every 30mm horizontally and 20mm vertically if the fill angle is set to 0.
Use a Bee for a My Fill Pattern
-
Click File, New
 , or File, New Window
  , and in the Choose Design Type page of the ExpressDesign Wizard select Load Existing Design, then click Next. In the Open Existing design page, click Load a Design
  , browse to the folder Documents\mySewnet\Samples\Digitizing\Edo, and load the file 'PetalsBasicFill'.
 -
Click File, Preferences
 , and ensure that Color Tolerance is selected (checked), and that Tie Off Before and After Trims is selected.
 -
Click the View tab and ensure that Grid size is set to 5mm.
-
In the color worksheet in the Design Panel, click the check box for the fourth color (slate blue) to hide the satin borders using that thread color. This will make it easier to select the fill areas.
-
Click the Edit tab.
-
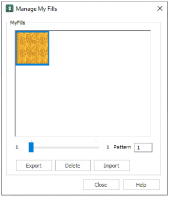
Click Manage My Fills
 and the Manage My Fills dialog box will appear.
 -
Click Import and the open a file dialog box will appear.
-
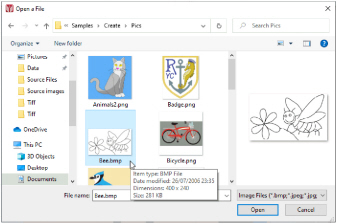
Browse to the folder Documents\mySewnet\Samples\Digitizing \Pics.
Simple black and white pictures are recommended. The height and width of the picture must be between 120 and 700 pixels. -
Click 'Bee.bmp', then click Open. The bee fill will be created and a preview sample will be shown in the Manage My Fills dialog box.
-
Click Close.
-
Select the fill area for the petal on the right, then right-click to see the Fill Area and Line dialog box. The Options tab is displayed.
-
In the Pattern section, click My Patterns
 . The the first fill in the My Patterns 1 category (the bee) is displayed.
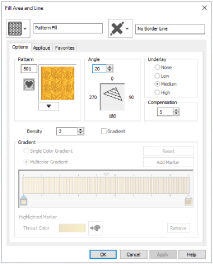
You could also browse to view all patterns in this category from the drop-down list.
Note that the bee design has automatically been given pattern number 501. You could enter this number to go directly to the bee pattern. -
Set the Angle to 20, then click OK.
Alternatively, you could use the handle on the Origin marker to change the fill angle.
 -
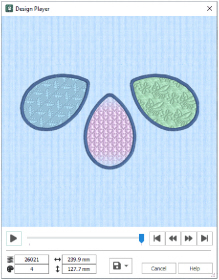
Click Design Player
 . This enables you to preview the way that the design will be stitched out, with no markers.
 -
Use the Play button

at the bottom left to start playing through the stitches in the embroidery.
-
Use the controls to play forwards or backwards through the embroidery at different speeds, jump to the start or end of the stitches, and stop at any time.
Use the Design Player or Life View
  when you wish to preview a design with no objects selected.
 -
Click Cancel.
-
Click Display all Objects
 to show the blue petal borders.
 -
Click Save
 and browse to the folder Documents\mySewnet\My Designs.
 -
Change the File name to 'PetalsFill1' and click Save to save your design file.
-
Click Export Embroidery
 and ensure that .vp4 is set as the file format. Click OK.
The preferred file format for saving embroideries is .vp4, as this will preserve background and appliqué information, thread color information and notes. -
In the Save As dialog, browse to the folder Documents\mySewnet\My Designs and click Export. The embroidery is saved as PetalsFill1_Exported.
There is no need to change the file name, as it is taken automatically from the design file name. -
Click File, Print.
-
Deselect (uncheck) Print Plan View and Print Picture.
-
In Worksheet options, ensure that Design Scale is set to 100% and ensure that Grid and all the Print Information boxes are checked. Click OK.
-
Select two pages to see both pages of the worksheet.
-
Click Print
 to print the embroidery worksheet.
Alternatively, use the petals design that you created in Create a Petal Design with the ExpressDesign Wizard, and added a leaf pattern and single gradient fill to in Change a Fill Area to a Leaf Pattern and Create a Single Color Gradient Fill in a Petal.
Print Plan View shows the picture with the embroidery printed over it. Print Picture prints the background picture. These features are useful where embroidery is used to enhance a picture.
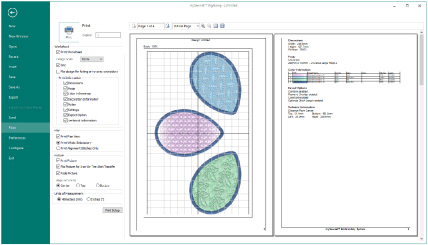
The embroidery worksheet will be printed at full size.