Patterns
Use the Pattern area to select the desired pattern category and number.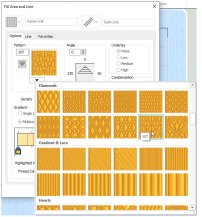
Select the desired pattern number. There are several ways to select patterns:
-
Click the drop-down arrow below the pattern sample and scroll down to choose a pattern Category, and a pattern. Click the desired pattern sample and the Pattern number is shown.
-
Enter a favorite Pattern number directly in the Pattern box. As you type the number, the correct pattern sample is selected immediately.
-
Use a My Fill pattern created with Manage My Fills. See Manage My Fills.
The pattern number can be seen in the FilmStrip.
View the patterns in the pattern gallery. See Fill and Satin Patterns.
Change a Fill Area to a Leaf Pattern
-
Click File, New

, or File, New Window

, and in the Choose Design Type page of the ExpressDesign Wizard select Load Existing Design, then click Next. In the Open Existing design page, click Load a Design
 , browse to the folder Documents\mySewnet\Samples\Digitizing\Edo, and load the file 'PetalsBasicFill'.
 -
Click File, Preferences
 and ensure that Color Tolerance is selected (checked), and that Tie Off Before and After Trims is selected.
 -
Click the View tab, and set the Grid size to 5mm.
-
In the color worksheet on the Design Panel, click the check box for the fourth color (slate blue) to hide objects, mainly satin borders, using that thread color. This will make it easier to select the fill areas.
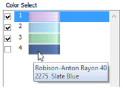
When you pause the arrow pointer over a color in the worksheet, a popup description of the thread appears. -
Click the Home tab.
-
Ensure that Edit Points
 is selected.
 -
Click inside the left petal near the edge. The points defining the shape of the fill area will appear. It will be shown as a Pattern Fill on the status bar and in the FilmStrip.
-
Right-click on the work area and the Fill Area and Line dialog box will appear showing the properties for Pattern Fill.
The Fill Area and Line dialog box enables you to change the fill and line types in your design, and set the properties for the lines and fills. -
Click the down arrow below the fill sample in the Pattern area.
-
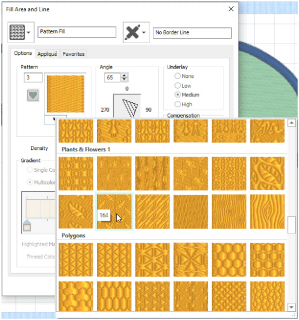
The fill Category is currently set to Standard 1. Scroll up the fill gallery to the 'Plants & Flowers 1' Category.
-
Place the pointer over the pattern sample in row two, column two. The pattern number is 164.
Patterns may also be selected directly by entering the desired pattern number in the Pattern box. -
Click to select pattern 164.
-
Check that Density is set to 2, as desired.
-
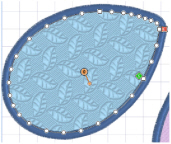
Change the angle to 45. Click Apply to see the new pattern in the left petal, then click OK. The pattern has changed in the petal, and you can see the fill number in the FilmStrip.
Even if you click Cancel, Apply has changed the stitches. Therefore, to return to the original pattern you would need to click Undo .
.
You could also change the angle of the pattern with the handle on the Origin marker .
.
To change the middle petal to a single gradient fill, see Create a Single Color Gradient Fill in a Petal.
Alternatively, use the petals design that you created in Create a Petal Design with the ExpressDesign Wizard.
If the Status Bar says Box Select, this is selected instead of Edit Points  . Click Edit Points and look again.