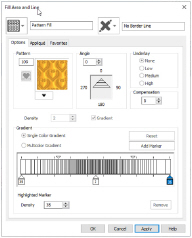
Use the Density area to see and change the density settings and the color Gradient of the fill.
The color on a fill area can change over a range, or have multiple color changes across the fill. This is ideal for gradual color changes such as sunsets, subtle shadow effects and so on.
Gradient is not initially selected.
Embroidery on thicker fabrics usually looks better with more stitch coverage, or a low density setting. Choose a low value such as 2 or 3 for heavy knit fabrics, a higher value such as 5 or 6 for a light material like linen or satin.

Set the standard Density from 2 to 80. The lower the number, the closer together the stitches and the more stitches are produced.
The initial setting is 2.
Use Single Color Gradient to change the density across a fill with only one color. Set a value for the start and end density markers for the fill, and the density gradually changes between the two values. Add multiple markers for a more complex pattern.

The markers can each take a value of 2 to 80, which means you can reverse the gradient simply by swapping the start and end values.
If you change a gradient density fill back to standard, then you should also select the desired underlay.
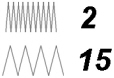
The example shows a Gradient of 2 to 15, with a fill angle of 90°.
Use Density Gradient for loosely stitched areas so that the traveling stitches will go around the outside of the fill area. Set the start and end densities to the same number. If the Density Gradient option was not used the traveling stitches would cross the fill area and show through.
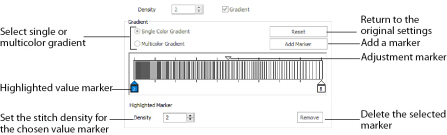
Use the adjustment marker above the gradient bar to change the gradient across the fill.
Reset
Reset your changes and use the initial settings.
Add Marker
Click Add Marker to add a value marker below the gradient bar, and an adjustment marker above the gradient bar. The initial value for the marker will be between the existing markers. Edit the density value, and move the value and adjustment markers as desired.
This means that you can have any combination of density values across the fill area. Remember, a higher value means the fill is less dense.
Density
Density is used to change the density of the stitching. Set Density from 2 to 80. The higher the number, the less dense the fill. The initial start marker setting is 2, and end marker setting is 8.
Remove
Click Remove to delete the highlighted marker.
Change a Fill to Single Color Gradient
-
Open the Fill Area and Line properties dialog.
-
In the Density area, click the Gradient option. The Gradient box will become available.
-
Select (check) the Single Color Gradient box.
-
Click a value maker (the marker below the gradient bar) and change the value in the Density box to the required density value.
-
Click Apply to view your changes.
-
Move the adjustment marker above the gradient bar to vary the change in density across the fill.
-
Click Add Marker to add another value marker and adjustment marker.
-
Change the density of the fill as desired.
-
Click OK to close the Fill Area and Line properties dialog.

If you change a gradient density fill back to standard, then you should also select the desired underlay.
Create a Single Color Gradient Fill in a Petal
-
Click File, New

, or File, New Window

, and in the Choose Design Type page of the ExpressDesign Wizard select Load Existing Design, then click Next. In the Open Existing design page, click Load a Design
 , browse to the folder Documents\mySewnet\Samples\Digitizing\Edo, and load the file 'PetalsBasicFill'.
 -
Click File, Preferences
 , and ensure that Color Tolerance is selected (checked), and that Tie Off Before and After Trims is selected.
 -
Click the View tab, and ensure that Grid size is set to 5mm.
-
In the color worksheet in the Design Panel click the check box for the fourth color (slate blue) to hide the satin borders using that thread color. This will make it easier to select the fill areas.
-
Click inside the middle petal. The points defining the shape of the fill area will appear, and the Pattern Fill area will be selected in the FilmStrip.
-
Right-click on the work area and the Fill Area and Line dialog box will appear, showing Pattern Fill.
-
Enter 109 in the Pattern Box. In the Pattern gallery, this is the design in row 1, column 1 of the Hearts category.
-
Click Apply to see the pattern.
If needed, move the Fill Area and Line dialog box to one side to see this. -
Click the Gradient checkbox. The Gradient options become available.
-
Ensure that Single Color Gradient is selected. A bar with a marker at either end becomes available.
-
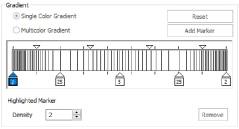
Click Add Marker. A third marker is placed in the middle of the bar, highlighted in blue.
All three markers initially use the stitch density set above (this should be 2). -
Click the marker box on the left. It is highlighted in blue.
-
In Density, use the up arrow to change the number to 35. The number and position of the lines in the density bar changes.
-
Leave the Density for the middle marker at 2.
-
Click the marker box on the right.
-
Change the density for the marker on the right to 35.
-
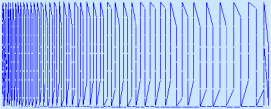
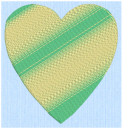
Change the Angle to 0, then click OK. The heart pattern fill is densely stitched in the center and lightly stitched at top and bottom.
Alternatively, use the petals design that you created in Create a Petal Design with the ExpressDesign Wizard, and added a leaf pattern to in Change a Fill Area to a Leaf Pattern.
The lines in the density bar represent the density of the stitching.
This will create lightly stitched areas at the edges of the fill area, and a heavily stitched area in the middle.

Notice that underlay has been automatically set to None. This occurs when Single Color Gradient or Multicolor Gradient density is selected.
To fill the right petal with a bee pattern that you create, see Use a Bee for a My Fill Pattern.

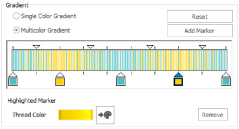
Use Multicolor Gradient to change the color across a fill with only one density. Set colors for the start and end markers for the fill, and the color gradually changes between the two values.
Use the marker above the gradient bar to change the color gradient across the fill.
Reset
Reset your changes and use the initial settings.
Add Marker
Click Add Marker to add a color marker below the gradient bar, and an adjustment marker above the gradient bar. The initial color for the marker will be the same as the currently highlighted marker. Change the color and move the color and adjustment markers as desired.
This means that you can have any combination of colors across the fill area.
Thread Color
Use Thread Color  to change the color of the currently highlighted marker. The Color Selection box will be displayed.
Remove
Click Remove to delete the highlighted marker.
Create a Multicolor Gradient Fill
-
Open the Fill Area and Line properties dialog.
-
In the Density area, click the Gradient option. The Gradient box will become available.
-
Select (check) the Multicolor Gradient box.

-
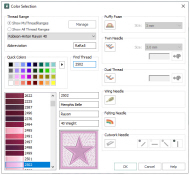
Click a color maker (the marker below the gradient bar) and click Thread Color to open the Color Selection dialog box.
-
Change the color to the required color and click OK.
-
Click Apply to view your changes.
-
Move the adjustment marker above the gradient bar to vary the change in color across the fill.
-
Click Add Marker to add another color marker and adjustment marker.
-
Change the color of the fill as desired.
-
Click OK to close the Fill Area and Line properties dialog.
Fill a Petal with a Multicolor Gradient Density Fill
-
Click File, New

, or File, New Window

, and in the Choose Design Type page of the ExpressDesign Wizard select Load Existing Design, then click Next. In the Open Existing design page, click Load a Design
 , browse to the folder Documents\mySewnet\Samples\Digitizing\Edo, and load the file 'PetalsBasicFill'.
 -
Click File, Preferences
 and ensure that Color Tolerance is selected (checked), and that Tie Off Before and After Trims is selected.
 -
Click the View tab, and ensure that Grid size is set to 5mm.
-
In the color worksheet in the Design Panel, click the check box for the fourth color (slate blue) to hide the satin borders using that thread color. This will make it easier to select the fill areas.
-
Select the fill area for the middle petal, then right-click to see the Fill Area and Line dialog box.
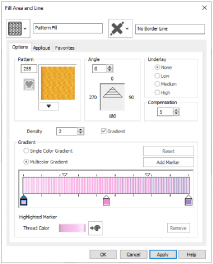
-
Enter 255 in the Pattern Box. In the Pattern gallery, this is the design in row 1, column 3 of the Gradient & Lace category.
-
Change the Angle to 0.
-
Ensure that the Gradient checkbox is selected.
-
Click Add Marker to place a third marker in the middle of the bar, highlighted in blue.
-
Click Multicolor Gradient. The gradient bar is now colored, as are the markers.
The selected marker has a dark blue outline, and the pointer is highlighted in blue. -
Click the marker box on the left.
-
Click Thread Color
 . The Color Selection dialog box is displayed.
 -
Ensure that Robison-Anton Rayon 40 is displayed in Thread Range.
-
Click in the Find Thread box and enter '2502'. Thread color 2502 (Memphis Belle) will be found in the list. Click OK to change the color.
-
Double-click the marker box in the middle. The Color Selection dialog box opens.
-
In the Color Selection dialog box change the color to 2259 (Wild Pink), then click OK.
-
Double-click the marker box on the right and change the color to 2286 (Tulip).
The bar is now shaded from pale pink, to dark pink, to purple. The stitches for each color are calculated from the original density value. -
Click Apply. The design will show how the colors will be blended when stitched out.
-
Click OK to close the Fill Area and Line dialog box.
Alternatively, use the petals design that you created in Create a Petal Design with the ExpressDesign Wizard.
The top four patterns in this category are recommended for multicolor gradient (the other eight are suitable for a weave pattern combined with parallel crosshatch, as used for lace designs).
This is a quick way of displaying the dialog.
If needed, move the Fill Area and Line dialog box to one side to see this.
To fill the left petal with a Radial Fill with gradient density, see Use a Radial Fill in a Petal.