Use the Choose Picture page to select the picture you wish to convert to a QuickCross Design or load as a background for a new cross stitch design.
From Camera or Scanner will not be available if you do not have a WIA compliant scanner or digital camera attached to your computer.
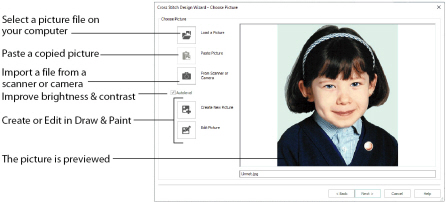
After choosing or scanning a picture, you are returned to the Choose Picture page of the Cross Stitch Design Wizard. The picture is shown in the preview window. Click Next to continue.
Click Load a Picture
to open a picture from clipart, or one you have previously scanned or created in an image editor. After selecting a picture, the preview box will show the selected picture. Click Next to continue.
The following file formats may be loaded: Windows or OS2 Bitmap (.bmp), JPEG-JFIF Compliant (.jpg, .jif, .jpeg), Portable Network Graphics (.png), Tagged Image File Format uncompressed (.tiff, .tif), Windows Meta File (.wmf), Windows Enhanced Meta File (.emf) and Windows Icon (.ico).
mySewnet™ Cross Stitcher is not used for picture editing or enhancement. If you wish to enhance the picture for conversion to a cross stitch design, use a picture editor. For example, you may wish to use mySewnet™ Draw & Paint to adjust and save a picture before loading it in mySewnet™ Cross Stitcher.
Select a Picture File
-
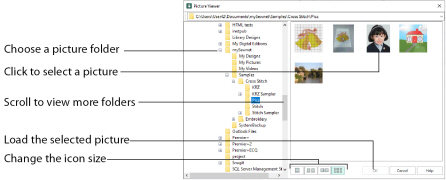
In the Choose Picture page of the Cross Stitch Design Wizard, click Load a Picture

and the Picture Viewer dialog box appears.
-
Double-click to expand the folders until the desired folder is highlighted.
-
Click on a picture to select it.
-
Click OK to open the picture in the Choose Picture page.
-
Click Cancel to exit without selecting a picture.
Paste Picture
Click Paste Picture

to load the picture in the Clipboard Block. The picture is shown in the preview area of the Cross Stitch Design Wizard.
to display the program that is used to acquire pictures from a scanner, a digital camera or another suitable device. Only devices that use Windows Image Acquisition (WIA) can be used to obtain pictures.
WIA (Windows Image Acquisition) is a standard method for transferring pictures from the device’s scanning or downloading program to another program, in this case the mySewnet™ Cross Stitcher module of the mySewnet™ Embroidery Software. If the manufacturer provides the appropriate software components needed for WIA compliance, these should have been installed when the device was installed.
Each scanner or digital camera has its own program that is used to scan or download pictures. Refer to the manual or online help provided with the program for instructions, if required. When the device and its software finish processing the Picture, it will be shown in the Choose Picture page.
Autolevel improves brightness and contrast in most photos, and can be used to bring out the color in underexposed pictures. By default Autolevel is enabled.
Autolevel does not make new adjustments each time a picture is loaded.
Occasionally Autolevel does not improve the appearance of a picture, and may need to be switched off.
Create New Picture and Edit Picture
Create a new picture
or edit an existing picture
in mySewnet™ Draw & Paint.
Back
Return to the Design Options page.
Next
Go to the Rotate and Crop Picture page.