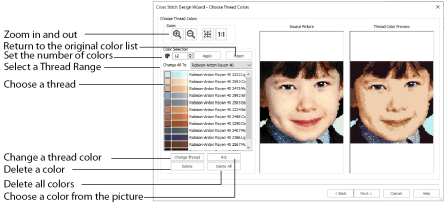
Use the Choose Thread Colors page to match thread colors to colors in the picture for creating a Quick Cross Design.
The picture is shown as blocks that correspond to the number of crosses that are created when the picture is converted to a cross stitch design. Thread colors are mapped to the blocks, according to the best match within the number of colors selected from the thread range.
The Number of Colors

is initially set to the Recommended number of colors. The Cross Stitch Design Wizard determines the optimal number of colors for converting the picture into thread colors. When this number is changed, the list of colors and the preview are updated. The maximum Number of Colors is 256.
A high number gives a more realistic result for photographs if a suitable Thread Range is used, but this may cause a high number of isolated crosses and more movement stitches in the finished embroidery.
Apply
Click Apply to recalculate the threads with the new number of colors.
Return the thread list to the initial (recommended) set of threads.
When Reset is used, any custom thread matches that were made must be reselected.
Click the drop-down arrow to choose a different thread range. When a thread range is chosen, each picture color in the list will be assigned the nearest matching thread color from the chosen thread range.
When a new thread range is chosen, all custom thread matches set by Change Thread will be lost.
The color list shows the colors that have been automatically selected. The colors are picked to give the closest representation of the original picture with the current Number of Colors. Each time the number of colors is changed, this list is updated.
Sometimes, when the Number of Colors is reduced to a low number, colors will be chosen that are averages of two or more prominent colors in the picture. This can give a posterized appearance to the Thread Color Preview. If this effect is not desired, increase the Number of Colors.
The same thread color may be matched to two or more colors in the picture. Each thread color can be individually changed with Change Thread. When thread colors are changed in the list, the Thread Color Preview is updated.
When more than one color in the picture is matched to the same thread color, the number of color changes in the final embroidery is reduced.
Click a color in the list, then click the Change Thread button. The Color Selection dialog box will appear so that a different thread color can be chosen. Alternatively, double-click a color in the list and the Color Selection dialog box will appear.
It is recommended only to use Change Thread after the main thread range has been selected.
Click Pick to add thread colors to the list by clicking the desired colors in the Source Picture.
When Pick is selected, the pointer changes to an eyedropper

over the source picture. Click the picture to pick up the color under the tip of the eyedropper, and the nearest matching thread color from the selected Thread Range will be automatically selected and added to the thread color list. The Thread Color Preview will be updated to show any other areas that can use the selected thread color.
The thread color is picked for the clicked color according to the RGB (red, green, blue) value at the point clicked. If there is already a thread color assigned to that exact RGB value, it will be highlighted in the list instead of adding a thread color to the list.
Delete the picture color currently highlighted in the list. The deleted color is replaced with the nearest remaining picture color in the list. The Thread Color Preview is re-displayed, with the reduced set of thread colors.
Click Delete All to remove all the thread colors from the list if you wish to use Pick to choose colors from the Source Picture.
This shows the original picture, after being rotated and cropped, in full color.
This shows how the thread colors have been chosen to replace colors in the picture. This gives an approximate indication of where thread blocks will be in the final design.
If variegated threads have been selected, only the first color is shown in the preview.
Zoom
Use the Zoom functions to change the view of the picture. The same area of the picture is shown in both previews when the zoom level is changed.
Use Zoom In

to magnify the view. Move the pointer over the picture and the pointer changes to the zoom in pointer

. Then either click a point you want to zoom in towards, or click and drag a rectangle around the area you want to zoom in to and release the mouse button to zoom. When zoomed in, use the scroll bars to move around.
Use Zoom Out

to shrink the view. Move the pointer over the picture and the pointer changes to the zoom out pointer

. Then click a point you want to zoom out from.
Click Zoom To Fit

to fit the picture to the preview area.
Click Real Size

to view the picture at its real size in pixels. This means that one pixel of the picture uses one pixel of the screen.
Back
Return to the Design Size page.
Next
Go to the Design Preview page.