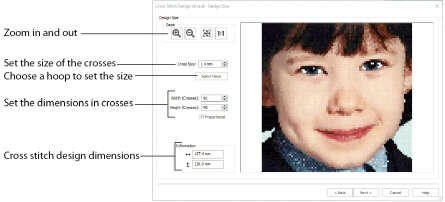
Use the Design Size page to set the picture size, hoop and cross size. Set the cross size, then set the desired hoop size. The preview shows the grid squares that fit in that hoop size. If desired, adjust the number of crosses.
Use Proportional to change the original proportions of the picture.
When starting a new design with no picture, the preview area shows the grid size of the new design.
Each grid square corresponds to one cross in a cross stitch design. When creating a QuickCross Design, it shows the amount of detail that is kept when the picture is converted to a cross stitch design.
When loading a chart or picture of a cross stitch, ensure that the number of grid squares used matches the original.
This is the Cross Size that will be used for the converted design. Set the Cross Size before changing the Height and Width or using Select Hoop.
Set the cross size from 1.0 to 30.0mm in steps of 0.1mm.
Select a hoop to set the size of the cross stitch design. The design area will be a best fit to the selected hoop, using the chosen Cross Size.
Height and Width set the size in crosses that the picture will be when it is converted to a cross stitch design. Adjust the Height and Width in Crosses by typing numbers or clicking the up and down arrows. The maximum size for a design is 400 x 400 crosses.
If this option is selected, when either Height or Width in Crosses is adjusted, the other dimension is altered automatically. This option is on when you start the Cross Stitch Design Wizard.
Information
This shows the size of the design according to the Cross Size, Height and Width. Use this to ensure the design will fit in the desired hoop.
Zoom
Use the Zoom functions to change the view of the picture.
Use Zoom In

to magnify the view. Move the pointer over the picture and the pointer changes to the zoom in pointer

. Then either click a point you want to zoom in towards, or click and drag a rectangle around the area you want to zoom in to and release the mouse button to zoom. When zoomed in, use the scroll bars to move around.
Use Zoom Out

to shrink the view. Move the pointer over the picture and the pointer changes to the zoom out pointer

. Then click a point you want to zoom out from.
Click Zoom To Fit

to fit the picture to the preview area.
Click Real Size

to view the picture at its real size in pixels. This means that one pixel of the picture uses one pixel of the screen.
Back
For a QuickCross design, return to the Rotate and Crop Picture page. When starting a design with no picture, return to the Design Options page.
Next
For a QuickCross design, go to the Choose Thread Colors page.
Finish
When loading a picture, close the Cross Stitch Design Wizard and load the chosen picture on the main screen. When starting a design with no picture, close the Cross Stitch Design Wizard and open the main screen.