If required, rotate the picture to any angle from 0 to 359 degrees, in steps of 0.1 degree. For example, this is useful for straightening scanned pictures. Use Crop to select the section of the picture that is to be used, and Perspective Correction to adjust for perspective or skew.
Rotate
Rotate the picture to any angle from 0 to 359 degrees, in steps of 0.1 degree.
When the picture is rotated between the 90 degree steps, the picture is made larger and the detected background color is added. If there is no distinctive background color, white is used.
The size of the crop box may vary if the picture is rotated.
Crop
Use the Crop function to select the section of the picture that is to be used to create the design. When using Crop, the handles on the crop area are blue.
-
When creating a QuickCross Design, the crop area selects the part of the picture to be converted to a cross stitch design.
-
When loading a picture for a new design, the crop area selects the part of the picture to be used as the background for the new design.
The picture is automatically cropped to remove excess background color. If required, adjust the crop lines to select the desired part of the picture.
Sometimes, the automatic crop area may not appear to remove as much background color as possible. This can happen when the background color appears to be a plain color, such as white, but actually has minor variations that are not immediately visible. For example, this often happens with the JPEG-JFIF Compliant (*.jpg, .jif, .jpeg) picture format.
Click and drag anywhere inside the crop box to move the crop box. Click and drag outside the crop box to draw a new crop box.
Click the Select All button to select the whole picture. Alternatively, double-click the picture to select the whole picture.
Automatic
Click Automatic to set the crop lines back to the default position for the current picture.
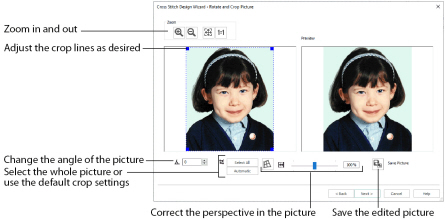
Rotate and Crop a Picture
-
Drag the rotational slider to rotate the picture to the desired angle.
-
Drag the blue handles on the crop area boundary line to select the desired part of the picture.
-
Drag anywhere inside the crop box to move the crop box.
-
If desired, click Automatic to select the crop lines automatically, or click Select All to use the whole of the picture.
Alternatively, enter a number in the rotation angle number box, or use the arrows to increase or decrease the angle of rotation.
Hold the Ctrl key while dragging to resize the rectangle proportionally. Hold the Shift key while dragging to resize the rectangle without moving its center.
If you need to expand a crop box again, make sure it is not touching the edge of the frame, as this will stop it expanding.
Perspective Correction
To remove the effects of perspective in a picture, or to correct skew, select Perspective Correction ![]() . When using Perspective Correction, the crop handles are red.
. When using Perspective Correction, the crop handles are red.

Move the red handles so that the crop lines frame the picture. Use the Zoom tools to view the outline of the picture more clearly.
When taking a picture, hold the phone or camera so as to avoid reflected light and shadow on your subject. To get the best possible results with a picture, use a scanner.
Stretch Picture
Drag the Stretch Picture

slider to make the picture in the Preview wider or narrower.
Save Picture
Use Save Picture
to save your edited picture.
Change the Perspective in a Picture
-
In the Rotate and Crop Picture page, ensure that Perspective Correction
 is selected.
 -
Move the pointer over one of the red crop handles in the corner.
-
Move the red corner handles so that the crop lines frame the picture. The angle of the adjoining crop lines changes.
-
Drag the Stretch Picture
 slider to correct the proportions of the picture.
 -
If desired, Save

the edited picture.
The pointer changes to a diagonal double-headed arrow ![]() .
.
A version of the picture with the perspective corrected appears in the Preview area.
When taking a photo for a background or QuickCross design, hold the phone or camera so as to avoid reflected light and shadow on your subject. To get the best possible results with a picture, use a scanner.
Zoom
Use the Zoom functions to change the view of the picture.
Use Zoom In
to magnify the view. Move the pointer over the picture and the pointer changes to the zoom in pointer

. Then either click a point you want to zoom in towards, or click and drag a rectangle around the area you want to zoom in to and release the mouse button to zoom. When zoomed in, use the scroll bars to move around.
Use Zoom Out
to shrink the view. Move the pointer over the picture and the pointer changes to the zoom out pointer

. Then click a point you want to zoom out from.
Click Zoom To Fit
to fit the picture to the preview area.
Click Real Size
to view the picture at its real size in pixels. This means that one pixel of the picture uses one pixel of the screen.
Back
Return to the Choose Picture page.
Next
Go to the Design Size page.