Use the QuickStitch™ functions QuickStitch™ ![]() , QuickStitch™ + AutoHole
, QuickStitch™ + AutoHole ![]() and QuickStitch™ Hole
and QuickStitch™ Hole ![]() to automatically fill clicked on color areas of the picture with bordered fill areas, lines, or holes, depending on the function. QuickStitch™ can create fill areas with or without automatic holes.
to automatically fill clicked on color areas of the picture with bordered fill areas, lines, or holes, depending on the function. QuickStitch™ can create fill areas with or without automatic holes.
Using QuickStitch™ Functions
-
Set the stitch options for your chosen stitch type. See Select a Stitch Type.
-
Select the Quick Create
 toolbar.
 -
Click the QuickStitch™ button
 or the QuickStitch™ + AutoHole
  button.
 -
Click in the color area you wish to fill with stitches.
-
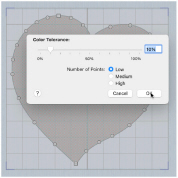
If Color Tolerance is enabled then the Color Tolerance dialog appears. Adjust the Color Tolerance as required. The area selected by the Color Tolerance value is previewed. If you selected a function with AutoHole, any holes in the area are shown.
-
Click OK to confirm.
Stitches representing the border and fill pattern set in the Fill Area of the Quick Create toolbar appear in the area. For QuickStitch™ + AutoHole, any holes detected are cut out. -
Repeat to place as many fill areas as desired.
-
Control–click and choose "Finish..." to deselect, or simply select another Create tool.
-
To edit the fill or the border, click the fill area to select it, then Control–click it, choose Properties, and change the properties in the Area Properties dialog. Click OK to save the changes.
-
To edit several fills, select a group with Command–click or Shift–click, then Control–click and choose Properties to open the Area Properties dialog. To edit all visible fills of that type, Control–click and choose Global Properties.
Create a QuickStitch™ Heart
-
Select the Quick Create
 toolbar.
 -
In the Fill pop-up menu in the Quick Create toolbar choose Pattern Fill. See Select a Stitch Type.
-
Ensure that Line and Appliqué are both deselected.
-
Click Load Background
 in the main toolbar and browse to /mySewnet/Samples/Digitizing/Pics.
 -
Select 1CCe003.png (a heart) and click Open. The heart is displayed as your background picture.
-
In the Quick Create toolbar, click the QuickStitch™
 button.
-
Click on the red part of the heart.
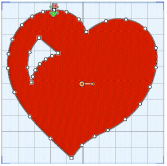
The Color Tolerance dialog appears, and the heart is filled with a checkered pattern. -
All of the heart is selected, so click OK to confirm.
An embroidered heart using pattern fill with no border appears in the work area.
Note: The white highlight on the heart is covered by the stitching. -
In the toolbar, click 2D View Mode
 . You can now see the background picture through the stitching.
 -
In the Quick Create toolbar, click the QuickStitch™ Hole
 button.
 -
Click the white highlight in the heart to create a hole, then click OK in the Color Tolerance dialog. The white highlight now forms a hole in the stitch area.
-
Control–click and choose Finish QuickStitch Hole.
-
Choose Edit > Undo twice to remove the fill area and hole.

-
In the Quick Create toolbar, click the QuickStitch™ + AutoHole
 button.
 -
Click on the red part of the heart, then click OK in the Color Tolerance dialog. The fill area and hole are created automatically.
-
Control–click and choose Finish QuickStitch + AutoHole.
-
Control–click on the embroidered heart and choose Properties. The Area Properties dialog opens at the Fill tab.
-
Click OK to save any changes that you make, then click Design Player to see the design as it would be stitched.
Note: The QuickStitch™, Freehand and Point Create tools are active until another tool is chosen, or they are deselected.
You can add a border line to enclose this fill area, or change the fill type.