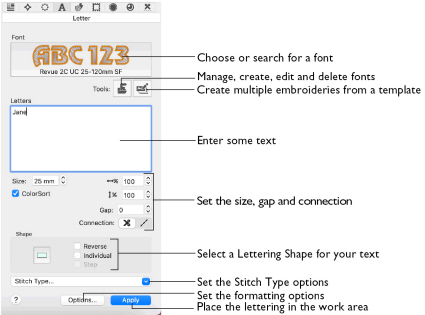
This chapter describes how you can use the Lettering window to personalize your embroidery project with the fonts available in mySewnet™ Embroidery.
In the Letter window you can create lettering to personalize your embroidery project using single or multicolor fonts (lettering styles) and fonts of special characters. Alternatively, use the ExpressMonogram Assistant. Use Font Manager  to search for fonts by name or size, and to create, rename, duplicate and delete user generated fonts. Use QuickFont
  to create new fonts for mySewnet™ Embroidery from most TrueType® or OpenType® fonts on your computer. Import embroidered letters to create a font with Import Font From Embroideries
 ![]() . Use Name Changer
. Use Name Changer  to create a series of embroideries with varied lettering automatically from a template.
Choose the font, line format, size, stitch type and thread color. Place lettering around your embroidery, or anywhere on the work area. Lettering can be resized with constant stitch density, and the stitch properties adjusted, until it is fixed as embroidery.
To Open the Letter Window
-
Click Control Panel, then click Letter
 .
.
|
To learn how to |
Go to |
|---|---|
|
Create Lettering |
|
|
Set properties for new lettering |
|
|
Use the font viewer |
|
|
Use Block lettering to sculpt text |
|
|
Change an existing block of lettering |
|
|
Check the spelling in your lettering |
|
|
Add special characters, e.g. accents |
|
|
Enter letters in an alternative alphabet, e.g. Greek |
|
|
Create and adjust circles of lettering |
|
|
Use straight and wavy lettering lines |
|
|
Place a full circle of lettering around an embroidery |
See Full Circle Lettering: I Love the Sunshine and Let’s Go Fishing. |
|
Create a monogram from individual letters |
|
|
Change lettering colors |
|
|
Create a monogram with a border automatically |
|
|
Create your own embroidered font |
|
|
Import embroideries to form a font |
|
|
Create, rename and delete personal fonts |
|
|
Create a series of embroideries with varied lettering from a template |
Create Lettering
-
Open the Letter window
 .
. -
Click the displayed font, and scroll up or down the Font Viewer to select a font.
For more information on fonts, see About Fonts. -
Set the Size in millimeters as desired, from 3mm to 200mm.
This sets the height of the 'A' character in the font. Other characters and symbols are sized accordingly. See Font Size.
-
Set the proportions, the gap between the letters, and the connection type (trim or running stitch).
-
Click in the Letters text box and the pointer becomes an I-beam.
If needed, drag to highlight any existing text and overwrite it. -
Enter your desired text, pressing Option–Return to create more than one line of text.
Control–click to view alternatives for words underlined in red by the spelling checker. -
Choose a Lettering Shape. See Using Block Lettering.
-
Choose a Stitch Type from the pop-up menu, and edit its properties in the dialog. See Stitch Type.
-
Click Options to change the alignment and line spacing. See Letter Options.
-
Click Apply.
-
Control–click the lettering and choose Properties to adjust the lettering properties. See Letter Properties.
-
Drag the handles on the lettering to resize the lettering, or adjust the proportions for the lettering shape. Hold the Shift key for most lettering shapes to keep the proportions as you resize. Hold the Option key for most lettering shapes to resize from the center. See Lettering Shapes.
Note: Some Lettering Shapes can only use one line of text. See Lettering Shapes.
You can reverse the order of letters, position (or kern) letters individually, or use Step to rotate the letters at a different angle from the line. See Fit Lettering to a Line.
The lettering appears in the work area, leaving any existing lettering unchanged.
Note: Alternatively, use the ExpressMonogram Assistant to create a one, two or three letter monogram, and add a border automatically.
Searching for Lettering
-
Open the Letter window
 .
.
-
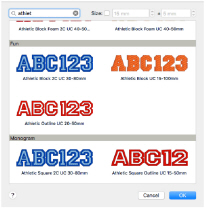
Click the displayed font to open the font menu.
-
To search for a font by name, at the top of the font dialog in the Search box, enter the name of the font or font category that you want to find.
Note: Part of the name will narrow the list of fonts displayed, so a search for ’Athletic’ will display fonts from the Applique, Foam, Fun and Monogram Categories. -
Click clear
 to remove the text from the search box.
 -
To search for a font by size, select (check) the Size checkbox to enable searching by size.
-
Enter the desired Size for the font in the Size number box.
-
To choose a size range, adjust the number in the Range
 box. The list of displayed fonts will change.
For example, set Size to 5mm, and the Range to 5mm, to select a small font for a quilt label. You could also set an exact size (Range 0mm) to find an imported embroidery font.
Font Viewer
Use the Font Viewer to browse fonts and select a font for lettering.
To Open the Font Viewer
-
Open the Letter window
 .
.
-
Click the font sample.
-
Scroll up or down the list of font Categories and fonts to choose a font.
Alternatively, enter a part of a font name in the Search box to search for a font. -
Click on a font to highlight it.
-
Click OK to select the font.