Use lettering to enhance an embroidery, or create a monogram.
Full Circle Lettering: I Love the Sunshine
-
If required, choose File > New.
-
Click Hoop
 and in the Universal Hoop Groups select 260mm x 200mm - Universal Large Hoop 3.
 -
Set Orientation to Rotated and click OK.
-
Choose mySewnet™ Embroidery > Preferences or ⌘, and ensure that the Grid size is set to 10mm.
-
Choose File > Insert. See Insert.
-
Browse to mySewnet/Samples/Embroidery/Stitch.
-
Scroll down to "Sunshine Applique Large.vp4" and select it.
-
Click Open to load the embroidery into the work area.
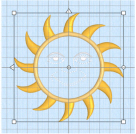
The embroidery has white or blue handles on its selection box, depending on the Resize mode.
mode. -
In the Letter window
 of the Control Panel
  , click the displayed font, and scroll down the font viewer until you see the Traditional font category.
 -
Select the font Georgia 20-40mm and click OK.
-
Deselect (uncheck) ColorSort.
Note: Each letter will have its own color block. -
Enter the words "I love the" in the Letters text box.
-
Press Option–Return to start a new line.
-
Enter the word "Sunshine".
-
In the Lettering Shape pop-up menu, click Full Circle.
-
Click Apply. The lettering appears in the center of the work area surrounding the embroidery. Its handles are green.
-
Drag the square green handle at the top of the circle of lettering downwards half a grid square.
The circle becomes smaller, but the size of the letters is unaffected.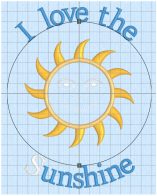
-
Open the Design window
 of the Control Panel
  . Each letter has a separate color block in the Color Select area.
 -
Move the arrow pointer over the 9th color block and pause for a moment. The letter ’S’ is highlighted, and a popup description of the thread is displayed.
-
Click the color block. The Color Selection dialog appears.
-
Select ’All Thread Ranges’.
-
Choose Solar Active Ultra Violet 40 from the pop-up menu.
-
Select thread color 0002 (White/Orange). Click OK to change the color.
The S in Sunshine is now white. -
Change each of the other color blocks in the word ’Sunshine’ to Solar Active Ultra Violet 40, thread color 0002 (White/Orange).
-
Control–click the lettering, and choose Fix as Stitches in the Context menu.
The lettering now has white or blue handles (depending on the resize setting). You can no longer adjust other stitch properties.
 -
Click Design > ColorSort. There are now only two thread colors.
-
Click the blue (number 1) in the Color Select and in the Color Selection dialog ensure that All Thread Ranges is selected, then choose Solar Active Ultra Violet 40 from the pop-up menu.
-
Select thread color 0001 (White/Yellow) and click OK to change the color.
-
In the toolbar, click Select All Visible
 , then click Design > Center in Hoop. Both the sun embroidery and the lettering are centered in the hoop.
 -
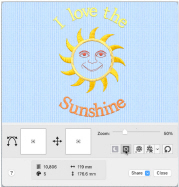
Click Life View
 .
.
-
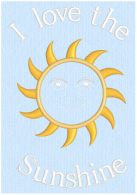
Click Solar Reactive
 . The sun’s face and the lettering change from white to yellow and orange.
Note: Solar Reactive simulates the sun shining on the photochromic threads in the design. The threads change shade to show the colors they will become in sunlight. -
Click File > Save and save the embroidery as ’I love the Sunshine’.
This will save the sun and lettering separately within this multipart embroidery, making further adjustment easier. -
Click File > Export to export the sunshine embroidery.
-
In the Export dialog, ensure that .vp4 is selected and click Continue.
-
In the Saving as dialog, browse to mySewnet/My Designs, and save the embroidery as ’I love the Sunshine’ (a .vp4 file extension and the word Exported are added automatically).
Note: When exported, the embroidery is automatically combined and ColorSorted if those options are selected.
Note: The green handles indicate that the lettering has not yet been fixed as an embroidery.
Note: If the lettering does not surround the embroidery, the embroidery was not selected. Click Actions  > Undo or ⌘Z to undo the lettering, click to select the embroidery, then click Apply again.
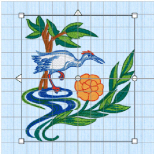
Let’s Go Fishing
Surround an embroidery with lettering.
-
If required, choose File > New.
-
Choose mySewnet™ Embroidery > Preferences or ⌘, and ensure that the Grid size is set to 5mm.
-
Choose File > Insert. See Insert.
-
Browse to mySewnet/Samples/Embroidery/Stitch.
-
Scroll down to "Crane in Pond.vp4".
-
Click to load the embroidery into the work area.
The embroidery has white or blue handles on its selection box, depending on the Resize
mode.
-
In the Lettering window

, choose the Traditional font category from the pop-up menu.
-
Click the displayed font, and in the font viewer scroll to the Traditional category and choose Arial 14-20mm.
-
Ensure that ColorSort is selected (checked).
-
Enter the words "Let’s Go" in the Letters text box.
-
Press Option–Return to start a new line.
-
Enter the word "Fishing".
-
In the Lettering Shape area, click Full Circle.
-
Click Apply. The lettering appears in the center of the work area surrounding the embroidery. Its handles are green.
-
A larger size may look better. Control–click the lettering and choose Delete from the menu to delete the lettering.
-
In the Lettering window, click the up arrow to change Size to 16mm.
-
Select the embroidery and click Apply.
-
Drag the square green handle at the top of the circle of lettering downwards.
The circle becomes smaller, but the size of the letters is unaffected.
-
Undo your change. The circle returns to its original size.
As the main subject of the embroidery is on the left side, the lettering does not appear to be centered. -
Hold down the Shift key and drag the square green handle at the top of the circle approximately one grid square to the left. The "Let’s Go" lettering moves around the left edge of the circle so that the "L" in "Let’s" is nearer the left side of the tree in the crane embroidery. The design now looks more balanced.
Use ⌘→ or ⌘←, if needed, to change between selecting the embroidery and the lettering, or use the FilmStrip. -
Press ⌘→ or ⌘← to select the lettering, if it is not selected.
-
In the Control Panel, click Design

. The Design window appears.
-
Note that there is only one color for the letters (the ColorSort option ensures that the minimum number of colors are used).
-
In the toolbar, click Select All Visible

and then click Group

. The crane embroidery and the lettering are grouped as a multipart embroidery. See Group.
The green handles indicate that the lettering has not yet been fixed as an embroidery.
If the lettering does not surround the embroidery, the embroidery was not selected. Click to select it, then click Apply again.
The grouped embroidery now has orange handles. Use Reveal Groups

to adjust the lettering separately.
Note: When exported, an embroidery is automatically combined and ColorSorted.
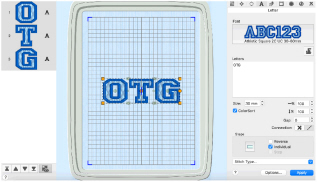
Individual Letter Monogram
-
In the Lettering window, click the displayed font, and scroll down until you see the Monogram font category.
-
Choose Athletic Square 2C UC 30-80mm and click OK.
-
Enter the letters "OTG" in the Letters text box.
-
In the Lettering Shape pop-up menu, click Horizontal Line.
-
Select the checkbox labeled "Individual".
-
In the Stitch Type pop-up menu and choose Pattern Fill.
-
In the Pattern Fill properties dialog, click the Pattern button.
-
In the Pattern viewer, choose Diamonds from the pattern pop-up menu.
-
Click the pattern in row 1, column 1 (number 97).
-
Click OK to return to the Letter window.
-
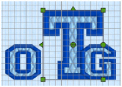
Click Apply. Each letter forms a separate block, with its own handles.
-
Drag the lettering towards the top of the screen. The pointer changes to the Move
 pointer, and the lettering moves as a block.
 -
Click outside the lettering. None of the letters are now selected.
-
Click the "T". It alone is surrounded by a selection box.
-
Drag the top right green handle up and to the right, until the T is approximately twice the height, and one and two-thirds the width, of the other two letters.
-
Drag the T to the left so that it is midway between the two letters.
-
Alternatively, use the arrow keys to nudge the T into position.
This forms a simple three-letter monogram.
Note: To create monograms with different fonts for the large and small letters, use the ExpressMonogram Assistant. -
In the Control Panel, click Design. The Design window appears.
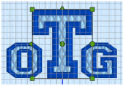
As only the T is selected, only the two threads for the T can be seen in Color Select. -
Click Select All Visible

in the toolbar. All three letters are surrounded by selection boxes again. See Select All Visible.
-
Choose Design > Combine Selected. See Combine Selected.
-
Choose Design > ColorSort. There are now only two thread colors. See ColorSort.
Note: These fonts have most characters of equal width, designed for monograms. They are all upper case only.
This is a two–color monogram font.
Since this is an uppercase font, it is not required to enter uppercase letters.
The stitch type can be changed in the Letter window before the lettering is created. To change the stitch type for lettering placed in the work area, Control–click each letter separately and select the stitch type from the context menu.
The three letters are combined and fixed as a single embroidery. In Color Select separate threads can be seen for each of the three letters.
You could also change the thread colors for single letters in the monogram. See Change the Colors in Lettering.