Use Font Manager to arrange, rename, duplicate and delete user fonts.
Note: Font Manager only displays user created fonts.
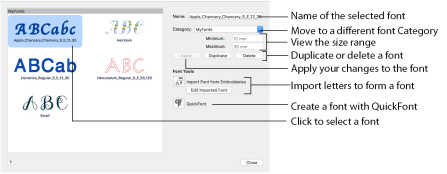
Font Preview
The selected font is previewed, showing its type, name, category and size range.
Name
Use the Name text box to change the name of the selected user font.
To rename a font
-
Edit the font name in the text box, then click Apply to save your changes.
Note: Remember to preserve the size range information when changing the name. Changing the name does not change the size range.
Category
Select a different Category for the font, or enter the name for a new font Category.
Change the font Category
-
Select a Category from the pop-up menu, and click Apply to confirm the change. The font moves to its new Category.
Note: If the selected Category already contains a font with the same name, an error message is displayed: "A font already exists in this category with this name." Rename the font, or select another font.
Size
View the Minimum and Maximum recommended size for the font.
Note: This is the size range used by Font Search.
Duplicate
Use Duplicate to create a copy of the selected user font.
The copy is placed in the same Category as the original font, using the same name suffixed with "Copy of ".
Make a Copy of a Personal Font
-
Open the Letter window
 .
. -
Click to launch Font Manager
 .
. -
Click the font you want to copy in Font Manager.
-
Click the Duplicate button. The font name changes to the original name with "Copy of "in front.
-
In Name, change the text to give your copied font a new name.
-
Click Apply to save the copied font under the new name.
-
If desired, use the Category pop-up menu to place the font in a different Category, then click Apply again to confirm this change.
Your original font and its copy are now in the font category, with your new font selected.
Note: Take care not to remove the part of the name indicating the font size.
Note: Alternatively, enter the name for a new font Category, then move the font.
Delete
Use Delete to remove the selected user font from your computer. You cannot delete system fonts using Delete.
Note: If you delete a font that you used in an embroidery, when you open the embroidery again the lettering will have been fixed as an embroidery. You will no longer be able to edit the lettering.
Delete a Font
Note: Make a backup of your fonts before using Delete, as you cannot Undo font removal.
-
Open the Letter window
 .
. -
Click to launch Font Manager
 .
. -
Click to select the font you want to delete in Font Manager.
-
Click the Delete button. A message is displayed "This will remove your font and cannot be undone. Do you want to continue?".
-
Click Yes to remove the font from your computer.
Note: You can only Delete a User generated (personal) font.
Note: If you deleted the wrong font, copy it back in from your backup.
Font Tools
Import Font from Embroideries
Use Import Font from Embroideries  to import individual embroidered letters to create a font in the Import Font from Embroideries dialog. Use the Edit Imported Font button to make changes to an imported font. See Import Font from Embroideries.
QuickFont
Use QuickFont  to create new fonts for mySewnet™ Embroidery automatically from most TrueType® or OpenType® fonts on your computer in mySewnet™ QuickFont. See QuickFont.