Motif line is used for decorative stitches and details. Use a motif line to frame an embroidery or monogram.
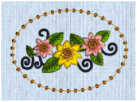
The example here enhances a flower embroidery with a Candlewicking Shield from the Frames category.
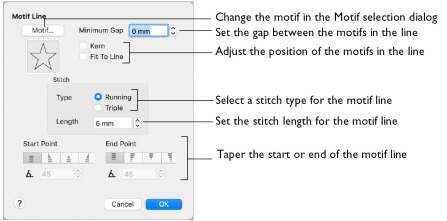
In the Motif Line dialog you can select motifs, and set the motif spacing, stitch type and length when creating a motif line.
The Motif Line Properties dialog appears when you select a motif line.
Motif
Select a motif to use for the motif line.
-
Click the Motif button to choose a motif. See Motif Selection.
Minimum Gap
This is the minimum amount of extra stitching that is placed between the motifs along the line. Minimum Gap is in addition to any spacing that is part of the selected motif.
Fit To Line
Select how the motifs follow the curves of the line.
|
|
|
|
When Fit To Line is off, the ends of each motif are placed on the line. |
When Fit To Line is on, each whole motif is adjusted to fit along the line. |
Kern
Kern automatically increases the space between adjacent motifs, so that the motifs fit along the line without overlapping.
Stitch
Select between Running and Triple stitch for stitching out the motif line.
Set the maximum stitch Length from 1 to 20mm in steps of 0.1mm.
Note: Length is initially set to the recommended value for each motif.
Tapered Ends
The Start Point and End Point settings can be used to taper the ends of your satin lines.
Note: Use these options to create mitered or pointed ends for your satin lines.
Start Point
Use these options to change the type of line beginning for the satin line. Select a taper type, then set the Taper Angle

.


End Point
Use these options to change the type of line end for the satin line. Select a taper type, then set the Taper Angle

.


Create a Motif Line Frame
-
Set the hoop size to 100mm x 100mm - Universal Square Hoop 1. See Hoop Selection.
-
Choose File > Insert. See Insert.
-
Browse to mySewnet/Samples/Embroidery/Stitch.
-
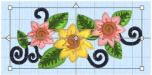
Scroll down to "Floral Motif.vp4".
-
Click to load the embroidery into the work area.
The embroidery has blue or white handles on its selection box, depending on the Resize Mode. -
Open the Frame window

, and in Type select Frame

.
-
Scroll down to the Frame set "Candlewick Shields 1".
-
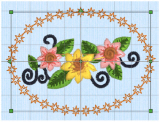
Click the frame in row 3, column 1.
This oval frame is designed to surround a landscape format embroidery. -
In Surround, set Margin to 3.0 mm.
-
Deselect Group.
Note: The stitch type of a frame cannot be adjusted immediately after creation if Group is selected. -
Click Apply. The frame is placed around the embroidery. It has green handles to indicate that it can be adjusted.i

-
Control–click the frame and choose Motif Line to change the line properties.
-
Set the Minimum Gap to 2mm and click OK. There are now gaps between the motifs in the lines.
-
Control–click the frame and choose Motif Line to open the Motif Line properties dialog again.
-
Try out the effect of using Kern and Fit To Line.
-
Open the Motif Line dialog and set the Minimum Gap back to 0mm.
-
Click the Motif button.
-
In the Motif selection dialog, choose General Motifs 1 from the Category pop-up menu.
-
Select motif number 8.
-
Click OK twice to close the Motif selection and Motif Line dialogs. The frame shows the new motif, but it is large, and overlaps the flower design.
-
Open the Motif Line and Motif selection dialogs again.
-
Ensure that Proportional is selected (the lock is closed

).
-
Change the Height to 6mm (the Width changes at the same time).
-
Click OK twice to close the Motif selection and Motif Line dialogs. The motifs in the frame no longer touch the edge of the embroidery.
Note: Once you are happy with the appearance of the embroidery and frame, select both and click Group to keep them together.