Crosshatch fills are used in quilting, and to create free-standing lace.
|
|
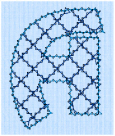
Crosshatch Fill, using Diamond style and an Angle of 45 degrees. Double Zigzag is the stitch used in the fill and for the border. (Revue Patchwork UC 50-120mm XH, Display category) |
The Crosshatch Fill properties dialog enables you to set the gap, style, line angle, stitch type and stitch length for the crosshatched lines of stitching in the fill. The preview changes according to the options chosen.
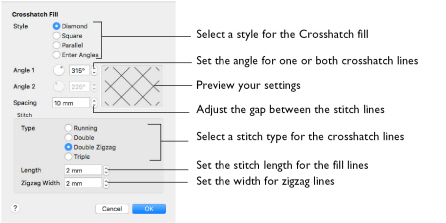
Style
Select Diamond, Square, Parallel or Enter Angles.
-
Diamond creates a symmetrical crosshatch pattern (balanced horizontally).
-
Square creates a crosshatch pattern of lines set at 90 degrees.
-
Parallel creates a pattern of parallel lines, with an initial angle of 0 degrees.
-
Enter Angles can be used to create an asymmetrical crosshatch pattern. Enter an angle for each of the two line directions in the crosshatch.
Note: The Pattern Fills 257 to 264 provide banded fill patterns that combine with crosshatch parallel fills to create a weave effect. Set Spacing for the parallel fill at 2.4mm to combine with Pattern 257, 2.8mm to combine with Pattern 258, and so on.
Angle 1
Use Angle 1 to set the line angle for Diamond, Parallel and Enter Angles fill. Angle 1 is initially set to the same angle as the Diamond style previously used.
Angle 2
Use Angle 2 to set the line angle for the second line in Enter Angles crosshatch fill. Angle 2 is initially set to Angle 1 plus 90 degrees.
Spacing
Set the Gap for the desired distance between the lines of stitching. You can set Gap from 5mm to 20mm in steps of 1mm. It is initially set to 10mm.
Stitch Type
Select a stitch type for the crosshatch fill. Choose from:
Note: Double Zigzag is a special stitch type, recommended for lace. A running stitch line is retraced in a zigzag pattern to create a mesh. After embroidering on water soluble stabilizer, the mesh of stitches provides strength when the stabilizer is washed away.
Stitch Length
Set the Stitch Length for the line type used in the crosshatch fill. You can set Stitch Length from 1 to 12mm in steps of 0.1mm. The initial setting is 2.0mm.
Zigzag Width
Set the Zigzag width for Double Zigzag stitch from 0.2 to 6mm in steps of 0.1mm. The initial setting is 0.6mm.
Change a Crosshatch Fill
-
Set the hoop size to 240mm x 150mm - Universal Large Hoop 2, and set the Orientation to Rotated. See Hoop Selection.
-
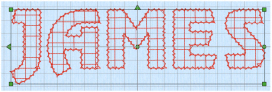
In the work area, create the name "James" using the font Display, Revue Patchwork UC 50-120mm XH and set the Size to 50mm. See Create Lettering.
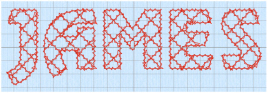
This crosshatch fill font uses Double Zigzag stitching in a Diamond style with an angle of 225 degrees, and a spacing of 10mm. -
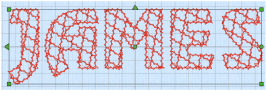
Control–click the lettering and choose Crosshatch Fill to change the fill properties.
-
Set Spacing to 8mm. The preview on the right changes.
-
Set Angle 1 to 30 degrees. The preview reflects your changes.
-
Click OK to view your changes in the work area.
-
Control–click the lettering again and choose Crosshatch Fill to open the properties dialog.
-
In Style, select Enter Angles.
Angle 2 is now available. -
Set Angle 2 to 100 degrees.
-
Click OK to view your changes in the work area, then open the Crosshatch Fill dialog again.
-
In Style, select Parallel.
-
Change Angle 1 to 70 degrees.
-
Click OK to view your changes in the work area, then open the Crosshatch Fill dialog again.
-
In Style, select Square.
-
Click OK to view your changes in the work area, then open the Crosshatch Fill dialog again.
-
Set Zigzag width to 4mm. This changes the stitch lines in the fill.
-
Click OK to view your changes in the work area. The stitch lines are much wider.
-
Open the Crosshatch Fill dialog again.
-
Change Stitch Type to Running (running stitch).
Note that Zigzag Width is no longer available. -
Click OK to view your changes in the work area. The square crosshatch now consists of fine stitch lines.
Note that Angle 2 is dimmed.
Angle 2 is no longer available, and its angle is now identical to Angle 1.
Neither Angle 1 nor Angle 2 is available, and their values are 0 degrees and 90 degrees.