Motif fill areas contain repeated small stitches placed using a Universal or machine motif pattern. Motifs are used at any angle, at varying sizes, and alternate lines can use different motifs. Typically, there are spaces between the motifs in a pattern.
|
|
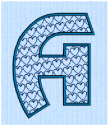
Motif fill using a heart pattern, number 6, in the General Motifs 1 category, at an Angle of 350 degrees. A satin line is used for the border. (Revue 2C UC 25-120mm MF, Display category) |
In the Motif Fill dialog you can select motifs, and set the motif angle, spacing, offset, stitch type and length when creating a motif fill area. Use Motif 1 to select the first motif and its size, and Motif 2 for a second optional motif.
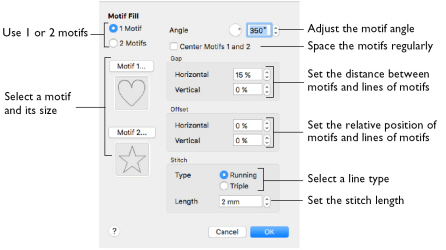
Motifs
Set the number of motifs in the fill to 1 or 2, and select the motif(s) and their size. A second motif is placed on alternating lines with the first motif.
To select motifs for a fill
-
Decide whether to use 1 or 2 motifs, then click the Motif 1 or Motif 2 button to open the Motif Selection dialog. See Motif Selection.
Angle
Change the angle of the motif fill pattern from 0 to 359 degrees.
Center Motifs 1 and 2
When selected, extra stitches are added to either side of the narrower of the two motifs, so it is the same width as the wider motif. The motifs then can be centered, and any horizontal offset between them is constant.
Gap
Use Horizontal gap to add or remove space between motifs along a line, and Vertical gap to add or remove space between lines of motifs. Horizontal and Vertical gap can be set from -50% to +100%.
Offset
Use Horizontal offset to move motifs along a line, relative to their position in the previous line. Use Vertical offset to adjust the position of a line of motifs, relative to the previous line of motifs. Horizontal and Vertical offset can be set from -50% to 50%.
Stitch
Select between Running and Triple stitch for stitching out the motif line.
Set the maximum stitch Length from 1 to 12mm in steps of 0.1mm.
Change a Motif Fill
-
Set the hoop size to 240mm x 150mm - Universal Large Hoop 2, Rotated. See Hoop Selection.
-
In the work area, use a Horizontal line type to create the name "Jane" using the font Display, Inform UC 25-120mm MF and set the Size to 50mm. See Create Lettering.
-
Control–click the lettering and choose Motif Fill to change the fill properties.
-
Click the Motif 1 button to change the motif in the Motif selection dialog. See Selecting a Motif.
-
Leave Group as Universal, then choose the General Motifs 1 category from the pop-up menu.
-
Select motif 7, a circle.
-
Check that Proportional
 (lock closed) is on, and set Width and Height to 5mm. Then click OK.
 -
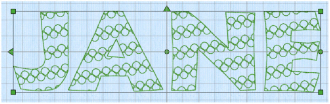
In Motif Fill click OK to apply your changes. The motifs are closely packed together.
-
Control–click the lettering and open the Motif Fill dialog again.
-
Set Horizontal Gap to 25% and click OK. Separate circles are now linked by stitch lines.
-
Open the Motif Fill dialog again and set Vertical Gap to 25%. Then click OK. There is now a greater gap between the lines of motifs.
-
Ensure the Horizontal Offset is set to 50% and set Vertical Offset to 50%. Click OK. The motif lines now form pairs with no gap, and a large gap between each pair of lines.
-
In the Motif Fill dialog, select 2 Motifs.
-
Click the Motif 2 button. The motif is set to the star, number 5 in the General Motifs 1 category, with a size of 8mm.
-
Click OK twice to view the new settings unchanged.
-
Open the Motif Fill dialog and select Center Motifs 1 and 2. Then click OK.
This motif fill font uses a single Hand Stitches 1 motif (number 2) at an angle of 350 degrees, with no gap and a 50% horizontal offset.
When two motifs are used, they are placed on alternate lines.
As the star is larger than the circle, the motifs are irregularly placed.
The gap between the circle motifs has been increased so that the two motifs are now regularly spaced.
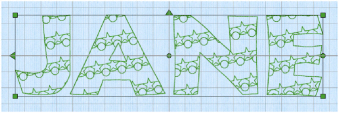
Center Motifs 1 and 2 adds space at either side of the smaller motif, to make the two the same size.