Spiral fill areas use a spiral pattern from an origin point. You can use constant or gradient density.
|
|
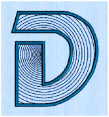
Spiral Fill using Gradient Density with a Satin Line border. (Revue 2C UC 25-120 SF, Display category) |
Change the density on a spiral fill area over a range, or use multiple density changes from the origin to the edge of the fill. There are two density options: Constant and Gradient.
Note: Embroidery on thicker fabrics usually looks better with more stitch coverage, or a low density setting. Choose a low value such as 2 or 3 for heavy knit fabrics, a higher value such as 5 or 6 for a light material like linen or satin.
Density
Constant density creates a uniform fill at the chosen density. Gradient density creates a fill with varying density.
-
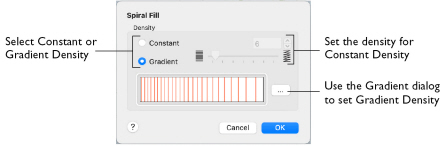
Select between Constant and Gradient density.
Setting Constant Density
The lower the number, the closer together the stitches and the more stitches are produced. You can set Density from 2 to 40.
-
Select Constant, then use the slider or the number box to set the Density.
Setting Gradient Density
-
Select Gradient, then click the ellipsis button (3 dots) to open the Gradient dialog.
Gradient
Use Gradient Density to change the density across the Spiral Fill. Set a value for the start and end density markers for the fill, and the density gradually changes between the two values. The start value is used at the origin of the spiral fill, and the end value is used at the edge.
Add multiple markers for a more complex pattern. The higher the value, the less dense the fill.
Use the marker above the gradient bar to change the gradient across the fill.
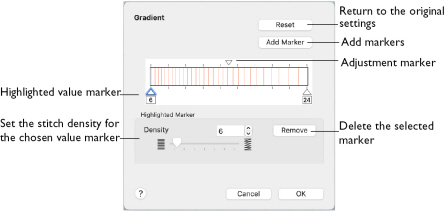
The markers can each take a value of 2 to 40, which means you can reverse the gradient simply by swapping the start and end values.
Reset
Return to the initial settings.
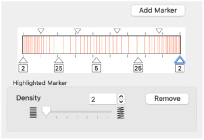
Add Marker
Add Marker places a new value marker below the gradient bar, and an extra adjustment marker above the gradient bar. The initial value for the marker is between the existing markers. Any combination of density values is possible across a fill area.
Note: The marker furthest to the left affects the spiral fill at the origin, then from left to right to the edge of the spiral fill.
-
Click Add Marker to add a new markers, then edit the density value and move the value and adjustment markers as desired.
Density
Set the fill density. The higher the number, the less dense the fill.
-
Use the slider or the number box to set the Density of the stitching from 2 to 40.
Remove
Click Remove to delete the highlighted marker.
Using Spiral Gradient
-
Open the Spiral Fill properties dialog. See Stitch Type.
-
Select Gradient.
-
Click the ellipsis (3 dots) button to open the Gradient dialog
-
Click a value marker (the marker below the gradient bar) and change the number in the Density box to the required density value.
-
Move the adjustment marker above the gradient bar to vary the change in density across the fill.
-
Click Add Marker to add another value marker and adjustment marker.
-
Change the density of the fill as desired.
-
Click OK twice to close the Gradient dialog and the Spiral Fill dialog, and view your changes on the work area.
-
To adjust your settings, Control–click the lettering, SuperDesign or frame and then choose Spiral Fill from the context menu. The Spiral Fill dialog reopens.