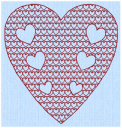
Use Freehand Hole ![]() to cut out holes within the selected fill area, by drawing outlines to define the holes.
to cut out holes within the selected fill area, by drawing outlines to define the holes.
Note: This function only affects the currently selected fill area.
Select Freehand Hole
-
In the Freehand Create toolbar, click the Freehand Hole
 button.
 -
Choose Create > Draw Hole > Freehand Hole.
-
Press ^⌥H
Draw a Hole in a Fill Area
-
In the work area or FilmStrip, select the area in which you want to cut the hole.
-
Select the Freehand Create
 toolbar.
 -
Draw a line around the edge of the desired area for the hole.
-
When the area is complete, lift the pen from the tablet (or release the mouse button). The area is closed with a straight line back to the start point.
-
Continue to cut as many fill holes as desired.
-
Control–click and choose Finish Freehand Hole Tool to deselect, or simply select another Create tool.
Note: It is recommended to draw back to the start point. However, you can adjust the shape of the hole afterwards, if it is not the exact shape you desired.
Note: Use Delete Hole ![]() to remove a hole. See Delete Hole.
to remove a hole. See Delete Hole.