You can adjust lettering after it has been placed in the work area, but before it has been fixed as an embroidery.
Note: A block of lettering that has not been fixed as an embroidery has green handles. Lettering fixed as an embroidery has white or blue handles, depending on the Resize setting. See Resize and Scale.
To Adjust Lettering
-
Drag the green handles to change the size and arrangement of a block of lettering. See Lettering Shapes.
-
Control–click a block of lettering and choose an option from the context menu:
-
Choose Properties to change the text, proportions, connection and line formatting. See Changing Letter Properties.
-
Choose a stitch type and open its properties dialog to alter properties such as density, pattern, angle and stitch length. See Choosing Stitch Properties.
-
To change the thread colors in the lettering, in the Control Panel click Design, then click a thread color. See Color Select.
-
Fix the lettering as an embroidery. See Fixing Lettering as an Embroidery.
Edit the Stitch Type
You can edit the stitch type of lettering placed in the work area.
Note: If the lettering is placed as individual letters, each letter must be changed separately.
To edit a Stitch Type
-
Control–click the lettering and choose a stitch type from the context menu. The properties dialog for the stitch type opens.
Change the Fill in Lettering
-
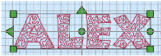
In the Lettering window, click the displayed font, and in the Search
 box enter Inform UC 25-120mm QS. Click to select the font. This is an uppercase font using QuiltStipple fill.
 -
Enter the name "Alex" in the Lettering window. See Create Lettering.
-
Under Lettering Shape, ensure that Individual is not selected, then click Apply. The lettering appears in the work area.
-
Drag the lettering towards the bottom of the screen.
-
Control–click the lettering and choose QuiltStipple Fill from the context menu. The QuiltStipple Fill properties dialog opens.
-
Set the Type to Straight.
-
Click OK to close the QuiltStipple Fill dialog. The fill now uses straight lines.
-
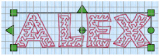
Open the QuiltStipple Fill dialog again.
-
Set the Spacing to 2 mm.
-
Click OK to close the QuiltStipple Fill dialog.
The lines in the fill are now more widely spaced.