Use Resize  to switch between resize and scale for the selected embroidery or block of stitches. Resize the selected embroidery to any size using free resize or rescale with the mouse. Alternatively, use Modify Design
 ![]() .
.
-
Resize changes the size of the embroidery while retaining constant density.
-
Scale changes the size of the embroidery while retaining constant stitch count.
The handles on the embroidery selection show when resize or scale is selected.
The resize and scale information for each subdesign is remembered separately.
Note: Lettering, SuperDesigns and Frames have green handles before they are fixed as embroidery. This allows them to be resized from their original design for optimum results.
To Switch between Resize and Rescale
-
Click the Resize button
 in the toolbar.
 -
Choose Edit > Resize Mode.
-
Press ⌘R
Resize and Rescale an Embroidery
-
Open the Design window
 of the Control Panel
  .
. -
Choose File > Insert and select a small embroidery (for example, Toy Soldier.vp4 in mySewnet/Samples/Embroidery/Stitch).
-
Place the embroidery in the bottom left corner of the hoop.
-
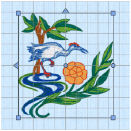
With a selection box around the embroidery, click Resize
 . The handles change between blue and white as you click.
 -
Click Resize
 to make the handles white.
 -
Look at the stitch count
 in the Information section of the Design window.
 -
Move the pointer over one of the square corner handles
 and it becomes the diagonal double-arrow pointer
  .
. -
Drag the handle at the top right until the embroidery is much larger.
-
Click Actions
 > Undo or ⌘Z to return the embroidery to its original size.
 -
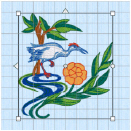
Select the embroidery again, and click Resize
 until the handles are blue.
 -
Drag the handle at the top right until the embroidery is several times larger.
Note: When using a trackpad, pinch two fingers on the selected embroidery to decrease the size, and spread two fingers to increase the size.
Gaps appear between the stitches. Although the size has increased, the stitch count has remained the same.
Note: Hold down Shift as you drag to resize or scale proportionally. Hold down the Option key to resize or scale from the center.
The stitching in the embroidery remains dense, as the stitch count has increased greatly.