If required, rotate the picture to any angle from 0 to 359 degrees. This can be useful when straightening scanned pictures.
Use Crop to select the section of the picture that is to be used to create the PhotoStitch embroidery. Alternatively, crop to a fixed orientation, selecting from square, portrait and landscape. Use Perspective Correction to adjust for perspective or skew.
Note: To obtain more detail on an individual’s face it is often helpful to crop so that only the head and part of the shoulders are shown.
Note: The size of the crop box may vary if the picture is rotated.
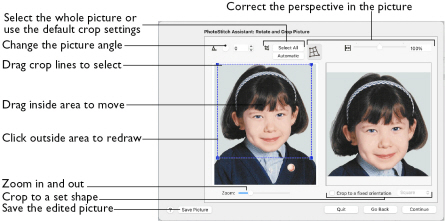
Select All: Select the whole of the picture.
Automatic: Select the smallest rectangle that includes all colors that are not the background color.
Rotate and Crop a Picture
-
Drag the rotational slider to rotate the picture to the desired angle.
Alternatively, enter a number in the rotation angle number box, or use the arrows to increase or decrease the angle of rotation. -
Drag the handles on the crop area boundary line to select the desired part of the picture.
-
Drag anywhere inside the crop box to move the crop box.
-
If desired, click Automatic to select the crop lines automatically, or click Select All to use the whole of the picture.
Hold the Shift key while dragging to resize the rectangle proportionally.
Hold the Option key while dragging to resize the rectangle without moving its center.
Alternatively, crop to a fixed orientation, selecting from square, portrait and landscape.
Note: If you need to expand a crop box again, make sure it is not touching the edge of the frame, as this will stop it expanding.
Perspective Correction
To remove the effects of perspective in a picture, or to correct skew, select Perspective Correction  . When using Perspective Correction, the crop handles are red.
Drag the red handles so that the crop lines frame the picture. Use the Zoom tools to view the outline of the picture more clearly. Drag the Stretch Picture  slider to make the picture in the Preview wider or narrower. Use Save Picture to save your edited picture.
Zoom
Use the Zoom bar to change the view of the picture. Zoom in (drag the slider to the right) to magnify the view. Zoom out (drag the slider to the left) to shrink the view.
When zoomed in, use the scroll bars or swipe to move around.
Go Back
Return to the Choose Picture page.
Continue
Go to the Remove Background page.