Use the Linear Embroidery Options page to choose the color for the embroidery. Optionally, use a Linear, Spiral or one of four Maze stitch effects, change the angle of the stitching, select scan depth and density, and enhance detail in the picture. View and check the final design in 3D before closing the PhotoStitch Assistant.
The Linear Embroidery Options page of the PhotoStitch Assistant only appears when you are creating a Linear PhotoStitch embroidery.
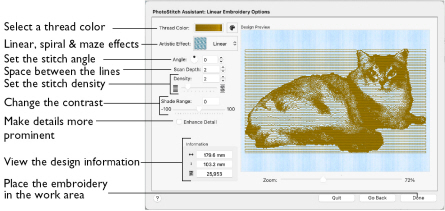
Thread Color
Use Thread Color to select the color used for stitching the linear PhotoStitch embroidery.
-
Click Thread Color

. The Color Selection dialog opens. See Color Select.
Artistic Effect
Use an artistic effect. The available options are Linear, Spiral and four Maze effects.
-
Choose an artistic effect from the pop-up menu.
Monochrome Linear
to use straight lines of thread for the basic stitch pattern. The lines are smooth for light areas of the picture. Zigzag stitches on either side of the lines emphasize the detail of the picture.
Monochrome Spiral
Choose Monochrome Spiral
to use circular lines of thread for the basic stitch pattern. The lines are smooth for light areas of the picture. Zigzag stitches on either side of the lines emphasize the detail of the picture.
Monochrome Maze
Choose the Monochrome Maze (
,
,
and
) modes to use one of four patterns to build up the picture. The stitching is sparse for light areas of the picture, which also reveals the basic shape used by the Maze mode you have chosen. Increased density of stitching emphasizes the detail of the picture.
Angle
Use Angle to change the angle at which the stitches are created for the embroidery. Changes in Angle are visible in the preview.
-
Enter an Angle from 0 to 360 degrees. The initial setting is 0.
Note: Alter the Angle by typing a number in the box, or use the up and down arrows to change the number. The computer will recalculate how to stitch the picture.
Enhance Detail
Use Enhance Detail to make details in the picture more prominent. For example, it can be used to improve definition in a picture with good detail, but little contrast.
By default, Enhance Detail is deselected.
Scan Depth
Scan Depth refers to the distance between the lines that produce an embroidery from a picture. The lower the Scan Depth figure, the finer the detail shown in the embroidery, and the more stitches produced.
Changes in Scan Depth are visible in the preview.
-
Set Scan Depth from 1 to 20. The default and recommended setting is 2.
Density
The density of the stitching along each line. The lower the Density number, the closer together the stitches, and the more stitches are produced.
Changes in Density are visible in the preview.
Note: Depending on the fabric and machine used, a lower number may produce more detail in the embroidery.
-
Set Density from 1 to 9. The recommended (and default) setting is 2.
Shade Range
Change the contrast in the picture. Negative values make the picture darker, and positive values make the picture lighter.
Zoom
Use the Zoom bar to change the view of the picture. Zoom in (drag the slider to the right) to magnify the view. Zoom out (drag the slider to the left) to shrink the view.
When zoomed in, use the scroll bars or swipe to move around.
Design Information
The design information boxes show the number of stitches in the embroidery, the height and width and the total number of color changes.
Go Back
Return to the Design Size page.
Done
Accept the final design and close the PhotoStitch Assistant.