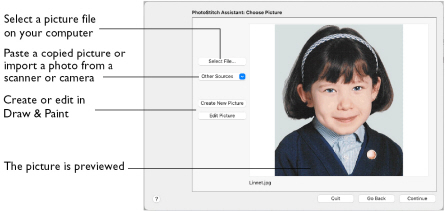
Use the Choose Picture page to select the picture you wish to convert to a PhotoStitch embroidery.
After selecting a picture, the preview box shows the selected picture with its name underneath.
Select File
-
Click Select File to open a picture from one of the Samples subfolders, such as: mySewnet/Samples/Cross Stitch/Pics. Alternatively, browse to a folder elsewhere on your computer.
Note: Click Show as Icons
to view thumbnails of the pictures.
The following popular file formats may be loaded: Bitmap (.bmp), Encapsulated PostScript (.epi, .eps), Graphics Interchange Format (.gif), JPEG-JFIF Compliant (.jpg, .jfif, .jpeg), JPEG 2000 (.jp2, jpf), JPEG Multi-Picture Object (.mpo), Photoshop (.psd), Portable Document Format (.pdf), Portable Network Graphics (.png), Postscript (.ps), Tagged Image File Format uncompressed (.tiff, .tif), Camera RAW (.raw & many others), High Dynamic Range (.exr, hdr), High Efficiency Image Format (.heic).
These additional formats can also be loaded: Apple Icon (.icns), Fax (.fax & many others), Linux Icon (.xbm), Macintosh Picture (.pct, .pic, .pict), MacPaint (.mac, .pnt, pntg), Microsoft Icon (.cur, .ico), Silicon Graphics (.rgb, .sgi) and Truevision TGA (.targa, tga).
Select a Photo for a PhotoStitch
-
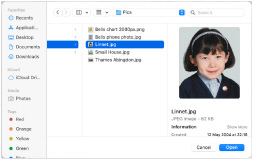
Click Select File. The Open dialog appears.
-
Browse to the desired folder, for example mySewnet/Samples/Cross Stitch/Pics.
-
Click on a photo.
-
Click Open to open the photo onto the Choose Picture page, and to close the dialog.
Click the Cancel to exit without selecting a picture.
Other Sources
Paste
-
Paste an image from the Clipboard.
Import Image
Services
Use Services to import a picture.
-
Camera: Import a picture from an integrated MacBook® camera.
-
Capture Full Screen: make a screenshot of the whole screen.
-
Capture Selection from Screen: make a screenshot of part of the screen.
Create New Picture and Edit Picture
Create a new picture or edit an existing picture in mySewnet™ Draw & Paint.
Go Back
Return to the Choose Embroidery Type page.
Continue
Go to the Rotate and Crop Picture page.