PhotoStitch Assistant Examples
Use the PhotoStitch Assistant to Create a PhotoStitch Embroidery
-
In the Create window

of the Control Panel

click PhotoStitch Assistant
 > PhotoStitch into Hoop.
 -
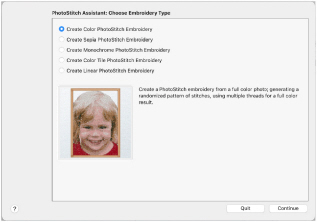
The PhotoStitch Assistant opens at the Choose Embroidery Type page.
-
Select one of the following embroidery types:
-
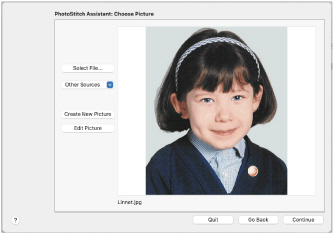
Click Continue. The Choose Picture page appears.
-
Click the desired option from:
-
In the Open dialog, browse to your photo.
-
Click Open to load the photo into the preview area.
-
Click Continue. The Rotate and Crop Picture page appears.
-
If required, rotate the picture to any angle from 0 to 359 degrees. This can be useful when straightening scanned pictures.
-
If required adjust the crop lines to select the desired area of the picture. Click Automatic to start again.
-
Use Flood Erase
 to remove adjacent areas with a similar color. Use the Large
  , Medium
  and Small
  Erasers to ’wipe out’ background areas.
 -
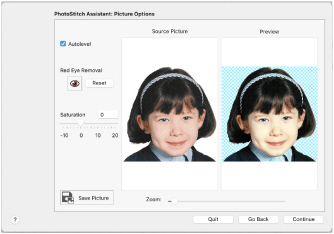
Click Continue. The Picture Options page appears.
-
Autolevel is initially enabled. It adjusts brightness and contrast automatically. Deselect it if the colors appear distorted.
-
To remove the red eye effect caused by flash photography, select Red Eye Removal
 and draw an ellipse around the affected area.
 -
Increase saturation to make colors more intense, for example to make pale skin tones appear ’warmer’.
-
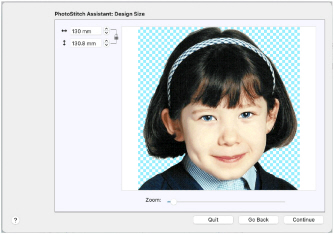
Click Continue. The Design Size page appears.
-
Specify the size of your PhotoStitch. The size changes proportionally.
-
Click Continue. If Linear PhotoStitch Embroidery was selected in the Choose Embroidery Type page, the Choose Thread Color page appears.
-
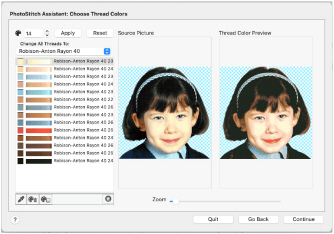
To change the thread color, click Change Color
 , then select a new color in the Color Selection dialog.
 -
Select an artistic effect from the pop-up list. The available options are Linear, Spiral and four Maze effects.
-
Select Enhance Detail to bring out detail in the picture, for example in a photo where the face is clear, but the contrast is poor.
-
Click Done to close the assistant.
-
In the Choose Embroidery type page, select Color PhotoStitch Embroidery and click Continue to prepare your picture. After editing your picture, the Choose Thread Colors page appears.
-
Adjust the number of colors with the arrows in the Color Selection box, or type in the required number of colors.
-
Click Apply to update the colors list and preview.
-
To change a particular thread color, select the color, click Edit Selected Color, then select a new color in the Color Selection dialog. See Color Selection Dialog.
-
Add an extra color from the source picture by clicking Pick New Colors, then selecting the color with the eye-dropper pointer
 . The nearest matching thread is added to the list.
 -
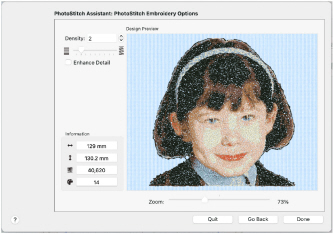
Click Continue. The PhotoStitch Embroidery Options page appears.
-
Use the slider to adjust the Density of the stitching.
-
Select Enhance Detail to bring out detail in the picture, for example in a photo where the face is clear, but the contrast is poor.
Note: Enhance Detail does not change the colors used, it affects the way that those colors are used. -
Click Done to close the assistant. The embroidery is placed in the work area.
-
If desired, add a frame or border to the PhotoStitch. See Frames, Borders & Underlines.
• Color PhotoStitch Embroidery
• Sepia PhotoStitch Embroidery
• Monochrome PhotoStitch Embroidery
• Color Tile PhotoStitch Embroidery
• Linear PhotoStitch Embroidery
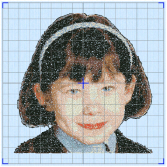
In this example, a Linear PhotoStitch Embroidery and a Color PhotoStitch Embroidery are used.
• Select File to select an existing picture file.
• Other Sources to paste or to obtain a picture directly from a scanner or camera, including a MacBook® integrated camera.
• Create New Picture or Edit Picture to create or edit a picture in mySewnet™ Draw & Paint.
• Hold the Shift key while dragging to resize the rectangle proportionally.
• Hold the Option key while dragging to resize the rectangle without moving its center.
Note: The gray rectangular lines show crop size. Drag anywhere inside the crop box to move it.
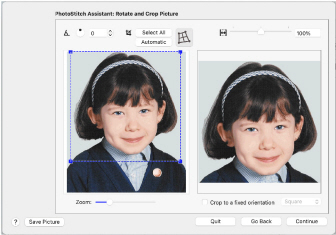
Alternatively, crop to a fixed orientation, selecting from square, portrait and landscape.
Use Undo to reverse actions, and Reset to go back to the original picture.

Note: Save the picture if desired, in order to adjust the project later.
Note: This page displays the number of stitches in the embroidery, its height, width, and the total number of color changes.

Note: Scan Depth refers to the distance between the lines that produce an embroidery from a picture. The lower the Scan Depth figure, the finer the detail in the embroidery, and the more stitches produced.
Note: Density changes the density of the stitching along each line, where 1 is the standard default density and 40 is the most open, with the fewest stitches.
Creating a Color PhotoStitch
Note: Remove the selected color from the list with Delete Selected Color, or all colors in the list with Delete All Colors. Go back to the original color list with Reset.
Delete All Colors enables you to control the exact colors used. You can delete all colors, then select new colors with Pick New Colors.
Note: If the photo is large, you may receive a warning about the time taken to create the embroidery.
This page displays the number of stitches in the embroidery, its height, width, and the total number of color blocks.