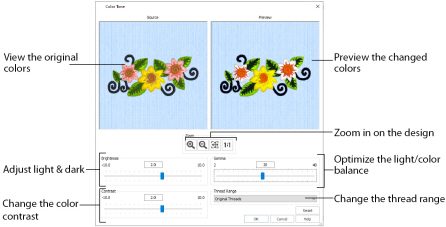
to change the thread colors in an embroidery. The Color Tone dialog box includes the Brightness, Contrast and Gamma sliders, and the Thread Range box.
Try different settings to enhance different designs. You may also combine more than one Color Tone tool.
Use the Thread Range box to convert all the threads in the embroidery to a new thread range, with or without adjusting the Color Tone options. Thread and needle effects will not be removed.
Shortcuts
-
Tools, Home Tab:

-
Keys: Alt, H, CT
Use Color Tone to Change the Colors in a Floral Embroidery
-
Click File, New

to open a new window.
-
In the Quick Access toolbar, click Insert

.
-
In the folder Documents\mySewnet\Samples\Stitch Editor\Stitch load the 'Floral Motif' embroidery.
-
Click Color Tone

in the Home tab. The Color Tone page is displayed.
-
Move the slider to the right to change the Brightness to 2.
Alternatively, click to select the slider and use the right arrow key, or enter a positive number in the box. -
Enter 2.0 in the number box to change the Contrast.
-
Click the Gamma slider bar to select it, then use the right arrow key to change the Gamma to 20.
-
To adjust the threads used, select a new range from the Thread Range drop-down list.
-
When the picture of the embroidery in the preview window at the right appears as desired, click OK.
You can adjust the Brightness between -10 and +10 relative to the starting point by typing in a number, using the left and right arrow keys, or by clicking and dragging the slider bar. To darken the embroidery, move the slider to the left, use the left arrow key, or enter a negative number in the box.
You can adjust the Contrast between -10 and +10 relative to the starting point by typing in a number, using the left and right arrow keys, or by clicking and dragging the slider bar.
You can adjust the Gamma between 2 and 40 by typing in a number, using the left and right arrow keys, or by clicking and dragging the slider bar.
The threads in the design will be mapped to the nearest color in the range, and the result shown in the preview pane.
You can return to the original thread range(s) used in the design by selecting ’Original Threads’.
The Brightness effect makes the selected part or all of an embroidery lighter or darker than the original. Use it to lighten embroideries.
Adjust Brightness from -10 to +10 in steps of 0.1. The default setting is 0.
The Contrast effect changes the amount of shading between areas for the embroidery. Use it to make specific areas stand out. Adjust Contrast up to +10 or -10 more or less than the original. Increasing the setting will increase the darkness of dark areas and the lightness of light areas.
Adjust Contrast from -10 to +10 in steps of 0.1. The default setting is 0.
Use Gamma to adjust the brightness and contrast together so that dark areas are made brighter, but bright areas are not overexposed.
Adjust Gamma from 2 to 40 in steps of 1. The default setting is 10. Lower values will make the embroidery appear lighter.
Use the Thread Range box to select the thread range used for the embroidery from the drop-down list.
Choose from any of the manufacturer’s thread ranges or the MyThreads ranges you create using mySewnet™ Thread Cache.
If the embroidery originally used more than one thread range, only one thread range will now be used.
To return to the original thread range(s) used in the design select ’Original Threads’ from the top of the list.
Reset
Reset the embroidery back to the original settings.
Use the Zoom functions to change the view of the embroidery.
Use Zoom In
to magnify the view. Move the pointer over the embroidery and the pointer changes to the zoom in pointer

. Then either click a point you want to zoom in towards, or click and drag a rectangle around the area you want to zoom in to and release the mouse button to zoom. When zoomed in, use the scroll bars to move around.
Use Zoom Out

to shrink the view. Move the pointer over the embroidery and the pointer changes to the zoom out pointer

. Then click a point you want to zoom out from.
Click Zoom To Fit
to fit the embroidery to the preview area.
to view the embroidery at a magnification as close as possible to the Real Size setting you chose in mySewnet™ Configure

.
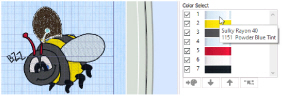
Change the Colors in a Bumblebee Embroidery
The bumblebee uses a very pale blue pattern fill for the wings. If a less dense fill is used, a darker thread will be easier to see.
-
Click File, New

to open a new window.
-
In the Quick Access toolbar, click Insert

.
-
In the folder Documents\mySewnet\Samples\Stitch Editor\Stitch load the 'Bumblebee 2' embroidery.
-
In the Design Panel move the arrow pointer over the very pale blue at the top of the color worksheet (color 1) and pause for a moment. The upper wing in the embroidery is highlighted, and a popup description of the thread is displayed.
-
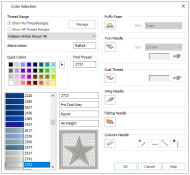
Right-click the color block and select change color from the context menu. The Color Selection dialog box will appear.
-
In Thread Range, ensure that Show MyThreadRanges is selected.
-
Select Robison-Anton Rayon 40 from the drop-down list.
-
Click in the Find Thread box and enter '2733'. Thread color 2733 (Pro Cool Gray) will be found in the list.
-
Click OK to change the color, and close the dialog box.
-
Move the arrow pointer over the other block of pale blue (color 4), and click to select it.
-
Click the Color Change icon

at the bottom of the color worksheet to open the Color Selection dialog box.
-
In Thread Range, select Robison-Anton Rayon 40 from the drop-down list.
-
Click in the Find Thread box and enter '2733'. Thread color 2733 (Pro Cool Gray) will be found in the list. Click OK to change the color.
Both of the bumblebee’s wings are now the same gray.
You can use Color Tone to change all of the colors in an embroidery to a different thread range. -
Click Color Tone

in the Home tab. The Color Tone page is displayed.
-
In the Thread Range drop-down list, select Robison-Anton Rayon 40. The thread shades change a little.
-
Click OK to close the Color Tone dialog box.
Alternatively, double-click the color block to open the dialog box.