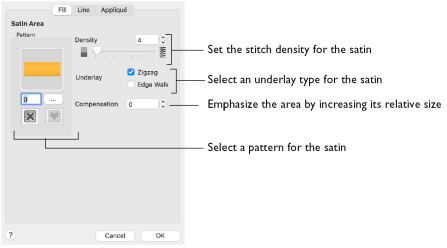
Use the Satin Area dialog to set density, compensation, pattern and underlay for satin areas.
Note: The same options are available for Satin Area in the Area Properties dialog. See Area Properties.
Density
Set Density from 2 to 40. The lower the number, the closer together the stitches and the more stitches are produced. The initial setting is 4.
Underlay
Set the Underlay option to be used for the satin area.
-
Zigzag creates zigzag lines of running stitch as underlay. Use zigzag underlay for wide areas of satin. Zigzag is initially selected.
-
Edge walk places lines of running stitch just inside the edges of the satin areas. Use edge walk when the satin areas have both wide and narrow sections.
-
For very wide areas of satin, select both underlay types.
Compensation
Compensation is used to make an area 'bolder' by increasing its relative size. Set Compensation from 0 to 30. The higher the number, the bolder the area appears.
Pattern
Choose from more than 250 patterns for satin (for areas wider than around 8-10mm). The initial setting is 0. Add new patterns using Manage My Fills. See Manage My Fills .
Note: View the patterns in the pattern gallery. See Fill and Satin Patterns.
-
Click a pattern sample or enter the Pattern number to select a pattern.
-
Set the Pattern number to 0 for standard satin with no pattern, or click No Pattern.
Create a Blue Jay Embroidery
-
Choose File > New to open a new design window.
-
Set the hoop size to 100mm x 100mm - Universal Square Hoop 1. See Hoop Selection.
-
Ensure that the Control Panel
 and FilmStrip
  are available.
 -
Click Load Background
 in the main toolbar and browse to /mySewnet/Samples/Embroidery/Pics.
 -
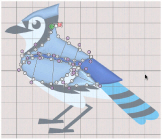
Select Birds4.png (a Blue Jay) and click Open. The jay is displayed as your background picture.
-
Control–click the color at the top of the FilmStrip and choose Properties.
-
In the Color Selection dialog ensure that Robison-Anton Rayon 40 is selected as the thread range.
-
Enter 2614 (Pro Lusty Blue) as the thread number and click OK.
-
Click Quick Create
 to open the Quick Create toolbar, then click the QuickStitch™ Satin Area
  button.
 -
Click on the medium blue on the lower back of the jay.
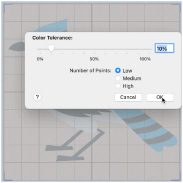
The Color Tolerance dialog appears, with the lower back area filled with a checkered pattern. See Use Color Tolerance to Select an Area or Line. -
Click OK to confirm.
The lower back of the blue jay is now covered by a medium blue satin area. -
In the Quick Create toolbar, click the Add Color Change
 button.
 -
In the Color Selection dialog, select 2522 (Bridgeport Blue) and click OK.
-
Ensure that QuickStitch™ Satin Area
 is still selected.
 -
Click the light blue on the top of the jay’s head, then click OK in Color Tolerance. The top of the head is filled with a pale blue satin area.
-
Click on the light blue on the upper back of the jay, then click OK in Color Tolerance. The rest of the back and the upper wing is filled with a pale blue satin area.
-
If needed, fill the pale blue in the lower part of the wing with a QuickStitch™ Satin Area.
-
Click the Zoom To Rectangle

button on the toolbar.
-
Drag a rectangle around the jay’s tail to zoom in.
-
Click Point Create
 to open the Point Create toolbar, then click the Point Satin Area
  button.
 -
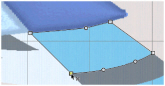
Click to place the first point at the top left corner of the top pale blue tail section.
-
Place a point in the middle of the top of this tail section. The point is round.
Note: Round points are used for curved edges to the area. -
Hold the Shift key and place a point at the top right corner of this section. This point is square.
Note: Square points are used for straight sections of the edge of the area, or for corners. -
Still holding the Shift key, click to place a point at the bottom right corner of the tail section.
-
Release the Shift key and place two round points for the curve at the bottom of the tail section.
-
Hold the Shift key and place a square point for the bottom left corner of the tail section.
-
Press Return to complete the area.
-
Click to place the first point at the top left corner of the second pale blue tail section.
-
Place a point in the middle of the top of this tail section.
-
Hold the Shift key and place a point at the top right corner of this section, and then another point for the bottom right corner.
-
Release the Shift key and place two round points for the curve at the bottom of the tail section, then hold the Shift key to place a square point for the bottom left corner.
-
Press Return to complete the area.
-
Place round and square points to create the third pale blue tail section, then press Return to finish.
-
Create the final pale blue tail section by placing points. Use a square point for the notch on the bottom edge.
-
Control–click and select Finish Point Satin Area to close the Point Satin Area tool.
-
In the toolbar, click 2D View Mode
 to see the picture behind the stitching, then adjust the points on the final area as desired.
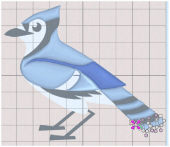
Note: Hold the Shift key when dragging square points, so that they remain square. -
Click the other tail sections in turn to select them, and make any adjustments needed.
Note: In the Control Panel use Delete Point to remove points, and Insert Point
  to add points, and if needed use Edit Points
  in the toolbar to enable points editing. Drag the pink hexagonal control points on the stitch angle lines to change the angle of the stitching. See Adjust a Satin Area.
 -
In the toolbar, click 3D View Mode
 , and then click Zoom to Fit
  to view the whole design.
 -
In the Create toolbar, click the Add Color Change
 button.
 -
In the Color Selection dialog, select 2440 (Blue Ink) and click OK.
-
Click the Zoom To Rectangle

button on the toolbar and drag a rectangle around the bottom of the wing to zoom in.
-
Click Point Satin Area
 and place points for the satin area. Use square points for sharp angles, and round points for curves.
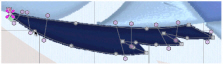
-
Press Return to complete the area.
-
Note that between the feathers at the bottom of the wing, parts of the stitching overlap the line that you drew.
Undo the area that you placed. -
Click the Quick Create
 button to open the Quick Create toolbar, then click the QuickStitch™ Multiple Satin Areas
  button.
 -
Click the bottom of the wing, then click OK in Color Tolerance. The new satin area is created in several sections. It follows the outline of the area with no overlap.
-
Click Zoom to Fit
 to view the whole design.
 -
Click the beak, then click OK in Color Tolerance. The beak is created separately from the flash above.
-
Click Zoom To Rectangle

on the toolbar and drag a rectangle around the eye.
-
Click Freehand Create
 to open the Freehand Create toolbar, then click Freehand Satin Area
  .
. -
Starting at the top, draw a line around the edge of the blue part of the eye, finishing where you started. Then lift the pen from the tablet (or release the mouse).
The area is closed with a straight line back to the start point, and filled with satin stitches. -
Control–click and select Finish Freehand Satin Area to close the tool.
-
Adjust, add and delete points and angle lines as desired.
-
Click Zoom to Fit
 to view the whole design.
 -
Click Quick Create
 to open the Quick Create toolbar, then click the QuickStitch™ Satin Area
  button.
 -
Fill the remaining area on the head, and the dark blue tail sections with satin.
-
In the stitch type area of the Create toolbar, choose Pattern Fill from the Fill Area pop-up menu, and deselect Line Type (this will create a fill area without a border). See Select a Stitch Type.
-
Click Zoom To Rectangle

on the toolbar and drag a rectangle around the legs.
-
Click Point Create
 to open the Point Create toolbar, then click the Create Area or Line
  button.
 -
Hold the Shift key and click to place straight lines for each of the legs. Press Return to complete each fill area.
-
Click Zoom to Fit
 to view the whole design.
 -
In the Create toolbar, click the Add Color Change
 button.
 -
In the Color Selection dialog, select 2343 (Eggshell) and click OK.
-
Click Quick Create
 to open the Quick Create toolbar, then click QuickStitch™ Satin Area
  and fill the white middle section of the wing.
 -
Click the QuickStitch™
 button.
 -
Click to fill the white area above the legs, and the small white area above the beak.
-
Click the QuickStitch™ + AutoHole
 button.
 -
Click the white area of the face that includes the eye. The area is filled with the eye still visible.
Note: You can create holes in fills, but not in satin areas.
-
Control–click and select Finish QuickStitch + AutoHole to close the tool.
-
Click the Design Player

button on the toolbar.
-
Click Play
 to view how the blue jay embroidery will be stitched out.
 -
Choose File > Save.
-
Save the embroidery design as Blue Jay.edo.
Note: If you misplace a point, move the pointer over the top of that point and when the pointer changes to the cross pointer  , drag it to the correct position. Then continue to place points.
Note: Use QuickStitch™ Multiple Satin Areas when creating complex satin areas. Alternatively, create several sections using the Freehand or Point tool.
Note: The Quick Create, Freehand Create and Point Create tools work exactly the same, regardless of whether you are creating a line, fill or satin area.