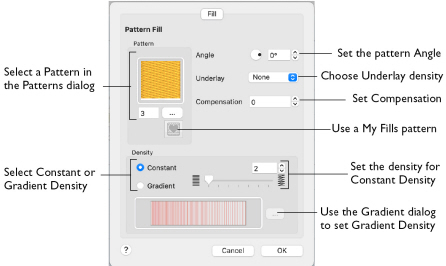
Use the Pattern Fill dialog to set the properties on a pattern fill area.
Pattern
Choose a fill pattern in the Pattern viewer. See Pattern.
Angle
The angle of the fill pattern, as shown by the rotational slider and numbers box. The thread is at a right angle to the fill pattern. You can set the Angle from 0 to 359 degrees.
You can also adjust the angle of a fill pattern with the handle on the Origin marker  .
.

Note: The fill angle also affects the orientation of a gradient fill.
Underlay
Underlay is a low density fill that is perpendicular to the stitches of the actual fill area. It is useful for stabilizing large fill areas.
Note: Underlay stitches are not generated for areas using gradient density. However it can be selected, as you may change the area to constant density. Underlay is only generated when stitches are created.
-
Choose None, Low, Medium or High density underlay from the pop-up menu.
Compensation
Compensation is used to make an area 'bolder' by increasing its relative size. The higher the number, the bolder the area appears. The initial setting is 0.
-
Use the up and down arrows to set Compensation from 0 to 20, or enter a value in the numbers box.
Density
Constant density creates a uniform fill at the chosen density. Gradient density creates a fill with varying density or color.
-
Select between Constant and Gradient density.
Setting Constant Density
The lower the number, the closer together the stitches and the more stitches are produced. You can set Density from 2 to 40.
-
Select Constant, then use the slider or the numbers box to set the Density.
Setting Gradient Density
-
Select Gradient, then click the ellipsis button (3 dots) to open the Gradient dialog. See Gradient.
Change a Pattern Fill
-
Open the Pattern Fill window of the Area Properties dialog. See Area Properties.
-
Click the button with the ellipsis (three dots) to open the Pattern viewer.
-
Scroll through the Pattern categories, and click a pattern to select it.
-
Choose a Pattern category from the pop-up menu, or click the previous and next buttons to view all categories.
-
Click a pattern to select it.
-
Set the angle for the pattern.
-
Click OK to close the Area Properties dialog and view your changes.
You can also adjust the angle of a fill pattern with the handle on the Origin marker  .
.
To create your own fill, see Manage My Fills and Use a Bee for a My Fill Pattern.