Quilt Block Assistant Examples
Surround an Embroidery in a Quilt Block with an Echo Fill
-
In the Create window

of the Control Panel

click Quilt Block Assistant
 . Alternatively, choose Assistants > Quilt Block Assistant.
 -
Select Filled Quilt Block; Inner Embroidery
 .
.
This will create a filled quilt block with an embroidery in the center.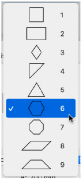
-
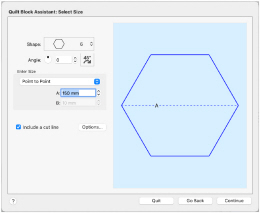
Click Continue. The Select Size page appears.
-
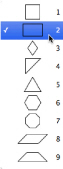
Look at the Shape pop-up menu. There are nine shapes to choose from.
Note: All of these quilt block shapes can be tessellated — they will fill an area if tiled individually or combined with another shape, with no overlaps or gaps. -
Choose Shape 6, a hexagon.
-
Look at the Enter Size pop-up menu. For a hexagon you can select from Point to Point, Side, and Side to Side.
-
Ensure that Point to Point is selected in Enter Size.
-
Set measurement A to 150mm.
-
Ensure that "Include a cut line" is selected.
-
Click Continue and the Load Embroidery page of the assistant appears.
-
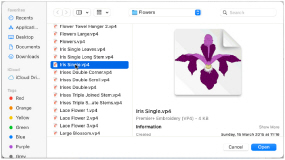
Click Open Embroidery and the Open dialog appears.
-
Browse to the folder mySewnet/Samples/Embroidery/Stitch.
-
Select the embroidery 'Iris Single.vp4'.
-
Click Open and the embroidery is loaded onto the preview area.
-
Click Continue. The Adjust Embroidery page appears. The embroidery is placed in the center of the quilt block shape, with a clear margin and blue fill area surrounding it.
-
Click Rotate 45
 twice. The embroidery rotates clockwise by 45 degrees in the preview.
 -
Enter 0 in the Angle number box to return the embroidery to its original position.
-
Click Mirror Vertically
 to reverse the embroidery.
 -
Click Mirror Vertically
 again to set the embroidery back to the previous position.
 -
Click the up arrow next to Margin to increase the margin by 2mm. The margin around the flower embroidery grows larger.
-
Drag the embroidery so that the margin lies outside the edge of the quilt block. The blue fill disappears, and the line showing the edge of the margin becomes red.
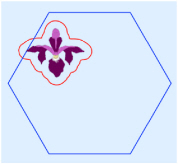
Note: You could drag it back to its original position, but it is just as easy to reload the embroidery. -
Click Go Back. In the Load Embroidery page, click Open Embroidery to open the Open dialog and load Iris Single.vp4 again.
-
Click Continue. In the Adjust Embroidery page the embroidery has returned to its original position and settings.
If you had clicked Continue without loading the embroidery again, your changes would have been retained. -
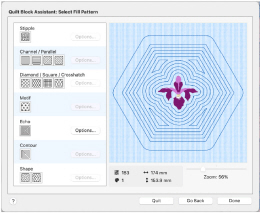
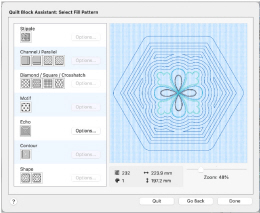
Click Continue. The Select Fill Pattern page appears.
-
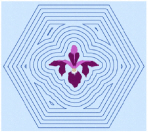
Click Echo
 . The fill around the embroidery changes to an Echo Fill.
The outer lines in the echo fill follow the outline of the quilt block, while the inner lines follow the outline of the embroidery. -
Click the Options button for Echo Fill. The Echo Fill properties dialog opens.
-
Set the Spacing to 4.0mm, and ensure the Stitch length is 1.5mm.
-
Click OK to view the effect of the changes.
-
The gap between the embroidery and the echo lines is greater than the gap between the lines themselves. Click Go Back to return to the Adjust Embroidery page.
-
Set the Margin to 4mm, then click Continue to return to the Select Fill Pattern page.
The first line in the echo fill now starts at the same distance from the embroidery as the other lines are from each other.
There are several small ’islands’ around the flower. -
Click Options and in the Echo Fill dialog set the Spacing to 4.2mm. Then click OK.
-
Click Done to place the finished quilt block in the work area.
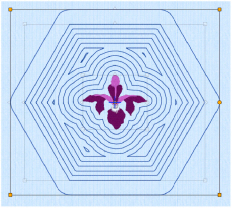
Two rows of stitching around the quilt block show the lines at the edge of the block where the fabric should be cut and folded.
Note the orange handles for the group created from the embroidery, the echo lines and the cut line. -
In the Color Worksheet, select the color for the echo lines and change it to the dark purple used in the Iris petals in the embroidery.
The color of the stitching in the fill now matches the main color in the embroidery.
The Select Quilt Block Style page appears.
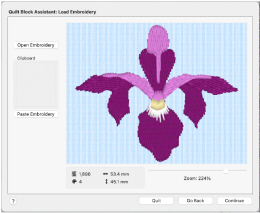
Note: After choosing an embroidery you can select a different embroidery, but only the most recently chosen embroidery is shown on the preview area. The dimensions, number of stitches, and thread colors used in the embroidery are shown below the preview.
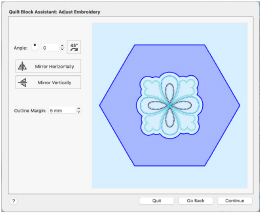
You can use Angle and Rotate 45  to rotate the shape by 45 degrees, or an angle that you choose, in a clockwise direction.
Mirror Horizontally ![]() mirrors the embroidery from left to right, and Mirror Vertically
mirrors the embroidery from left to right, and Mirror Vertically  mirrors the embroidery from top to bottom.
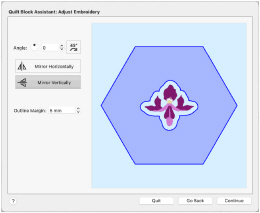

Note: The embroidery is surrounded by an unstitched margin, and the default fill, a Stipple Fill. The Options button is available to change the Stipple Fill settings.
The Style is set to style 1, rounded corners. You can also use square (Style 2) or diagonal (Style 3) corners. These styles have more significant effects when using the Inner Shape quilt block option.
This increases the distance between the lines of stitching, and removes the small islands.
Adjust the Gap and Style, and the position of the embroidery to achieve your preferred results.
Show an Echo Around an Embroidery
-
Open a new mySewnet™ Embroidery window.
-
Choose File > Insert (or ⌘I) to load an embroidery.
-
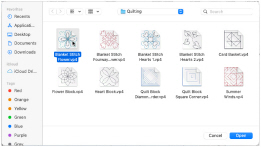
In the Open dialog browse to the folder mySewnet/Samples/Embroidery/Stitch.
-
Switch to Icon View to see thumbnail pictures of the designs in the folder.
-
Click the Blanket Stitch Flower embroidery to select it, then click Open to load the design. The flower design appears in the work area.
-
With the flower embroidery still selected, click Actions
 on the toolbar and choose Copy. Alternatively, choose Edit > Copy or press ⌘C.
 -
In the Create window

of the Control Panel

click Quilt Block Assistant
 . Alternatively, choose Assistants > Quilt Block Assistant.
 -
Select Filled Quilt Block; Inner Embroidery
 .
.
This will create a filled quilt block with an embroidery in the center. -
Click Continue. The Select Size page appears.
-
Look at the Shape pop-up menu. There are nine shapes to choose from.
-
In the Shape pop-up menu choose Shape 6, a hexagon.
-
Ensure that Point to Point is selected in Enter Size, and that "Include a cut line" is selected.
-
Set measurement A to 200mm.
-
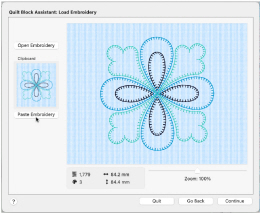
Click Continue and the Load Embroidery page of the assistant appears. The Blanket Stitch Flower can be seen in the Clipboard.
-
Click Paste Embroidery. The blanket stitch flower is placed in the preview.
-
Click Continue. The Adjust Embroidery page appears. The embroidery is placed in the center of the quilt block shape, with a clear margin and blue fill area surrounding it.
-
Click Continue. The Select Fill Pattern page appears.
The embroidery is surrounded by an unstitched margin, and the last used fill. The default is Stipple Fill. The Options button is available to change the settings. -
Click Echo
 . The fill around the embroidery changes to an Echo Fill, emphasizing the blanket flower.
 -
Click Done to place the finished quilt block in the work area.
The Select Quilt Block Style page appears.
Note: All of these quilt block shapes can be tessellated — they will fill an area if tiled individually or combined with another shape, with no overlaps or gaps.
To use embroideries created or loaded in mySewnet™ Embroidery in the Quilt Block Assistant, use Copy and Paste.
Note: The dimensions, number of stitches, and thread colors used in the embroidery are shown below the preview.
Note: The outer lines in the echo fill follow the outline of the quilt block, while the inner lines follow the outline of the embroidery.
Create a Quilt Block with a Central Filled Shape
-
In the Create window

of the Control Panel

click Quilt Block Assistant
 . Alternatively, choose Assistants > Quilt Block Assistant.
 -
Select Outline Quilt Block; Filled Inner Shape
 .
.
This will create a block with an filled shape in the center. -
Click Continue. The Select Size page appears.
-
Look at the Shape pop-up menu. There are nine shapes to choose from.
Note: All of these quilt block shapes can be tessellated — they will fill an area if tiled individually or combined with another shape, with no overlaps or gaps. -
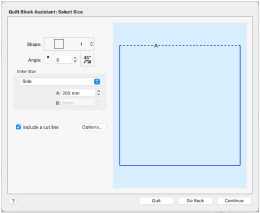
In the Shape pop-up menu choose Shape 2, a rectangle.
In the preview area two sides of the rectangle are shown with a dotted line, sides A (the top) and B (the side). -
In Enter Size, click the up and down arrows in boxes A and B. The rectangle changes shape.
This enables you to set the rectangle shape and size. -
In the Shape pop-up menu choose Shape 1, a square.
Only one side, A, now has a dotted line as all sides are the same size. The box B is now unavailable (dimmed). -
Look at the Enter Size pop-up menu. You can choose from Side and Diagonal, so you can enter the measurements according to the quilt pattern you are piecing.
Note: If you select Diagonal the dotted line 'A' will run diagonally across the center of the square. -
Ensure that Side is selected in Enter Size.
-
Set side A to 150mm.
-
Position the arrow pointer over box A in Enter Size without clicking. A tooltip shows the measurement in inches, and the minimum and maximum size.
Note: Positioning the arrow pointer over a measurement box shows the alternative measurement. You may also enter the alternative measurement with units of mm or " and it is automatically converted. -
Set A to 200mm. The square is now 200mm wide and high.
-
Ensure that "Include a cut line" is selected.
-
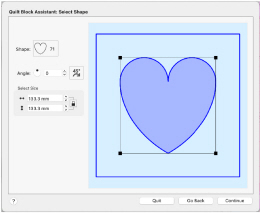
Click Continue. The Select Shape page appears.
Use this page to select the internal shape for the quilt block.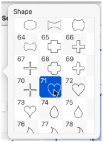
-
Look at the Shape pop-up menu. There are 120 shapes to choose from.
-
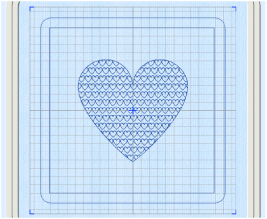
Scroll down the list and select Shape 71, a heart. In the preview the internal shape becomes a heart.
To resize the shape, use the handles on the corners of the box. The Width and Height boxes show the new dimensions.
To change the shape, set Proportional to unlocked, then move a corner handle or one of the dotted lines.
To move the shape, drag within the box and position the shape as desired. -
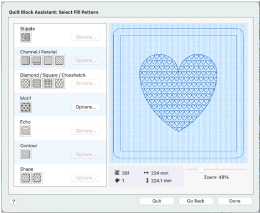
No adjustment of the shape is required, so click Continue. The Select Fill Pattern page appears. The heart shape is filled with the last used fill.
-
Click Motif
 . The fill pattern changes to stars, and the Options button in the motif area becomes available.
 -
Click the Options button for motifs. The Motif Fill Properties dialog opens.
-
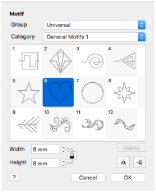
Click the Motif 1 button. The Motif dialog opens.
-
Set the Group to Universal and the Category to General Motifs 1.
-
Select Pattern 6, a heart in the pattern window.
-
Ensure that the motif Height is set to the default value of 8mm.
-
Click OK to close the motif dialog.
-
In the Gap area of the Motif Fill properties dialog, set Horizontal to 10% and set Vertical to 25%.
This will create more space between the hearts in the fill. -
In Offset, set Horizontal to 50%.
This will alternate the positioning of the hearts.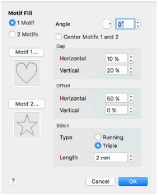
-
Click OK to return to the Select Fill Pattern page.
Use the preview on the Select Fill Pattern page to check your adjustments. -
Click the Options button for motifs again.
-
Change the Stitch Type to Triple.
-
Set the Horizontal Gap to 10% and the Vertical Gap to 20%.
-
Click OK to return to the Select Fill Pattern page.
-
Click Done. The quilt block is displayed in the design area.
The Select Quilt Block Style page appears.
Note: Two rows of stitching around the quilt block show the lines at the edge of the block where the fabric should be cut and folded.