How to Use the Cross Stitch Design Assistant
Create a Cross Stitch from a Photograph
-
Choose File > New and the Design Options page of the Cross Stitch Design Assistant appears.
-
Leave Create QuickCross Design selected and click Continue. The Choose Picture page of the Cross Stitch Design Assistant appears.
-
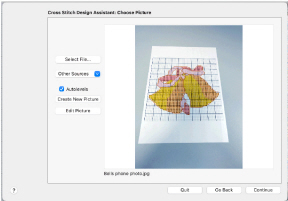
Click Select File.
-
In the Open dialog browse to the folder /mySewnet/Samples/Cross Stitch/Pics, click the file named 'Linnet.jpg' and click Open.
The picture is loaded onto the Choose Picture page, with the name shown below the preview area.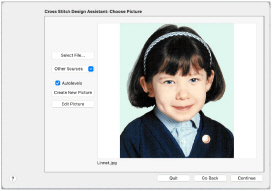
-
Uncheck (deselect) Autolevels.
Note: Autolevels adjusts brightness and contrast automatically. In this picture the flesh tones in the face appear better without it. -
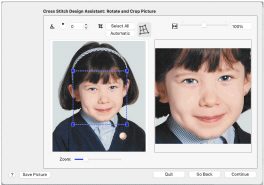
Click Continue and the Rotate and Crop Picture page appears.
-
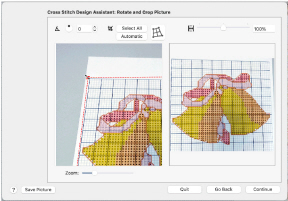
Initially, the whole picture is selected. Drag the top right corner handle until the crop box is half way across the ear on the right, then release the mouse button or lift the pen.
-
Drag the handle at the top left until the line is half way across the ear on the left.
-
Drag the handle at the bottom right and move it upwards until it touches the button just under the girl’s chin.
-
Drag the handle at the top left and move it downwards until the crop box is approximately square.
-
Click Continue.
-
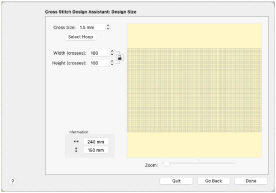
In the Design Size page change the Cross Size to 1.4mm.
-
Click Select Hoop and the Hoop Selection dialog appears. Ensure the Brand and Machine Group are set to Universal, then set the Hoop Size to 100mm x 100mm - Universal Square Hoop 1. Click OK and the new design area is calculated and previewed.
-
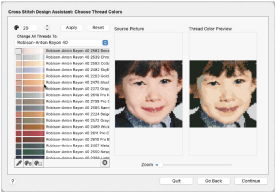
Click Continue and the Choose Thread Colors page appears, showing only the cropped area of the picture.
Note: The original picture is not affected by the Cross Stitch Design Assistant. -
Select Robison-Anton Rayon 40 as the Thread Range.
-
Set the Number Of Colors to 20 and click Apply.
-
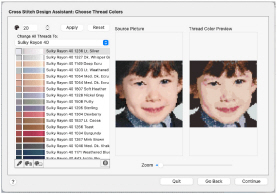
Notice that the thread selection from Robison-Anton Rayon 40 has mainly brown tones for this picture. Click the drop-down arrow for the Thread Range and choose Sulky Rayon 40 instead.
Note: The Thread Range can be changed as often as desired.
Note: The Cross Colors preview and thread color list may differ from the result shown. This is because even slight differences to the selected crop area will give different results in the cross stitch design. -
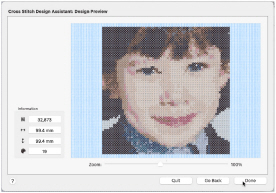
Click Continue to see the Design Preview preview page of the Cross Stitch Design Assistant.
-
Click Done. The cross stitch design is created and then displayed on the screen.
-
Click Add Color
 and the Color Selection dialog appears so you can choose a new color for the color worksheet.
 -
Select Sulky Rayon 40 as the Thread Range.
-
Click Colors
 to open the Colors window.
 -
Click Colored Pencils
 to select the Colored Pencils color model.
 -
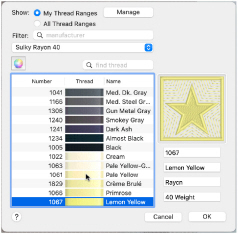
Click the yellow pencil in the bottom line (Banana), and the thread list jumps to 1067 (Lemon Yellow).
-
This color is rather bright, so click the paler yellow 1061 above it in the list (1061 Pale Yellow).
-
Click OK. The new color is added to the Color Select area.
-
Select the Create window
 of the Control Panel
  .
. -
Click the thread color in the Create area and choose the yellow at the bottom of the pop-up palette.
-
Click the Flood Fill button
 and the pointer changes to the paint bucket
  .
. -
Click the solid background areas on the left and right.
Note: If desired, also fill any individual colored crosses along the edges of the background where it meets the sweater and the girl’s hair. This reduces the number of movement stitches in the finished embroidery. -
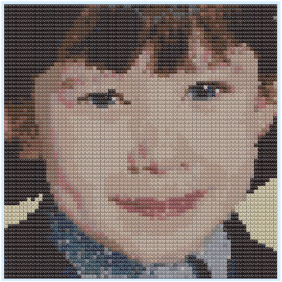
Drag the Zoom slider to the middle point of the range to view the design at approximately the size it will be stitched.
Note: Smaller cross sizes, such as this which is equivalent to Aida 18 count, provide greater detail when creating cross stitch designs from photographs.
Note: To save design and embroidery files for this cross stitch design, see Create Cross Stitch and Embroidery Files for a Photo Design. To print a worksheet, see Print a Worksheet for an Embroidery.
Load a Picture of a House
-
In mySewnet™ Cross Stitcher, choose File > New and the Design Options page of the Cross Stitch Design Assistant appears.
-
Select Load Picture for New Cross Stitch Design and click Continue. The Choose Picture page of the Cross Stitch Design Assistant appears.
-
Click Select File and the Open dialog appears.
-
Browse to the folder /mySewnet/Samples/Cross Stitch/Pics, click the file named 'Small House.jpg' and click Open. The picture is previewed in the assistant.
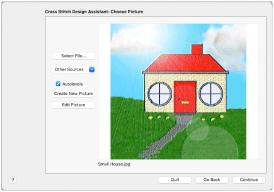
-
Click Continue and the Rotate and Crop Picture page appears.
-
The picture does not need cropping, so click Continue and the Design Size page appears.
-
Ensure the Cross Size is set to 2.0mm.
-
Reduce the Width to 40 crosses, and the Height also changes to 40 crosses because Proportional is selected. The grid on the house picture changes accordingly.
-
Click Done. The Cross Stitch Design Assistant closes, and the picture is shown in the background of the design area.
Note: A larger cross size, such as 2mm or more, gives a more traditional look to cross stitch designs.
Note: To create a cross stitch design over this picture, see Draw a House with Stitches.
Start a Design Without a Picture
-
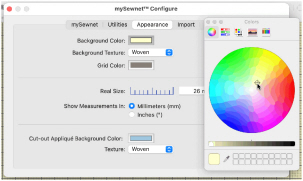
In mySewnet™ Configure
 click the Appearance tab.
 -
Click Background Color, and in the Colors Wheel select a pale yellow. The new color is shown on the Background Color button, and on the background if any mySewnet™ Embroidery Software apps are open.
-
Set the texture to Aida.
-
Open mySewnet™ Cross Stitcher
 .
. -
In the Design Options page of the Cross Stitch Design Assistant select Start a New Cross Stitch Design with no Picture.
-
Click Continue, and the Design Size page appears.
-
Set the Cross Size to 1.5mm, and click Select Hoop.
-
In the Hoop Selection dialog select the Universal Brand and Machine Group, then set Hoop Size to 240mm x 150mm - Universal Large Hoop 2.
-
Ensure the Orientation is Rotated, and click OK. The design area is calculated and the preview area shows the grid size for the chosen hoop with the selected cross size.
-
Click Done.
-
Click the Design Properties button.
-
In the Design Properties dialog, ensure that the Thread Count for Crosses and Backstitch is set to Single (2 Threads). Click OK.
-
Choose View > Grid > Every 5 lines.
Note: To start creating a sampler in this grid, see Draw and Fill a Cross Stitch Border, starting at step 14.
Import a Cross Stitch Chart
-
In mySewnet™ Cross Stitcher, choose File > New and the Design Options page of the Cross Stitch Design Assistant appears.
-
Select Load Picture for New Cross Stitch Design and click Continue. The Choose Picture page of the Cross Stitch Design Assistant appears.
-
Click Select File and the Open dialog appears.
Note: Click Other Sources to load a picture directly from your phone, scanner or camera, or use Create New Picture or Edit Picture to create or change a picture in mySewnet™ Draw & Paint. -
Browse to the folder /mySewnet/Samples/Cross Stitch/Pics, click the file named 'Bells phone photo.jpg' and click Open. The picture is previewed in the assistant.
-
Click Continue and the Rotate and Crop Picture page appears.
-
Click to select Perspective Correction

. The crop handles for selection become red.
-
Move the pointer over one of the red crop handles in the corner.
The pointer changes to a diagonal double-headed arrow
.
-
Drag the red corner handles so that the crop lines frame the grid for the cross stitch chart. A version of the picture showing the perspective changes that you made appears in the preview area.
Note: When you take a photo of a cross stitch chart, hold the phone or camera so as to avoid reflected light and shadow on your subject, and use a high resolution setting. To get the best possible results, use a scanner. -
Use the Zoom bar for making fine adjustments to the edges of the selected area.
Note: Use Stretch Picture
to ensure that the grid squares are actually square.
-
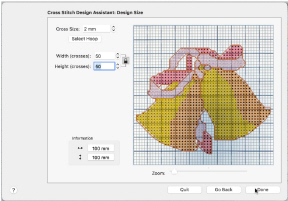
Click Continue and the Design Size page appears.
-
Change the Width and Height numbers to match the number of squares in the grid for your chart.
In this case the grid is 50 x 50, but the settings may well show 51 x 50. -
Deselect Proportional
 to attain an exact match.
Ideally, the grid on the screen should now fit over the grid in the picture.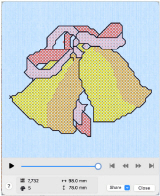
Note: If needed, click Go Back and adjust the selection area further, then try to match the two grids again. -
Click Done to load the picture onto the work area. You are now ready to create a cross stitch design over your loaded chart.
-
Use Add Color

in the Design Panel to add the thread colors from your chart.
-
Starting with the backstitch lines (and any French Knots), create stitches over the chart image, using the colors and their symbols as a guide.
Note: You may find it easier to work in 2D View.