How to Use Patterns and Shapes
Draw a House with Stitches
-
Open mySewnet™ Cross Stitcher
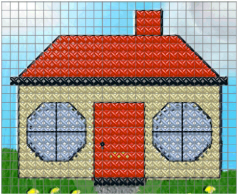
 and in the Design Options page of the Cross Stitch Design Assistant select Load Picture for New Cross Stitch Design, then click Continue. In the Choose Picture page, click Select File and load /mySewnet/Samples/Cross Stitch/Pics/Small House.jpg, then click Continue twice. In the Design Size page ensure the Cross Size is set to 2.0mm, and the Width and Height are set to 40 crosses. Then click Done to display the house in the design area.
 -
Open the Design window

of the Control Panel

.
-
Click the Design Properties button.
-
In the Design Properties dialog, ensure that Thread Count for Crosses and Backstitch are set to Single (2 Threads). Click OK.
-
Choose View > Grid > Every 5 Lines.
-
Open the Create window
 of the Control Panel
  .
. -
In the Shape section, click the Backstitch Outline
 button (the second Outline option).
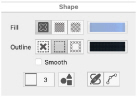
-
Ensure that No Fill
 is selected.
 -
Click the thread color block for Outline, then in the pop-up palette click Add Color
 .
. -
In the Color Selection dialog, choose Sulky Rayon 40 in Thread Ranges.
Choose from any of the manufacturer’s thread ranges or one of the MyThreads ranges you created using mySewnet™ Thread Cache. -
Enter 1005 in the Find Thread box, and Sulky Rayon 40 1005 (Black) appears. Select this thread, then click OK.
-
In the Shape pop-up menu, ensure that Rectangle (shape 3) is selected.
-
Click Place Shape
 .
. -
Drag the corners of the shape so that the rectangle fits just inside the outline of the front of the house. This should be a rectangle 24 grid squares wide by 11 high.
-
Control–click, and choose Finish Insert Shape Tool.
-
Select Cross Fill
 (the icon in the middle of the Fill line).
 -
Click the thread color block for Fill, then in the pop-up palette click Add Color
 .
. -
In the Color Selection dialog enter 1246 in the Find Thread box, and Sulky Rayon 40 1246 (Orange Flame) appears. Select this thread, then click OK.
-
In the Shape pop-up menu, ensure that Rectangle (shape 3) is selected.
-
Click Place Shape
 .
. -
Drag the corners of the shape so that the rectangle fits just inside the outline of the front door of the house.
-
Control–click, and choose Finish Insert Shape Tool.
-
Click the thread color in the upper part of the Create window and choose the black color in the pop-up palette.
Note: This is the black color that you selected earlier. -
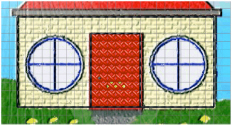
Click Full Cross
 and drag to draw a roof gutter across the top of the wall, one grid square deep and one grid square wider than the wall on each side of the house.
 -
Click Standard Backstitch
 to draw backstitch lines on the sides and diagonals of grid squares.
 -
Now draw the roof. At the left hand end of the roof gutter, drag from one square in from the end (1), to place a line of five diagonal sections of standard backstitch up and to the right, then release the mouse button or lift the pen (2).
Note: If you prefer, you can place each section of standard backstitch with a single click. Select Erase and click to erase individual sections of standard backstitch, or use ⌥ click.
 -
At the right hand end of the roof gutter, drag from one square in from the end (3), to place a line of five diagonal sections of standard backstitch up and to the left (4).
-
Drag along the grid line to place a line of backstitch along the top of the roof (2 to 4).
-
Now draw the chimney. At the top right of the roof, start two grid squares in from the end. Drag to place a line three squares straight up, then a second line three squares left, then a third line three grid squares back down to the roof.
-
Click Zoom to Rectangle
 and the arrow pointer changes to the zoom in pointer
  .
.
-
Drag around the left half of the house, then release the mouse button or lift the pen to zoom in.
-
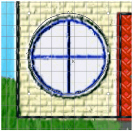
Select the Backstitch Outline
 option and ensure that No Fill
  is selected.
 -
Ensure that the Smooth option is selected (checked).
-
In the Shape pop-up list, select the Circle (number 1).
-
Click Place Shape
 .
. -
Drag the circle over the window of the house, then hold down the Shift key and drag the handles on the box so they lie along the grid lines framing the window.
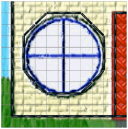
-
Control–click, and choose Finish Insert Shape Tool.
Note: If the shape does not match the picture, click Undo and try again. -
Open the Design window
 of the Control Panel
  .
. -
At the top of the Design window is the color worksheet. This contains threads that are currently available for use in a design. Click Add Color
 next to the color palette and the Color Selection dialog appears.
Note: Colors can be added individually and then used, or added automatically when designs, shapes or lettering are inserted using thread colors that are not already in the worksheet. A tooltip shows the full thread color name when the pointer is positioned over a color in the worksheet. Use the buttons below the worksheet to move, change, add and delete colors. -
Ensure the thread range is set to Sulky Rayon 40, and enter 1030 in the Find Thread box. Sulky Rayon 40 1030 (Periwinkle) is displayed. Click it, then click OK. The color is added to the worksheet.
-
Open the Create window
 of the Control Panel
  .
. -
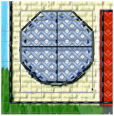
Click the thread color in the upper part of the Create window and choose the pale blue color in the pop-up palette. This is the color you just added.
-
Click the Cross Flood Fill icon
 and the pointer changes to the paint bucket
  .
. -
Click inside the octagonal window and it fills with pale blue crosses.
-
Click the thread color in the upper part of the Create window and choose the black color in the pop-up palette.
-
Click the Freehand Backstitch icon
 .
.
Note: Use Freehand Backstitch to add backstitch lines of any length to a design. Freehand Backstitch snaps to half-grid spacing. By contrast, Standard Backstitch only places fixed length lines that snap to the sides and diagonals of grid squares. -
Drag a line across the middle of the window, then another line down the middle of the window.
-
Click Box Select
 .
. -
Drag a square around the window.
-
Choose Edit > Copy.
-
Click Zoom To Fit
 .
. -
Choose Edit > Paste. A new copy of the window appears over the original.
-
Drag the window to the right-hand side of the house in a similar position to the window on the left.
-
Click the thread color in the upper part of the Create window, then in the pop-up palette click Add Color
 .
. -
Ensure the thread range is set to Sulky Rayon 40, and enter 1066 in the Find Thread box.
-
Sulky Rayon 40 1066 (Primrose) is displayed. Click it, then click OK to set it as the drawing color.
-
Click the Cross Flood Fill icon
 and the pointer changes to the paint bucket
  .
. -
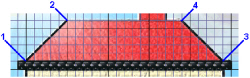
Click the front wall of the house.
-
Click the thread color in the upper part of the Create window, then in the pop-up palette click the red color to set it as the drawing color.
This is Sulky Rayon 40 1246 (Orange Flame), the color you used for the door.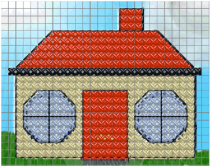
-
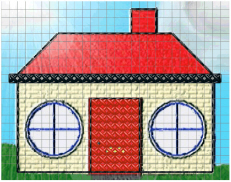
Click on the main part of the roof and the chimney.
Note: You can change the fill color while you still have the Cross Flood Fill tool active. -
Click the thread color in the upper part of the Create window, then in the pop-up palette click the black to set it as the drawing color.
-
Click the Full Cross icon
 .
. -
Drag under the door to place a row of six black crosses as a doorstep. (Alternatively, click six times to place individual crosses.)
-
Click the French Knot icon
 .
. -
Click one square in from the left edge of the door and four squares up to place a door handle.
-
Select No Outline
 and Cross Fill
  .
. -
In the Shape area, click the Fill color for shape drawing, click Add Color
 , then select 1011 (Steel Gray) from Sulky Rayon 40. Click OK.
 -
In the Shape pop-up menu, ensure that Rectangle (shape 3) is selected.
-
Click Place Shape
 .
. -
Drag to create a rectangle under the doorstep that is six crosses wide and three crosses high. This will make a short path.
-
Click the Fill color for shape drawing, click Add Color
 , then select 1100 (Lt. Grass Green) from Sulky Rayon 40. Click OK.
 -
Draw a rectangle of crosses that is 11 wide by four high on the left of the doorstep and path. It should be two squares wider than the house.
-
Click Zoom to Rectangle
 and the arrow pointer changes to the zoom pointer
  .
. -
Drag around the grass rectangle to zoom in.
-
Click the thread color in the upper part of the Create window, then in the pop-up palette click Add Color
 .
. -
Ensure the thread range is set to Sulky Rayon 40, and enter 1187 in the Find Thread box.
-
Sulky Rayon 40 1187 (Mimosa) is displayed. Click it, then click OK to set it as the drawing color.
-
Click French Knot
 .
. -
Start two squares in and two squares down from the top left of the grass, and click in the center of the grid square to place the first yellow flower head. Move right and place four more flower heads in the center of alternate grid squares.
-
Click the thread color in the upper part of the Create window, and in the pop-up palette click Add Color
 . Select the color Sulky Rayon 40 569 (Garden Green) and click OK.
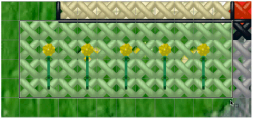
-
Click Freehand Backstitch
 .
. -
Start from the center of a grid square containing a yellow flower head and drag to draw a backstitch line two grid squares straight down. This is the stem for the flower. Repeat this for the other four flowers.
-
Click Box Select
 .
. -
Drag a selection box around the grass and flowers.
-
Choose Edit > Copy.
-
Click Zoom To Fit
 .
. -
Choose Edit > Paste. A new copy of the grass rectangle with flowers appears over the original.
-
Drag the pasted grass to the right-hand side of the path.
-
Open the Design window
 of the Control Panel
  .
. -
Click Edit > Remove Unused Colors. The color list is reduced to the eight colors used for the house.
Note: See Load a Picture of a House for a detailed description of this process.
Note: This is from about 10 squares in and 15 squares down from the top left of the design area, at the top left of the front of the house.
Note: Use File > Save to save the design as Small House.krz, and use File > Export to export the design as Small House_Exported.vp4.
Draw and Fill a Cross Stitch Border
-
In mySewnet™ Configure

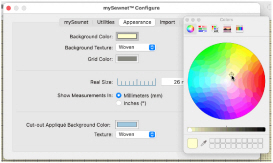
click the Appearance tab.
-
Click Background Color, and in the Colors Wheel select a pale yellow. The new color is shown on the Background Color button, and on the background if any mySewnet™ Embroidery Software apps are open.
-
Set the texture to Aida.
-
Open mySewnet™ Cross Stitcher

.
-
In the Design Options page of the Cross Stitch Design Assistant select Start a New Cross Stitch Design with no Picture.
-
Click Continue, and the Design Size page appears.
-
Set the Cross Size to 1.5mm, and click Select Hoop.
-
In the Hoop Selection dialog select Universal for Brand and Hoop Group, then set Hoop Size to 240mm x 150mm - Universal Large Hoop 2.
-
Ensure the Orientation is Rotated, and click OK. The design area is calculated and the preview area shows the grid size for the chosen hoop with the selected cross size.
-
Click Done.
-
Click the Design Properties button.
-
In the Design Properties dialog, ensure Thread Count for Crosses and Backstitch are set to Single (2 Threads). Click OK.
-
Choose View > Grid > Every 5 lines.
-

of the Control Panel

.
-
In the Shape area, click the Backstitch Outline

option and ensure that No Fill

is selected.
-
Click the Outline thread color, then in the pop-up palette click Add Color

.
-
In the Color Selection dialog, choose Robison-Anton Rayon 40 from the pop-up menu.
-
Enter 2289 in the Find Thread box, and the list shows Robison-Anton Rayon 40 2289 (Rust).
-
Select this thread and click OK.
-
In the Shapes pop-up menu, ensure that the square (number 3) is selected.
-
Click Place Shape

. A square outline appears on the work area.
-
Drag the corner handles on the square to create a rectangle one square inside each edge of the design area.
Note: Move the outline to just inside the second square to draw a line between the first two squares. -
Control–click, and choose Finish Insert Shape Tool to place the outline.
-
Click Place Shape

and drag to create a second rectangle that is four squares inside the first rectangle.
-
Control–click, and choose Finish Insert Shape Tool.
-
Select the Pattern window

of the Control Panel

.
-
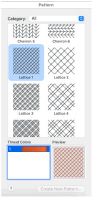
Select Blackwork Basic as the Category.
-
Scroll down the list of pattern samples and click Lattice 1. When it is selected, a sample of the pattern and its color are shown below the list.
-
Click the black thread color for the pattern and the Color Selection dialog appears.
-
Enter 2289 in the Find Thread box, and the list highlights Robison-Anton Rayon 40 2289 (Rust).
-
Select this color and then click OK. The thread color and pattern sample show the new color.
-
Select the Create window

of the Control Panel

.
-
Click Pattern Flood Fill

and the pointer changes to the paint bucket

. Click in the space between the two rectangles. The border is filled with a cross stitch pattern.

Note: To add a title to this sampler, see Create Title Text for a Sampler.
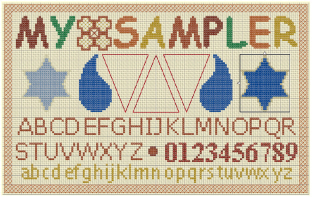
Draw Filled Shapes for a Sampler
-
In the Appearance tab of mySewnet™ Configure

, set the Background Color to a pale yellow, and set the Background Texture to Aida.
-
Open mySewnet™ Cross Stitcher

, and in the Design Options page of the Cross Stitch Design Assistant select Load Existing Cross Stitch Design, and then click Continue.
-
In the Open Existing Design page, click the Select File button and browse to /mySewnet/Samples/Cross Stitch/Krz/MySamplerText.krz. Click Done to close the assistant.
-
Open the Multiply window

in the Control Panel

.
-
Click Use Multiply

. Blue reflection line(s) appear in the design area.
Note: The reflection lines are not part of the design. They only show the effect of the Multiply feature. -
Click to select Reflect Across

.
-
Click Zoom to Rectangle

and the arrow pointer changes to the zoom in pointer

.
-
Drag around the central area of the design to zoom in.
-
Select the Create window

of the Control Panel

.
-
Select Freehand Backstitch

.
-
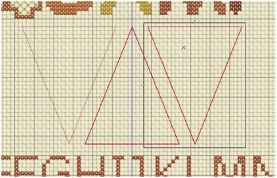
Click the thread color in the upper part of the Create window, and in the pop-up palette select Robison-Anton Rayon 40 2263 Foxy Red (color number 7), then click outside the palette to close it.
-
Place the pointer on the central vertical grid line, three squares below the A (grid number 81,28 on the bar below the design area).
-
Drag down and to the right, until the pointer is three squares above the top right part of the ’K’ (grid number 92,57 on the bar below the design area), then release the mouse.
-
From there, drag to draw a horizontal line to the central vertical grid line to form a triangle.
Note: Ensure the triangle is split by the center grid line, so that it is in the center of the design. If not, use Undo and try again. -
Select the Multiply window

in the Control Panel

.
-
Click Use Multiply

so that it is no longer selected. The blue reflection lines are no longer shown.
-
Click Box Select

and drag to select the triangle.
-
Click Use Multiply

.
-
Choose Edit > Duplicate Selected. The copy is placed below and to the right of the original, with a shadow copy to its left.
-
Move the pointer over the Flip Vertical handle

on the copied block and it becomes the vertical double-arrow pointer. Click the Flip Vertical handle to mirror the block vertically.
-
Move the copy so that it is level with the original triangle, and four squares to the right of it.
-
Control–click and choose Finish Box Select to place the copied triangle.
-
Move to the right of the design area, so that you can see the empty space to the right of the new triangle.
-
Select the Create window

of the Control Panel

.
-
In the Shape area, for Fill select Cross Fill

, and for Outline select No Outline

.
-
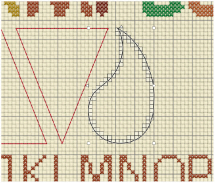
In the Shape pop-up menu select 77, a teardrop.
-
Click the Shape

button to place the shape in the design area.
-
Drag the shape into the space to the right.
-
Hold down Shift and drag to resize the shape proportionally until it is the same height as the triangle, and the tip of the teardrop is two grid squares to the right of the top right tip of the triangle.
-
Control–click and choose Finish Insert Shape Tool to place the shape.
-
Click Cross Outline

.
-
Click the Outline color for Shapes, and then in the pop-up palette click Add Color

.
-
In the Color Selection dialog, enter 2461 in the Find Thread box (Robison-Anton Rayon 40 2461 Wheat), select this color, then click OK.
-
In the Shape pop-up menu select 39, a star.
-
Click the Shape

button to place the shape in the design area.
-
Drag the shape into the empty space to the right of the teardrop.
-
Hold down Shift and drag to resize the star proportionally until it is the same height as the teardrop, and place it midway between the teardrop and the sampler frame.
-
Control–click and choose Finish Insert Shape Tool to place the shape.
-
Click Zoom To Fit

. You can now see all the shapes on the left that were duplicated by the Multiply feature.
-
Control–click and choose Finish Box Select.
-
Select the Multiply window

in the Control Panel

.
-
Click Use Multiply

so that it is no longer selected. The blue reflection line is no longer shown.
-
Select the Pattern window

of the Control Panel

.
-
In the Fill Pattern area, scroll down to select the Chevron 1 pattern from the Blackwork Basic Category.
-
Click the color for the pattern. In the Color Selection dialog, enter 2263 in the Find Thread box (Robison-Anton Rayon 40 2263 Foxy Red), select this color, then click OK.
-
Select the Create

window of the Control Panel

.
-
Click the Pattern Flood Fill icon

then click inside the center triangle.
-
Select the Pattern window

of the Control Panel

.
-
In the Fill Pattern area, scroll up to select the Brick 1 pattern from the Blackwork Basic Category.
-
Click the color for the pattern. In the Color Selection dialog, enter 2263 in the Find Thread box (Robison-Anton Rayon 40 2263 Foxy Red), select this color, then click OK.
-
Click inside the triangle on the right. It is filled with the brick design.
-
In the Cross Basic Category, select the Stripes 3 pattern.
-
Click the first color for the pattern. In the Color Selection dialog, enter 2289 in the Find Thread box (Robison-Anton Rayon 40 2289 Rust), select this color, then click OK.
-
Click the second color for the pattern. In the Color Selection dialog, enter 2332 in the Find Thread box (Robison-Anton Rayon 40 2332 Penny), select this color, then click OK.
-
Click in the teardrop shape on the right to fill it with the stripes.
-
In the Cross Basic Category, select the Check 4 pattern.
-
Click the second color for the pattern. In the Color Selection dialog, enter 2289 in the Find Thread box (Robison-Anton Rayon 40 2289 Rust), select this color, then click OK.
-
Click in the teardrop shape on the left to fill it with the check pattern.
-
In the Cross Basic Category, select the Diagonal 4 pattern.
-
Click the first color for the pattern. In the Color Selection dialog, enter 2461 in the Find Thread box (Robison-Anton Rayon 40 2461 Wheat), select this color, then click OK.
-
Click the second color for the pattern. In the Color Selection dialog, enter 2580 in the Find Thread box (Robison-Anton Rayon 40 2580 Green Grass), select this color, then click OK.
-
Click in the star on the left to fill it with diagonal stripes.
-
In the Mixed Category, select the Weave 3 pattern.
-
Click the first color for the pattern. In the Color Selection dialog, enter 2461 in the Find Thread box (Robison-Anton Rayon 40 2461 Wheat), select this color, then click OK.
-
Click the second color for the pattern. In the Color Selection dialog, enter 2580 in the Find Thread box (Robison-Anton Rayon 40 2580 Green Grass), select this color, then click OK.
-
Click in the star on the right to fill it with the weave pattern.
Note: Alternatively, use the design you created in Add Letters and Numbers to a Sampler.
Note: If desired, turn off the grid to see the effect of the brick pattern, then turn the grid on again to continue.
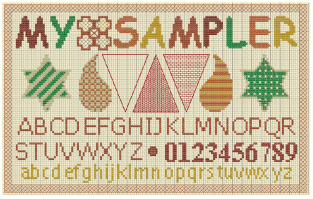
Note: To create a new fill pattern for the final triangle, see Create a Fill for a Triangle in a Sampler.
Create a Fill for a Triangle in a Sampler
-
In the Appearance tab of mySewnet™ Configure

, set the Background Color to a pale yellow, and set the Background Texture to Aida.
-
Open mySewnet™ Cross Stitcher

, and in the Design Options page of the Cross Stitch Design Assistant select Load Existing Cross Stitch Design, and then click Continue.
-
In the Open Existing Design page, click Select File and load /mySewnet /Samples/Cross Stitch/Krz/MySamplerShapesDrawn.krz. Click Done to close the assistant.
-
Click Zoom to Rectangle

and the arrow pointer changes to the zoom in pointer

.
-
Drag around the space in between the teardrop and the star on the left.
-
Select the Create window

of the Control Panel

.
-
Click the thread color in the upper part of the Create window, and in the pop-up palette, select color 7, Robison-Anton Rayon 40 2263 Foxy Red.
-
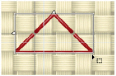
Click the Standard Backstitch icon

.
-
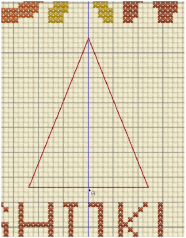
Draw a backstitch triangle. Drag to place four horizontal sections of backstitch, then two diagonal sections up above the center of the line, then two diagonal sections back down to the end of the line.
-
Click Box Select

.
-
Drag a selection box that exactly fits around the triangle.
-
Select the Pattern window

of the Control Panel

.
-
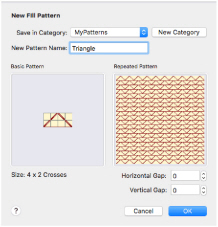
Click the Create New Pattern button and the New Fill Pattern dialog appears. The Basic Pattern shows the area you have selected. The Repeated Pattern shows a preview of how the pattern will look when it is used.
-
Leave Save In Category set to My Patterns. Click in the New Pattern Name box and enter Triangle, then click OK. The pattern is added to My Patterns, and it is automatically selected as the current Fill Pattern.
-
The triangle used to create the pattern is no longer needed. Click on the selection area on the design, then choose Edit > Delete to remove it from the design.
-
Click Zoom To Fit

.
-
Select the Create window

of the Control Panel

.
-
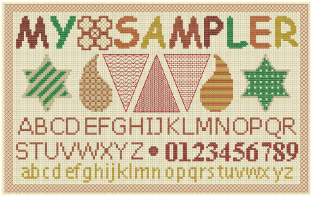
Click the Pattern Flood Fill icon

then click inside the triangle on the left. The triangle is filled with the Triangle pattern you created.
-
Choose View > Grid > No Grid to turn the grid off so that the backstitch can be seen more easily.
-
Select the Design window

of the Control Panel

.
-
Click Edit Notes

and in the Notes dialog enter 'Text Shapes and Patterns'. Click OK.
-
Choose File > Duplicate, and rename the design to My Sampler, to save a copy of your final version.
-
Choose File > Export and in the Export dialog select .vp4 as the embroidery format and click Continue.
-
In the Saving as dialog, in the Save In box browse to the folder /mySewnet/My Designs. In the Save As box, leave the name as 'My Sampler Exported', then click Save.
-
Choose File > Print and the Print dialog appears. Click Print to print a worksheet for the embroidery.
Alternatively, use the design you created in Draw Filled Shapes for a Sampler.
Note: The Create New Pattern button is only available when an area is selected that may be saved as a new fill pattern.
Note: After completing this exercise, use the Appearance tab of mySewnet™ Configure

to set the Background Color back to the default blue (RGB 211, 233, 255).