Use the Print button to print a worksheet in 3D for the embroidery created from your design.
Print a Worksheet for an Embroidery
-
Open mySewnet™ Cross Stitcher

, and in the Design Options page of the Cross Stitch Design Assistant select Load Existing Cross Stitch Design, and then click Continue.
-
In the Open Existing Design page, click the Select File button and browse to /mySewnet/Samples/Cross Stitch/Krz/Linnet.krz. Click Done to close the assistant.
-
Click the central marker in the Zoom Sider to view the design at the size it will be stitched.
-
Select the Design window

of the Control Panel

.
-
Click the Design Properties button, and in the Design Properties dialog ensure Thread Count, Crosses is set to Single (2 Threads). Click OK.
-
Click Edit Notes
 and in the Note dialog enter 'Family Photo'. Click OK.
 -
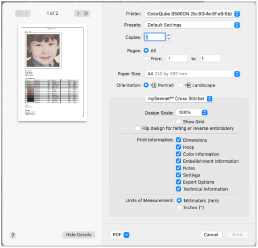
Choose File > Print and the Print dialog appears.
-
If needed, click the Show Details button to see the large version of the dialog.
-
Ensure that Design Scale is set to 100%, deselect (uncheck) Show Grid and ensure all the Print Information options are checked.
-
Click Print and print the design.
Note: Alternatively, use the design you created in Create a Cross Stitch from a Photograph, saved and exported as described in Create Cross Stitch and Embroidery Files for a Photo Design.