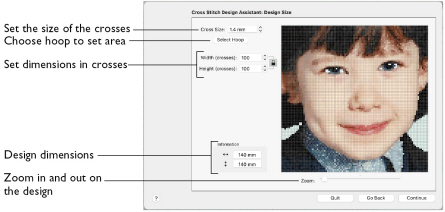
Use the Design Size page to set the picture size, hoop and cross size. Set the cross size, then set the desired hoop size. The preview shows the grid squares that fit in that hoop size. If desired, adjust the number of crosses.
Use the lock button (Proportional) to change the proportions of the picture.
Note: When starting a new design with no picture, the preview area shows the grid size of the new design.
Each grid square corresponds to one cross in a cross stitch design. When creating a QuickCross Design, it shows the amount of detail that is kept when the picture is converted to a cross stitch design.
Set the Design Size
-
Click the Cross Size up and down arrows or enter a number to change the size of the crosses, and click the Width or Height up and down arrows to change the number of crosses used in the design.
Cross Size
This is the Cross Size that is used for the converted design.
Note: Set the Cross Size before using Select Hoop, or changing Height or Width.
-
Set the cross size using the up and down arrows from 1.0 to 30.0mm in steps of 0.1mm, or enter a number.
Select Hoop
Select a hoop to set the size of the cross stitch design. The design area will be a best fit to the selected hoop, using the chosen Cross Size.
-
Click the Select Hoop button and choose a hoop in the Hoop Selection dialog.
Hoop Selection
Width and Height
Width and Height set the size in crosses that the picture is when it is converted to a cross stitch design.
-
Adjust the Height and Width in Crosses by entering numbers or clicking the up and down arrows.
Zoom
Use the Zoom bar to change the view of the design. Zoom in (drag the slider to the right) to magnify the view. Zoom out (drag the slider to the left) to shrink the view.
When zoomed in, use the scroll bars or swipe to move around.