Use Point Stamp Line
to place lines of the currently selected stamp across an embroidery in any direction. Click and drag to preview the stamp outlines, then release the mouse button to place the line of stamps.
Select different stamps and change the stamp size or angle without deselecting Stamp Line. Right-click to deselect Stamp Line. Only visible stitches are affected.
Shortcuts
-
Stamps, Emboss Tab:

-
Keys: Alt, E, SL, FP
Make Diamond Stamp Buttons for the Sweet Rose Embroidery
-
Click File, New

to open a new window.
-
In the Quick Access toolbar, click Insert

.
-
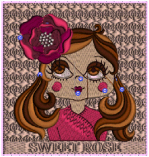
In the folder Documents\mySewnet\Samples\Stitch Editor\Stitch load the 'Girl with Rose and Name' embroidery.
-
In the Emboss tab, select the Games stamp Category, then click the diamond stamp (number 9).
-
Set the stamp size to 4mm.
-
Set the Angle to 30 degrees.

The preview changes to show the new angle. -
In the Stamp Line drop-down list, click Point Stamp Line

.
-
Click and drag the slider on the Zoom Bar at the bottom of the Design Panel to zoom in on the picture of the girl.
Alternatively, click the plus icon to increase magnification 10% each time. -
Click to place points for a line of buttons down the front of the girl’s jacket.
-
Right-click to finish the line of buttons.
-
Click Zoom To Fit

.
Alternatively, you could use the embroidery you created in Add a Name Below the Sweet Rose Embroidery.
.

If you are not satisfied with the line of stamps, use Undo to undo one line of stamps at a time. Right-click to deselect the Stamp Line function before using Undo.
You can select Point Stamp Line
again to place other lines. If desired, select different stamps and change the size or angle while Stamp Line is active.
To add a border to the embroidery, see Add a Satin Border to the Sweet Rose Embroidery.